How to Set Up a NAS for the First Time (Drives, RAID, Shares, and Backups)
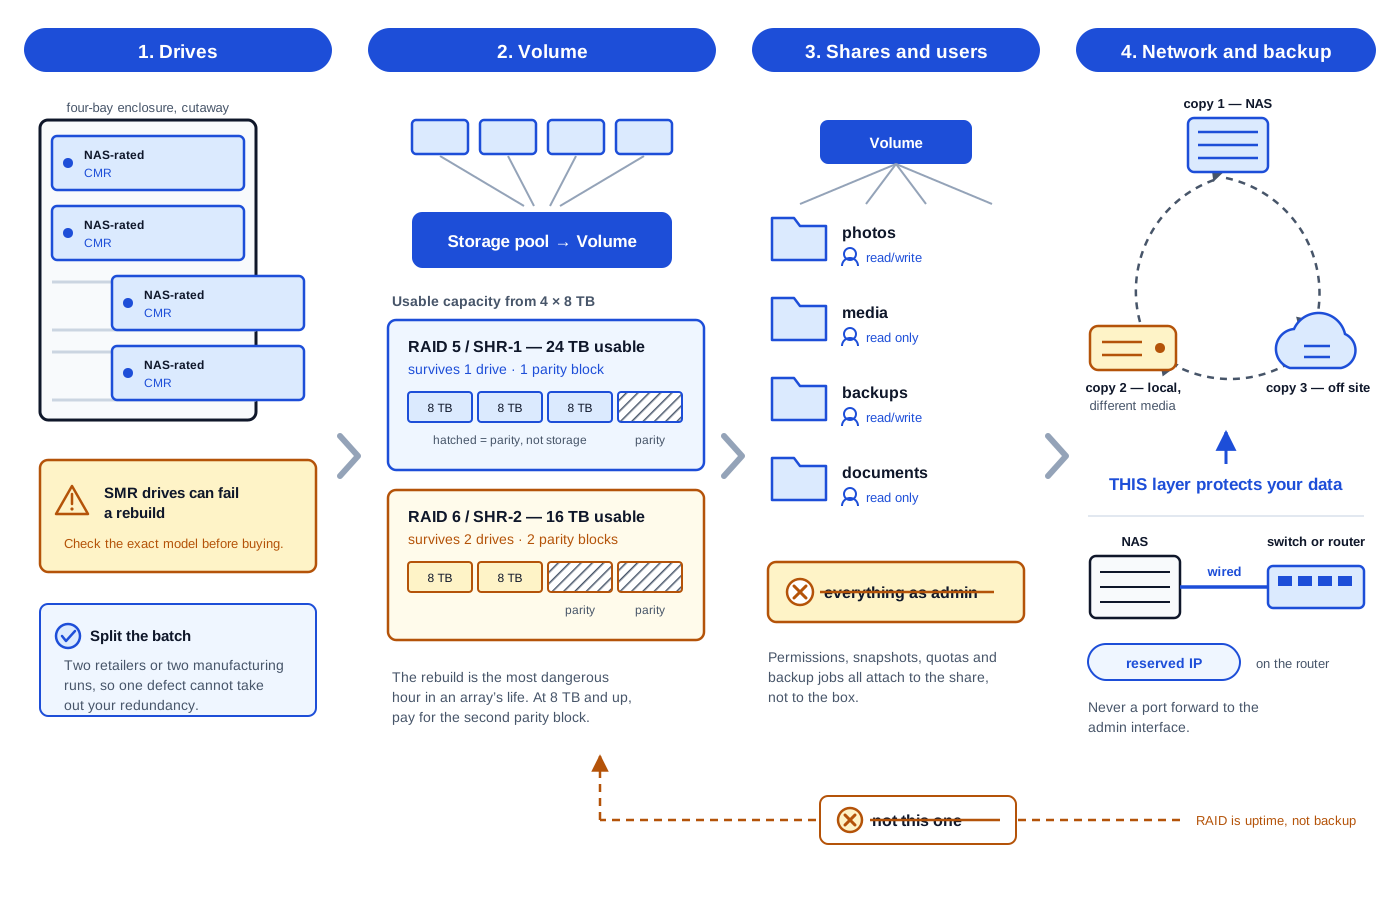
A NAS is the first piece of home network gear that holds something you cannot re-download. A router that dies is an annoying evening; a storage box that dies badly takes the only copy of ten years of photos with it. That difference is why the setup order matters far more here than it does anywhere else on your network, and why the fastest path from unboxing to a working volume is usually the wrong one.
The good news is that the decisions that actually matter are made early and rarely revisited: which drives you buy, which RAID level you build, which filesystem you format with, and whether the box is reachable from the open internet. Get those four right in the first afternoon and the NAS becomes a quiet appliance you stop thinking about. Get them wrong and you will discover it during a rebuild, which is the worst possible moment. This guide walks the full first-time build in order — choosing drives that survive a rebuild, sizing a RAID level to your bay count, understanding precisely what RAID does and does not protect you from, creating shares and users properly, putting the box on the network at a fixed address, and locking it down before it ever sees the internet. It applies to Synology, QNAP, Asustor, Terramaster, and TrueNAS alike; the menu names differ, the sequence does not.
What you’ll need
- A NAS enclosure with at least two bays — two is the practical minimum for redundancy, four is where the flexible RAID levels start
- Two or more NAS-rated CMR hard drives, ideally matched in capacity and bought from different batches or retailers
- A #1 Phillips screwdriver for 2.5-inch drives or older trays — most modern 3.5-inch trays are toolless
- An Ethernet cable and a free port on your router or switch; a NAS belongs on a wire, never on Wi-Fi
- A separate external USB drive large enough to hold the data you actually care about, for the local backup copy
- An uninterruptible power supply (UPS) with USB signalling — optional but strongly recommended
- A password manager, because you are about to create an admin account you must not reuse a password on
- Several hours of patience: the first parity sync runs in the background and can take most of a day
10-Step Overview
- 1
Decide what the NAS is for, because bay count follows from it
Before you buy anything, write down what will actually live on the box. The answer determines bay count, and bay count silently determines every RAID option you will ever have. This is the one decision that is genuinely expensive to reverse.
Three rough tiers cover most homes:
- Backups and documents only. A two-bay unit mirroring a pair of drives is plenty. You are storing laptop images, documents, and a photo library — call it a few terabytes that grows slowly.
- Photos, media, and a Plex or Jellyfin library. Still workable on two bays, but media libraries grow faster than anyone predicts and a two-bay mirror gives you exactly one drive's worth of space. Four bays is the sweet spot here. If a media server is the goal, our guide to setting up Plex on a NAS covers the transcoding side, which is a CPU question rather than a storage one.
- Surveillance, virtual machines, or a dozen containers. Four or more bays, plus attention to RAM and CPU. Storage stops being the bottleneck and the processor starts being one.
Two sizing rules that consistently save money. First, plan for about half the raw capacity you buy. Between parity and the redundancy level you should be running, usable space lands well below the number on the box. Second, buy bays before you buy capacity. A four-bay unit populated with two drives today is far more useful in three years than a two-bay unit stuffed with the largest drives on the shelf, because adding a third drive is trivial and replacing a whole enclosure is not.
Also decide now whether this box is your only copy of anything. It should not be — see step 5 — but knowing that up front changes how much you spend here versus on the backup target.
- 2
Buy NAS-rated CMR drives, and check the recording type before you pay
This is the step where first-time builders lose data, and the failure mode is invisible until the worst possible moment.
CMR versus SMR is the thing to check. Conventional Magnetic Recording (CMR) writes tracks side by side. Shingled Magnetic Recording (SMR) overlaps them like roof shingles to squeeze in more capacity, which means changing any data in a zone requires rewriting the whole zone. For sequential writes — dumping a movie library onto the drive — SMR is fine. For sustained random writes, it collapses, and a RAID rebuild is the most sustained random write a drive will ever see. An SMR drive can slow to a crawl mid-rebuild or stop responding long enough that the controller drops it from the array. You then have a second failed drive during the exact window when you have no redundancy.
This is not theoretical. In 2020 Western Digital was found to be shipping SMR drives in the consumer WD Red line without disclosing it, and users rebuilding ZFS and RAID arrays hit exactly this failure. WD subsequently split the line. The current safe picks:
Line Recording Safe for RAID WD Red Plus CMR yes WD Red Pro CMR yes WD Red (plain, small capacities) SMR avoid Seagate IronWolf / IronWolf Pro CMR yes Toshiba N300 CMR yes Desktop / external shucked drives varies check the exact model number Look up your specific model number on the manufacturer's own CMR/SMR disclosure page before buying. Capacity and line name are not enough — the recording type varies within a line by capacity.
Three more buying rules that matter:
- Buy NAS-rated drives, not desktop drives. They are firmware-tuned for RAID error recovery timing, rated for 24/7 operation, and specified for the vibration of several drives spinning in one chassis. A desktop drive that spends 90 seconds trying to recover a sector will get dropped from an array that expected an answer in seven.
- Match capacities if you can. Classic RAID levels use the smallest drive as the unit, so one 4 TB drive in an array of 8 TB drives wastes half of each big drive.
- Split your batch. Drives from the same manufacturing run can share a defect and fail near each other, which is precisely the correlated failure RAID cannot survive. Buy from two retailers or two batches.
One vendor-specific note if you are buying Synology: through much of 2025 Synology restricted its 2025-generation Plus units so that only Synology-branded or Synology-certified drives got full functionality, including storage pool creation and health monitoring. Synology reversed that decision, and DSM 7.3, released 7 October 2025, restored third-party drive support for WD, Seagate, and others. The practical advice is to update to DSM 7.3 or later before you build your array, and to check the current compatibility list for your exact drive model. Our Synology DS225+ review covers that episode and where the two-bay Synology option stands now.
Search on Amazon →Recommended Product
NAS-rated CMR hard drives
Matched-capacity NAS drives from the WD Red Plus, WD Red Pro, Seagate IronWolf, or Toshiba N300 lines are firmware-tuned for RAID error-recovery timing and rated for continuous operation. Confirm the exact model is CMR on the manufacturer's disclosure page before ordering, and buy from two different batches so a shared manufacturing defect cannot take out your redundancy.
- 3
Rack the drives, first-boot the box, and update before you build anything
Physical install is the easy part. Most modern 3.5-inch trays are toolless: pop the tray, flex the side rails off, drop the drive in connector-first, clip the rails back. A 2.5-inch drive or an older tray needs four screws. Seat each tray firmly until the latch clicks — a tray that is not fully home gives you a drive that appears and disappears intermittently, which looks alarmingly like a dying disk.
Connect Ethernet to your router or switch, then power up. Every vendor now uses a browser-based first-boot wizard that you reach through a discovery tool or a well-known address: Synology Assistant or `find.synology.com`, QNAP's Qfinder Pro, Asustor Control Center. The wizard downloads and installs the operating system onto a small partition on the drives themselves, which is why the drives must be installed first.
Two things to do before you create a single volume:
- Install every available firmware and OS update. Storage bugs get fixed, drive compatibility lists get updated, and — as above — an update can be the difference between your drives being fully supported and being second-class. Build the array on current software.
- Run an extended SMART test on each new drive. It takes hours on a large drive and you can leave it overnight, but infant mortality is real and this is the one moment when finding a bad drive costs you nothing but a return label. Finding it after you have loaded 6 TB onto the array costs considerably more.
While the tests run, think about power. A NAS holds its filesystem metadata in RAM and flushes it to disk continuously, so an abrupt power cut during a write can corrupt a volume in a way that redundancy does not help with — every drive loses power at the same instant. A UPS with a USB data cable lets the NAS see the outage and shut itself down cleanly, and every major NAS OS supports this natively.
Search on Amazon →Recommended Product
Uninterruptible power supply (UPS) with USB signalling
A line-interactive UPS in the 600 to 900 VA range runs a home NAS for the several minutes it needs to flush its cache and power down gracefully. The USB connection is the part that matters: without it the UPS just delays the problem, while with it the NAS performs a real shutdown. This is the cheapest insurance against the one failure mode RAID is structurally unable to help with.
- 4
Choose a RAID level that matches your bay count
RAID combines several drives into one volume that survives losing some of them. Which levels are available to you is decided entirely by how many bays you filled, so this decision was largely made back in step 1.
Here is what each level costs, using four 8 TB drives — 32 TB raw — as the worked example:
Level Usable from 4 x 8 TB Survives Use when RAID 0 32 TB nothing never, for data you keep RAID 1 (2 drives) 8 TB 1 drive two-bay units RAID 5 / SHR-1 24 TB 1 drive 3 to 4 bays, general home use RAID 6 / SHR-2 16 TB 2 drives 4+ bays, or large drives RAID 10 16 TB 1 per mirror pair when write speed matters A few notes on reading that table. RAID 0 has no redundancy at all and multiplies your risk — any one drive failing destroys the entire volume. It exists for scratch space, not for storage you care about. RAID 5 and RAID 6 differ only in how many parity drives they set aside, one and two respectively, which is why RAID 6 costs you another drive's worth of capacity.
The case for paying that extra drive: the rebuild after a failure is the most dangerous period in an array's life. Replacing a failed drive forces the NAS to read every sector of every surviving drive to reconstruct the missing one, at a moment when you have zero redundancy left. On modern high-capacity drives that rebuild runs for many hours and often more than a day, and the surviving drives — same age, often same batch — are under sustained full-load stress the whole time. An unreadable sector on one of them can abort the rebuild. With drives of 8 TB and larger in a four-bay or larger box, RAID 6 or SHR-2 is the defensible choice even though it feels like paying twice.
If you are on Synology, SHR is worth choosing over classic RAID for almost every home build. It behaves like RAID 5 or RAID 6 but handles mixed drive sizes far better and lets you grow capacity by swapping drives one at a time. The difference is concrete: four drives of 8, 8, 4, and 4 TB in classic RAID 5 use the smallest drive as the unit and yield 12 TB, while SHR-1 yields 16 TB from exactly the same hardware. It also removes the main penalty for buying drives gradually.
Finally, expect the reported capacity to look wrong. Drive makers count a terabyte as 1,000,000,000,000 bytes while operating systems display powers of two, so a 24 TB volume shows up as roughly 21.8 TiB. Nothing is missing — the units differ. Build the volume, then let the initial parity consistency check finish before you load data. It runs in the background and the array is usable meanwhile, but it will be slow until it completes.
- 5
Understand what RAID does not do, before you trust it
If you take one thing from this guide, take this: RAID is an uptime feature, not a backup. It exists so that a single drive dying does not interrupt you. That is all it does, and the gap between that and "my data is safe" is where most real-world home data loss happens.
RAID covers a genuinely narrow list. It covers a drive dying mechanically, and it covers a drive developing unreadable sectors. In both cases the array keeps serving files while you rebuild onto a replacement.
RAID does nothing whatsoever about:
- Deleting the wrong folder. The deletion is faithfully mirrored to every drive, instantly.
- Overwriting a good file with a bad version. Same mechanism, same instant.
- Ransomware. Encrypted files are written to a redundant array exactly as obediently as to any other disk. This is the failure that has actually hit home NAS owners at scale.
- The NAS itself failing. A dead power supply can take every drive with it, and a dead controller leaves you with a stack of disks in a vendor-specific format.
- Fire, flood, or theft, all of which take the whole box.
- A second drive failing during the rebuild, which as covered above is when the surviving drives are under the most stress they will ever see.
The answer is the 3-2-1 rule: at least three copies of anything you care about, on at least two different kinds of media, with at least one copy off site. Your NAS is copy one. A USB drive attached to the NAS, or a second NAS, is copy two. A cloud backup target or a drive you physically rotate to another building is copy three. The off-site copy is the one people skip and the only one that survives a house fire.
A practical refinement many people now use is 3-2-1-1-0: the extra 1 is a copy that is offline or immutable — physically disconnected, or written where it cannot be altered or deleted for a set retention period — and the 0 means you have verified the backups restore with zero errors. Both additions exist specifically because ransomware learned to go looking for attached backup drives and network shares.
Step 10 covers actually configuring this. Read this step before you start loading data, so that you never spend a week believing the mirror is your backup.
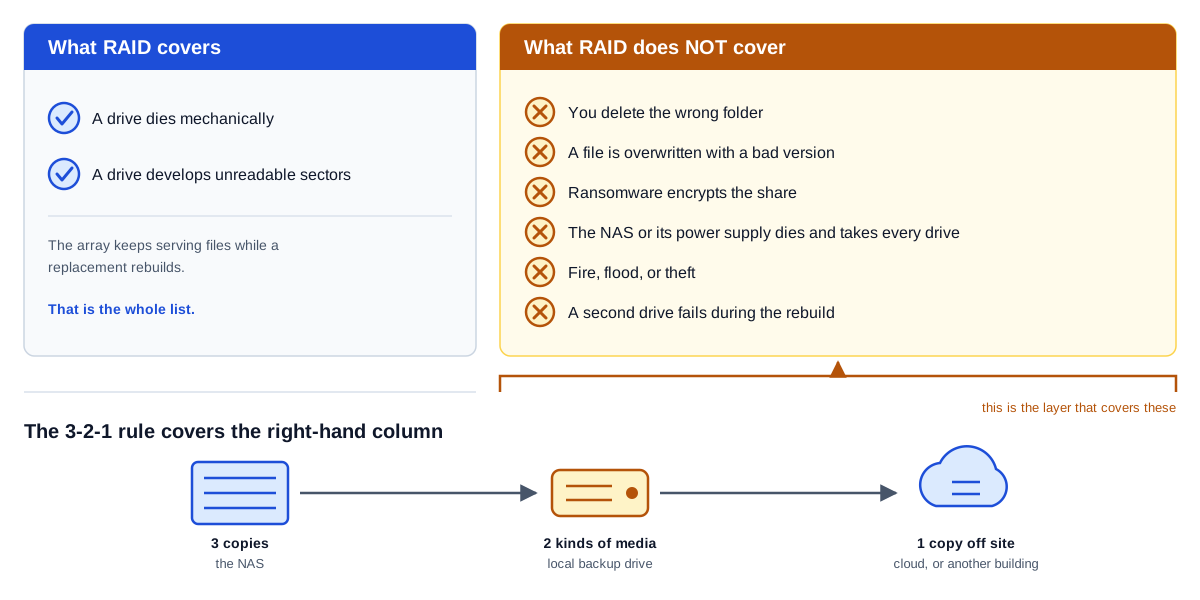
RAID buys uptime when one drive dies. It does not notice that you deleted the wrong folder, and it encrypts just as obediently as any other disk. Everything in the right-hand column is a backup problem. - 6
Pick the filesystem: Btrfs if it is offered, ext4 if not
Most NAS operating systems ask you to choose a filesystem when creating the volume. On Synology the choice is Btrfs or ext4, on QNAP it is ext4 or ZFS depending on whether you run QTS or QuTS hero, and TrueNAS is ZFS throughout.
Choose Btrfs or ZFS if your unit offers it. Both provide two things ext4 cannot:
- Checksums on data, with self-healing. The filesystem stores a checksum for every block and verifies it on read. On a redundant array, a block that fails its checksum is transparently repaired from the good copy. This catches silent corruption — bit rot, a drive quietly returning wrong data rather than an error — which ext4 has no mechanism to detect at all. The corruption simply propagates into your backups.
- Snapshots. Near-instant, space-efficient point-in-time copies of a shared folder. Because they only store changed blocks, you can keep hourly snapshots for days and daily ones for months at trivial cost. This is your fastest recovery from the "deleted the wrong folder" problem in step 5, and it is the single most useful feature on the entire box.
The case for ext4 is narrow: marginally higher raw throughput, lower RAM use, and availability on low-end units where Btrfs is not offered. On a value model with 1 to 2 GB of RAM, ext4 is the sensible pick. Everywhere else the integrity features are worth more than the performance difference, which you will not notice over a network link anyway.
Whichever you pick, this is decided at volume creation and changing it later means destroying the volume and restoring from backup. Choose deliberately.
- 7
Create shared folders and real user accounts
A fresh volume is one large empty space. Shared folders divide it into the things that appear as network drives on your computers, and they are also the unit that permissions, snapshots, quotas, and backup jobs all attach to. Getting the structure right now saves a lot of rework.
Create folders by purpose rather than by person, because purpose is what determines how each one should be treated:
- `photos` — irreplaceable, needs snapshots and off-site backup
- `documents` — irreplaceable, needs snapshots and off-site backup
- `media` — large, re-acquirable, probably does not need off-site backup
- `backups` — machine images from laptops and desktops
- `scratch` — transient working space, no backup needed
That split matters because it lets you spend your off-site backup budget only on the folders that justify it, which is usually a small fraction of total capacity.
Then create a normal user account for each person, and stop using the administrator account for daily access. Nearly every first-time NAS ends up with everyone mapping drives as admin because it is easier, and it converts every one of the step 5 scenarios into a whole-NAS event: any machine logged in as admin can encrypt or delete everything on the box, including the snapshots and the attached backup drive. A standard account with write access to two folders cannot.
Set permissions per folder and per user — read/write for the owner, read-only where that is enough, no access as the default. Groups make this manageable once you pass three or four people. Quotas are worth setting on shared media folders if a housemate's download habit might otherwise fill the volume and stop the backup jobs.
A note on protocols: SMB is the right default for a mixed household and is native to Windows and macOS. Enable SMB3, and explicitly disable SMB1 if your NAS still offers it — it is the decades-old version exploited by WannaCry and it has no place on a modern network. Enable NFS only if you have a specific Linux or hypervisor need, and leave AFP off entirely; it is deprecated and macOS has used SMB for years.
- 8
Put it on the network properly, at an address that will not move
A NAS needs to be reachable at a predictable address, because every mapped drive, backup job, and media library you configure from here on will point at it.
Wire it. A NAS on Wi-Fi is a slow NAS and an unreliable backup target. If there is no Ethernet run where the NAS lives, fixing that is a better investment than anything else in this guide — see running Ethernet through walls for the in-wall route, MoCA over existing coax if you have cable outlets, or powerline vs. MoCA vs. Ethernet for the comparison. Cat 6 is more than sufficient for any home NAS — Cat6 vs Cat6a vs Cat7 vs Cat8 explains why the higher numbers are not buying you anything here.
Give it a fixed address via a DHCP reservation on your router, rather than setting a static IP on the NAS itself. The reservation keeps your router in charge of address assignment, so the NAS cannot end up conflicting with something else. Our guide to DHCP reservations and static IPs covers the exact steps and the failure modes of each approach.
Consider the speed of the link. Gigabit Ethernet tops out around 110 MB/s in practice, which is slower than a single modern hard drive can read — on a gigabit network, the network is your bottleneck, not the disks. A 2.5GbE port lifts that to roughly 280 MB/s, but only if the other end is 2.5G too, which means a 2.5G port on your computer and a multi-gig switch in between. 2.5GbE vs 10GbE for a home network covers whether the upgrade is worth it for your workload; for a household that mostly streams and backs up overnight, gigabit is genuinely fine.
One setting to leave alone: jumbo frames. Raising the MTU to 9000 is a commonly recommended tweak that only works if every device in the path agrees, and a mismatch produces intermittent stalls and transfers that fail at 99 percent — symptoms that look like anything but an MTU problem. Leave it at 1500 unless you control the entire path and have measured a reason to change it.
If you want the NAS isolated from less-trusted devices such as IP cameras and smart plugs, that is a VLAN job — see VLANs explained for the concept, setting up IoT VLANs for the configuration, and managed vs. unmanaged switches for whether your hardware can do it at all.
Our TP-Link TL-SG108-M2 review covers the compact eight-port option and the TL-SX105 review covers stepping up to 10G.
Search on Amazon →Recommended Product
2.5GbE unmanaged switch
If your NAS has a 2.5GbE port, a compact fanless multi-gig switch is what lets you actually use it, roughly doubling large-transfer speed over gigabit. Confirm your computer has a 2.5G port or add a USB adapter first, because the link negotiates to the slowest end.
- 9
Lock it down before it ever touches the internet
Home NAS units are actively hunted. Ransomware campaigns including SynoLocker against Synology and eCh0raix and Deadbolt against QNAP have encrypted large numbers of home and small-business units, and the common factor in those campaigns was overwhelmingly the same: a NAS administration interface reachable from the open internet. QNAP's own repeated guidance during the Deadbolt campaign was to remove internet exposure and disable port forwarding to the device.
Work through this list before you put anything irreplaceable on the box:
- Do not port-forward the NAS. Forwarding ports 5000 and 5001 on Synology, or 8080 and 443 on QNAP, publishes your admin login to every scanner on the internet. There is no password strong enough to make this a good idea, because the attack that matters is a vulnerability in the web interface itself, not a guessed password.
- Turn off UPnP on your router. This is the silent version of the same mistake: UPnP lets the NAS open its own ports without telling you, so a box you never deliberately exposed can be exposed anyway. Turn it off at the router and verify from outside that nothing answers.
- Disable the default administrator account. Create a uniquely named admin account with its own strong password, then disable the built-in `admin` or `administrator` account entirely. Half of all automated attempts target that one known username. Modern DSM enforces this during setup; older systems and other vendors often do not.
- Enable two-factor authentication on every account with admin rights. This is the single highest-value setting on the page.
- Enable auto-block and account protection, which lock out an IP address after a set number of failed logins. Set it aggressively — five attempts in five minutes is generous for a device on your own LAN.
- Turn on the built-in firewall and restrict administration to your local subnet.
- Enable automatic security updates. For a device holding your only copy of anything, unattended patching is worth more than the small risk of a bad update.
- Turn off SSH, Telnet, and FTP unless you actively use them. Telnet and plain FTP send credentials in clear text and should never be on.
You will still want to reach your files from outside the house. Do it with a private tunnel rather than an open port. Tailscale is the easiest route and needs no inbound port at all; WireGuard on a Raspberry Pi is the self-hosted equivalent. Vendor relay services such as Synology QuickConnect are a reasonable middle ground that also avoids opening ports. If you have read our port forwarding guide, this is the main case where the answer is deliberately not to forward a port.
- 10
Configure backups and snapshots, then test a restore
Now build the layer that actually protects the data, in the order of how much work each step saves you.
Turn on snapshots first if you chose Btrfs or ZFS. A schedule of hourly snapshots retained for a day or two, daily retained for a month, and weekly retained for a few months costs very little space and covers the most common disasters — deleted folders and bad overwrites — with a restore that takes seconds. Where your NAS supports immutable or locked snapshots, enable that: it prevents a snapshot from being deleted before its retention expires, which is specifically what stops ransomware from destroying your recovery point along with your files.
Add a local backup to separate media. An external USB drive attached to the NAS, written by the built-in backup application on a schedule, is copy two. Critically, this must be a backup job, not a permanently mounted share — ransomware encrypts attached network and mounted volumes. Rotating between two drives, with one disconnected, is better still.
Add an off-site copy for the folders that are genuinely irreplaceable, which is usually photos and documents rather than the media library. Options are a cloud backup target, a second NAS at a relative's house, or a drive you physically rotate to another building. Encrypt anything going to a third-party cloud before it leaves your network — every major NAS backup app offers client-side encryption, and it means a breach at the provider is not a breach of your photos. If you are backing up a large library over a residential connection, check your upload speed first: how much internet speed do you need covers the asymmetry that makes the first cloud sync take days.
Enable the maintenance tasks, which are off by default on some systems:
- Data scrubbing, monthly or quarterly. This walks the entire array verifying checksums and parity, repairing what it can and reporting what it cannot. On a checksumming filesystem it is what turns silent corruption into a fixable event.
- Extended SMART tests, monthly, with quick tests weekly.
- Email or push notifications for drive health, volume status, and failed backup jobs. A degraded array nobody noticed is functionally the same as no redundancy at all — this is how single-drive failures turn into total loss.
Then test a restore, and put a reminder in your calendar to do it again in six months. Delete a test file and recover it from a snapshot. Pull an actual file out of the off-site backup and open it. An untested backup is a hypothesis, and the moment you discover a backup job has been silently failing for four months should not be the moment you need it.
Search on Amazon →Recommended Product
External USB drive for the local backup copy
Copy two in the 3-2-1 rule should be different media on a scheduled backup job, not a permanently mounted share. Size it to your irreplaceable data rather than to total capacity — photos and documents, not the media library — and buy two if you can, so one can stay disconnected between rotations.
What to do next
With the volume built, shares created, and backups running, the NAS becomes the anchor for a lot of other projects:
- Run a media server. Setting up Plex on a NAS covers libraries, naming, and the hardware transcoding question that decides which NAS you needed in the first place.
- Get a proper wired drop to it. Running Ethernet through walls, terminating Cat6 keystone jacks, and MoCA 2.5 over coax are the three routes, in descending order of effort and performance.
- Isolate it from untrusted devices. VLANs explained and setting up IoT VLANs cover keeping cameras and smart plugs off the same segment as your file server.
- Improve the link. 2.5GbE vs 10GbE and managed vs. unmanaged switches cover whether faster networking is worth it for your workload.
- Extend coverage where the NAS lives. Adding a wired access point is the right fix if the NAS is in a basement or closet with poor Wi-Fi nearby.
Frequently asked questions
Can I add drives to an existing array later? Usually yes, but it depends on the level. Synology SHR and most RAID 5/6 implementations support online expansion by adding a drive or replacing drives one at a time with larger ones, with a lengthy rebuild after each. RAID 1 on a two-bay unit can only be grown by replacing both drives. Check your vendor's expansion matrix before you rely on it.
Do I need identical drives? For classic RAID levels, mismatched capacities mean the array uses the smallest drive as its unit and wastes the rest. Synology SHR handles mixed sizes far better. Mixing brands is fine and mildly beneficial, since it reduces the odds of a correlated batch failure.
What happens when a drive fails? The array goes degraded but keeps serving files. Identify the failed drive by bay number in the web interface rather than guessing, pull it, insert the replacement, and start the repair. Do not pull the wrong drive — on a single-redundancy array that destroys the volume. Verify your backups before starting the rebuild, because the rebuild is the highest-stress moment the remaining drives will see.
Is a NAS better than cloud storage? They solve different problems and work best together. A NAS gives you capacity without a subscription, full local speed, and no third party holding your photo library. Cloud storage gives you the off-site copy that survives a house fire. The 3-2-1 rule in step 5 uses both rather than choosing between them.
Can I use old desktop drives to start? For a scratch volume or to learn the interface, yes. For anything you care about, no — desktop drives have error-recovery timing that gets them dropped from arrays, and an old drive's remaining life is unknown. If you do, treat the array as disposable until you replace them.