VLANs Explained: How to Split One Network Into Many (and Why Your Smart Home Wants This)
Published 2026-07-23 · By NetAudioHub Editorial
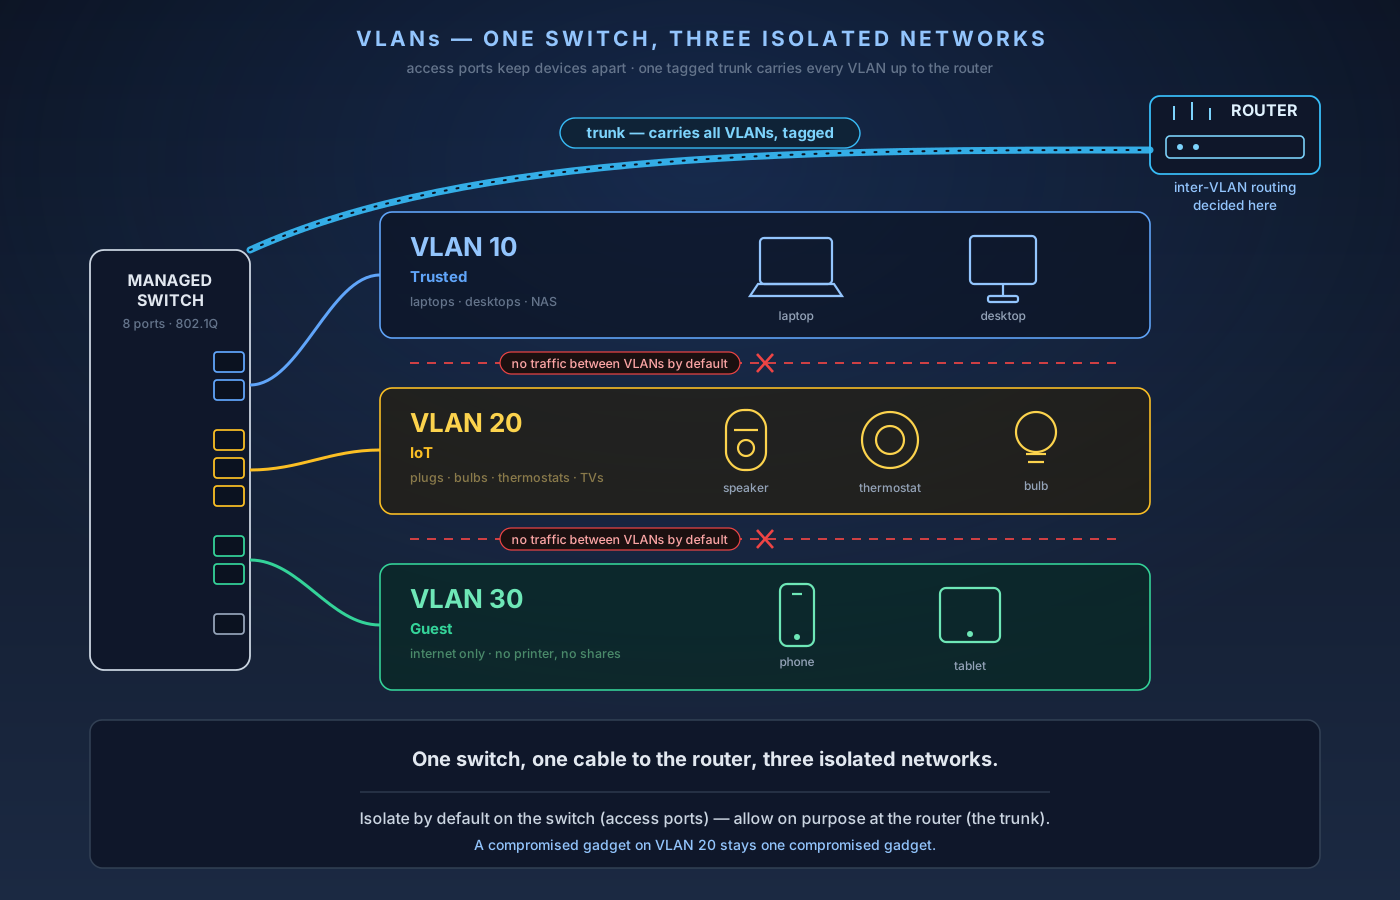
A VLAN lets one physical switch behave like several completely separate networks, so a compromised smart bulb can't reach your laptop, banking, or NAS. It comes down to three ideas — the 802.1Q tag, the access port, and the trunk port — plus one gotcha (the native VLAN) that catches everyone. Here's what each does, and a practical starter layout for walling off IoT, guests, and cameras.
The verdict up front: A VLAN (Virtual LAN) lets one physical switch behave like several completely separate networks. Devices on VLAN 20 can't see or reach devices on VLAN 10 unless you explicitly allow it — even though they're plugged into the same box and share the same wires. The point, for most homes, is security and tidiness: put chatty, rarely-updated smart-home gadgets on their own segment so a compromised bulb or camera can't reach your laptop, banking, or NAS; give guests internet without giving them your printer; keep a work-from-home network walled off from the kids' Xbox. You need a *managed* switch (and ideally a router that understands VLANs) to do it — an unmanaged switch can't. The mechanics come down to three ideas: a *tag* (the 802.1Q label that marks which VLAN a packet belongs to), an *access port* (a port that belongs to exactly one VLAN, where your devices plug in), and a *trunk port* (one cable that carries every VLAN at once, usually the link to your router). Get those three straight and the rest follows. Below: what a VLAN actually is, how tagging works, the "native VLAN" gotcha that catches everyone, and a practical starter layout.
What a VLAN Actually Is
Picture a plain 8-port switch. Everything plugged into it is on one network — every device can reach every other device, and a single broadcast (like a device shouting "who has this IP?") reaches all eight ports. That's fine until you plug in a $12 smart plug that hasn't had a firmware update since 2021 and now shares a network with the laptop you do your taxes on.
A VLAN fixes that by drawing invisible walls inside the switch. You tell the switch "ports 1–4 are VLAN 10, ports 5–7 are VLAN 20, port 8 is VLAN 30," and from that moment the switch treats them as three separate networks. A device on port 2 (VLAN 10) simply cannot send a packet to a device on port 6 (VLAN 20) — the switch won't forward it. No traffic, no broadcasts, no discovery. They're strangers that happen to live in the same building.
The key word is virtual: you get the isolation of three physically separate switches without buying three switches or running three sets of cable. One box, one uplink, many networks.
How the Tag Works: 802.1Q
The mechanism behind all of this is a standard called IEEE 802.1Q. When a packet needs to travel across a link that carries more than one VLAN, the switch inserts a small 4-byte tag into the ethernet frame. Inside that tag is a 12-bit VLAN ID — a number from 1 to 4094 that says "this packet belongs to VLAN 20." (Two values, 0 and 4095, are reserved, which is why you get 4094 usable IDs, not 4096.)
That tag is how a single cable can carry dozens of VLANs without mixing them up. Each packet wears a label; the switch on the other end reads the label and drops the packet into the right virtual network. When the packet finally reaches the device that consumes it — your laptop, a camera — the switch strips the tag off, because ordinary devices don't know or care about VLANs. They just see plain ethernet.
This is why the two port types matter so much:
- An access port carries exactly one VLAN and hands packets to the device untagged. This is where your normal devices plug in — a laptop, a TV, a printer. The device never sees a tag; the switch does all the VLAN bookkeeping.
- A trunk port carries many VLANs at once, each packet keeping its tag. This is the cable between two switches, or the link from your switch up to a VLAN-aware router. One trunk cable replaces what would otherwise be one cable per VLAN.
The Gotcha Everyone Hits: the Native VLAN
Here's the detail that turns a clean VLAN setup into an afternoon of confusion. On a trunk port, most VLANs travel tagged — but by tradition one VLAN travels untagged, and that one is called the native VLAN (VLAN 1 by default on most gear).
The trap: if the two ends of a trunk disagree about which VLAN is native — one switch thinks it's VLAN 1, the other thinks it's VLAN 99 — untagged traffic silently lands in the wrong network. Nothing errors out. Things just... don't work, or worse, a device ends up on a network it shouldn't be able to reach. It's also a known security concern (an attacker can sometimes hop between VLANs by exploiting native-VLAN mismatches).
Two habits keep you out of this ditch:
1. Set the native VLAN the same on both ends of every trunk, and write it down. 2. Don't put real devices on VLAN 1. Leave the default VLAN empty as a management/native placeholder and build your actual networks on VLAN 10, 20, 30, and so on. It costs nothing and sidesteps a whole class of "why can this thing see that thing" mysteries.
Getting Between VLANs: Inter-VLAN Routing
VLANs isolate by default — that's the entire point — but sometimes you do want controlled crossing. Your phone on the trusted VLAN needs to reach the printer, or you want your NAS visible from two segments but nothing else.
Crossing between VLANs is a routing decision, and a plain switch doesn't route — it switches. So one of two things has to happen:
- A VLAN-aware router (or firewall) sits at the top of the trunk and decides what's allowed to pass between VLANs. This is where you write rules like "IoT VLAN gets internet but can't start a connection to the trusted VLAN." Most prosumer routers and all the popular home-firewall platforms do this.
- A Layer 3 ("L3") switch can route between VLANs itself, without kicking the traffic up to a separate router. These cost more and are overkill for most homes, but they're common a rung up in small offices.
The practical takeaway: a managed switch alone will isolate your VLANs perfectly, but the moment you want selective, rule-based crossing, the brains live in the router. That's the natural next step after you've outgrown the wired-backbone basics in managed vs. unmanaged switches — VLANs are the single biggest reason to pay for "managed" in the first place.
What You Actually Need
There's no way around the hardware requirement, so it's worth stating plainly:
- A managed switch. An unmanaged switch cannot do VLANs — it has no configuration interface to tell it which port belongs to which VLAN. "Smart" or "web-managed" switches (a cheaper middle tier) usually support 802.1Q VLANs and are plenty for a home.
- A router that understands VLANs, if you want inter-VLAN rules or want each VLAN to get its own subnet and DHCP. Many stock ISP gateways don't; this is a common reason people add their own router behind the ISP box.
- VLAN-aware access points, if you want the same segmentation over Wi-Fi — for example, a "Home" SSID mapped to VLAN 10 and an "IoT" SSID mapped to VLAN 20 on the same access point. Most modern APs support this by mapping each SSID to a VLAN tag.
If your gear is powered over the network, this pairs directly with the PoE tiers that feed those access points and cameras — one managed PoE switch can both power a device and drop it onto the right VLAN.
A Practical Starter Layout
You don't need twelve VLANs. For most homes, three or four cover the real risks:
- VLAN 10 — Trusted. Laptops, phones, your NAS, the family desktop. The stuff you actually care about protecting.
- VLAN 20 — IoT. Smart plugs, bulbs, thermostats, TVs, voice assistants — anything cheap, chatty, and slow to get security updates. Give it internet, deny it any connection into VLAN 10. This one segment is the highest-value move for the least effort.
- VLAN 30 — Guest. Visitors get internet and nothing else. No printer, no cameras, no shared drives.
- VLAN 40 — Cameras (optional). IP cameras and the recorder they talk to, kept off the internet entirely if you don't need remote viewing. Cameras are a notorious phone-home risk, so a walled segment is worth it.
Set those up as access ports for the devices, one trunk up to the router, a matching native VLAN on both ends, and let the router decide the few crossings you actually want. That's the whole game: isolate by default on the switch, allow on purpose at the router. Do that, and one compromised gadget stays exactly one compromised gadget — instead of a doorway into everything you own.
Reference for the tagging standard and VLAN ID range: IEEE 802.1Q overview (Wikipedia).
Affiliate disclosure: NetAudioHub links to retailers including Amazon. We earn a small commission on qualifying purchases at no extra cost to you.