How to Set a Static IP at Home (Use a DHCP Reservation Instead)
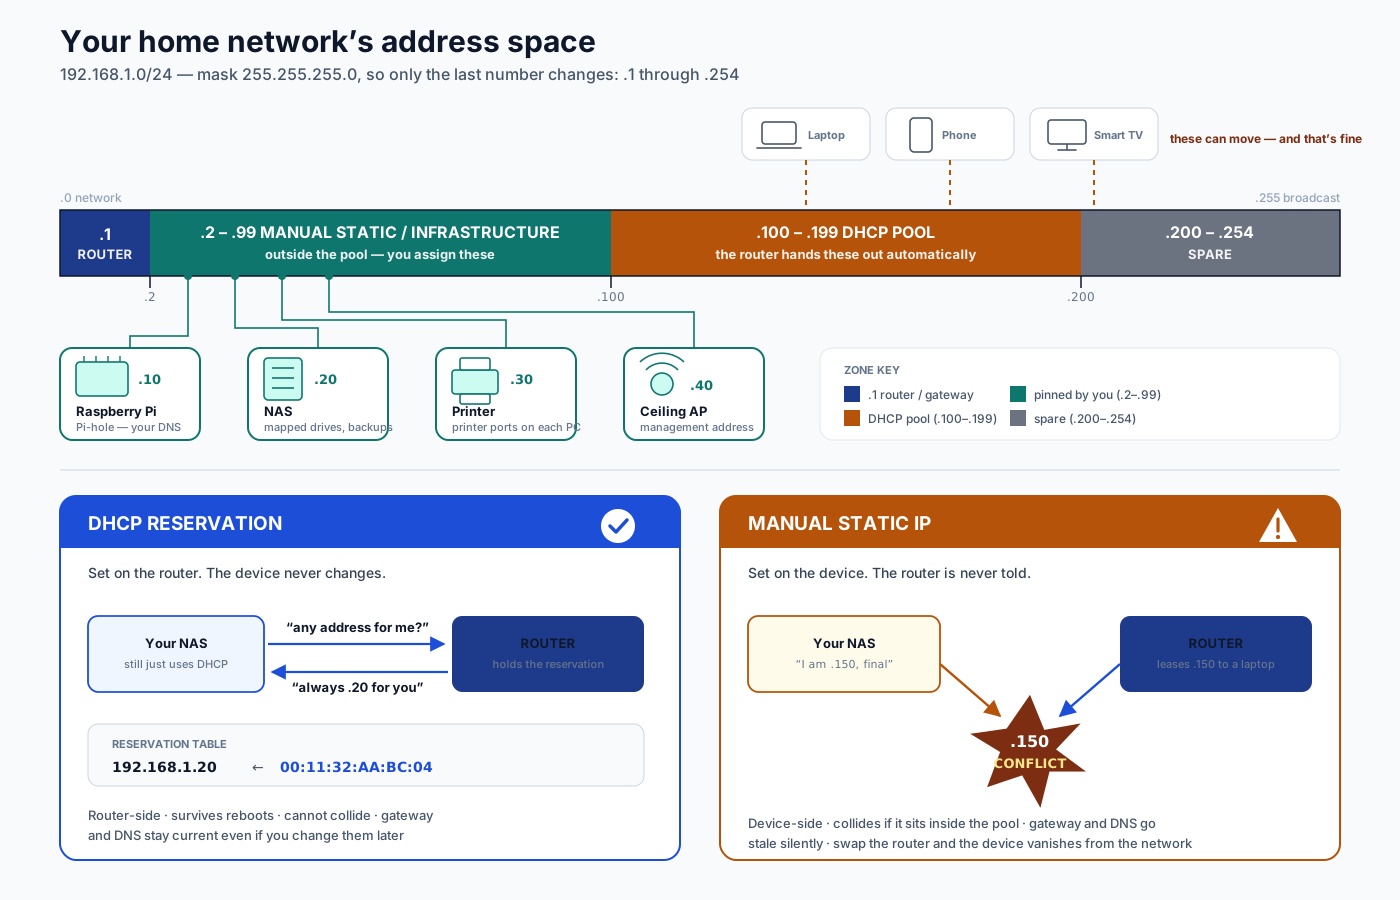
Sooner or later something on your home network needs an address that never changes. A port-forwarding rule has to point at a fixed number. A Pi-hole you have set as the network's DNS server has to stay exactly where the router says it is. A NAS you map as a drive letter, a printer, a ceiling access point, a camera — all of them get flaky the moment your router hands them a different address after a reboot. The usual advice is to "set a static IP," and that advice is subtly wrong: the better fix on almost every home network is a DHCP reservation, which does the same job from the router's side without the collisions and dead devices that manual static addresses are famous for. This guide covers both, when each one is right, and the two traps — MAC randomization and the DHCP pool boundary — that break more attempts than anything else. Budget 15–25 minutes.
The short version if you are in a hurry: find the device's MAC address, turn off private/randomized MAC on that device for your home network, create a reservation in your router's DHCP settings, then reboot the device so it asks for a new lease. Manual static IPs are a fallback, not a default.
What you’ll need
- Your router's admin login (the address and password are usually on a sticker on the router)
- The device you want to pin — NAS, Raspberry Pi, printer, access point, camera, or game console
- A computer or phone on the same network to run the checks
- Physical or remote access to the target device, in case it drops off the network mid-change
10-Step Overview
- 1
Decide whether you need a fixed address at all
Most devices should keep using DHCP. Your phone, laptop, TV and speakers do not care what address they get, and pinning them creates work with no payoff. A fixed address earns its keep when something else has to find the device by number: a port-forwarding rule that points at an internal IP, a Pi-hole or AdGuard Home box you have entered as your network's DNS server, a NAS you map as a network drive, a printer, an IP camera, a ceiling access point's management address, or a home-automation hub. There is also a lighter-weight option worth trying first. Most NAS boxes, printers and Raspberry Pis advertise themselves over mDNS, so nas.local or raspberrypi.local often just works with no configuration at all. That is enough for casual access, but it fails in two places that matter: mDNS does not cross between VLANs or subnets, and plenty of settings fields — a router's DNS server box, a port-forward target, a backup destination — accept only a literal IP address. If you are in either of those cases, keep going.
Search on Amazon →Recommended Product
Raspberry Pi 5 Starter Kit
The always-on devices that actually need a fixed address are usually self-hosted ones — Pi-hole, AdGuard Home, a WireGuard endpoint — and a Pi is the standard host. Every one of those setups begins by pinning its address.
- 2
Understand the difference before you pick a method
There are two ways to give a device a permanent address, and they fail very differently. A DHCP reservation is set on the router: the device keeps asking for an address the normal way, and the router simply always answers with the same one, matched to the device's MAC address. A manual static IP is set on the device: the device stops asking and declares an address, plus a subnet mask, gateway and DNS servers, that the router was never told about. Prefer the reservation. Because the router is the one handing out addresses, it can never lease your reserved address to something else, and everything the device needs — gateway, DNS, subnet — still arrives automatically and stays correct if you later change routers or renumber the network. A manual static IP has no such safety net: set it inside the range the router hands out and you invite an address conflict, and swap in a router that uses a different subnet and the device simply disappears from the network until you plug in a monitor and fix it by hand. Reserve first; treat manual static as the fallback for devices or routers that leave you no choice.
- 3
Map your network: gateway, subnet mask and DHCP pool
You need three numbers before you touch anything. On Windows, open Command Prompt and run ipconfig /all; on macOS or Linux, run ifconfig or ip addr along with netstat -nr. Note the Default Gateway (your router, almost always something like 192.168.1.1, 192.168.0.1 or 10.0.0.1) and the subnet mask, which on a home network is virtually always 255.255.255.0 — meaning only the last of the four numbers changes, giving you addresses .1 through .254 to work with. Then log in to the router and find the DHCP server settings, usually under LAN or Network. Write down the pool: the start and end of the range the router hands out automatically. Common defaults are .100 to .199, .2 to .254, or .64 to .253. That range is the single most important number here, because a manual static IP must sit outside it, while a reservation on many consumer routers must sit inside it. While you are on that screen, note the lease time too — typically 24 hours — because it tells you how long a device may cling to its old address after you change things.
- 4
Find the device's MAC address — and defeat MAC randomization first
A reservation binds an address to a MAC address, the twelve-character hardware identifier that looks like 3E:B0:77:1D:AA:04. Two traps live here. First, every network interface has its own MAC, so a laptop's Wi-Fi and Ethernet adapters are two separate identities: pin both if you want predictable behaviour docked and undocked, and accept that they must be two different addresses, because one IP cannot be reserved for two MACs. Second, and this is the one that quietly wastes an afternoon: modern devices invent a fake MAC per network. iOS and macOS call it Private Wi-Fi Address, Android calls it Use randomized MAC, and Windows 11 calls it Random hardware addresses. Some settings rotate that fake MAC on a schedule, so a reservation you made this morning stops matching next week and the device drifts back into the pool. Before you read the MAC, open the device's settings for your home network specifically and set the private address option to Off or Fixed. Then read the MAC — from the device's own network settings, or more reliably from the router's client list, which shows exactly the address the router sees. Wired devices, NAS boxes, printers and access points do not randomize, so this step is only about phones, tablets and laptops.
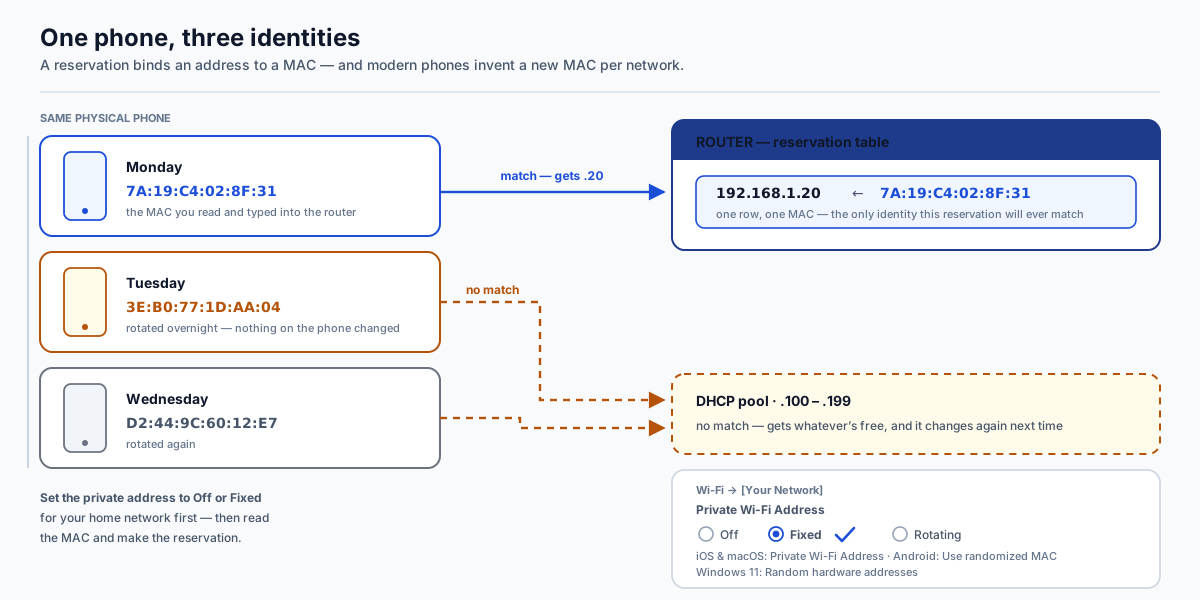
A reservation binds an address to a MAC. Phones and Windows laptops now invent a fresh MAC per network — and some rotate it on a schedule — so a reservation made against today's randomized MAC quietly stops matching. Set the device to a fixed or off private address on your home network first, then read the MAC. - 5
Choose an address that cannot collide
Pick the last number deliberately rather than taking whatever the device happens to hold. Leave .1 alone — that is almost always the router — and avoid .0 and .255, which are the network and broadcast addresses and are not usable hosts. A scheme that ages well on a 192.168.1.x network is: .1 for the router, .2 through .99 for infrastructure and anything you pin by hand, .100 through .199 as the DHCP pool, and .200 upward left spare. If your router's pool already starts at .2, either shrink the pool to free a block at the bottom or place your pinned devices at the top end. Group by function so the numbers themselves tell you something later — network gear in the .10s, servers and NAS in the .20s, printers and cameras in the .30s. Then check the address is genuinely free before you claim it: look at the router's client list, and from any computer run ping followed by the address. Silence is good; a reply means something is already there. One warning specific to reservations — many consumer routers require the reserved address to fall inside the DHCP pool and will reject an address outside it, which is fine and safe, since the router excludes reserved addresses from the pool it hands out. Manual static IPs are the opposite and must always sit outside the pool.
- 6
Create the DHCP reservation on your router
The feature exists on nearly every router but the name drifts: look for Address Reservation, DHCP Reservation, Static DHCP, Manually Assigned IP, or Fixed IP. On TP-Link's web interface it is under Advanced, then Network, then DHCP Server, then Address Reservation. On ASUS it is LAN, then DHCP Server, then the Manually Assigned IP around the DHCP list section, which you must switch on before the table accepts entries. On Netgear it is under Advanced, then Setup, then LAN Setup, then Address Reservation. On UniFi you open the client in the client list, go to its settings, and switch the IP from Auto to Fixed IP. In the eero app it lives with port forwarding under network settings, as Reservations and port forwarding. In the Google Home app it is under advanced networking as DHCP IP reservations. ISP-supplied gateways are the wild card: some expose reservations plainly, some bury them, and a few omit the feature entirely — if yours does, jump to the manual static IP step. Whichever screen you land on, the entry is the same three fields: a name you will recognise, the MAC address from the previous step, and the IP address you chose. Save, and apply or reboot if the router asks.
- 7
Force the device to pick up its new address
A reservation does not teleport onto the device. The device keeps the address it already holds until its current lease expires, which can be a full day, so make it ask again now. The blunt method that always works is to reboot the device, or unplug the Ethernet cable and plug it back in, or toggle Wi-Fi off and on. To do it properly: on Windows run ipconfig /release followed by ipconfig /renew; on macOS open System Settings, then Network, then your connection's Details, then TCP/IP, and click Renew DHCP Lease; on Linux run sudo dhclient -r followed by sudo dhclient. If the device comes back on the old address anyway, the usual culprit is a MAC mismatch — check the router's client list against the MAC you entered, and check that MAC randomization really is off for this network. If the device comes back with no address at all, you probably reserved an address outside a pool your router requires reservations to sit inside; move it inside the pool and try again.
Search on Amazon →Recommended Product
GL.iNet Flint 3 Wi-Fi 7 Router
ISP-supplied gateways often hide DHCP reservations entirely, which is the main reason people fall back to fragile manual static IPs. An OpenWrt-based router exposes the full DHCP server — reservations, pool boundaries and lease times.
- 8
Only if you must: set a manual static IP on the device
Use this when the router has no reservation feature, or when the device has to hold its address before it can ever talk to a DHCP server. Have all four values ready — the IP you chose from outside the DHCP pool, the subnet mask 255.255.255.0, the gateway, and DNS servers, which should be your router's address unless you are deliberately pointing at something else. On Windows 11, go to Settings, then Network and internet, then your connection's properties, find IP assignment, click Edit, switch from Automatic to Manual, turn on IPv4, and fill in the fields. On macOS, open System Settings, then Network, then your connection's Details, then TCP/IP, and here choose the option most people miss: Using DHCP with manual address. That lets you fix the IP while the gateway, mask and DNS still arrive automatically, which is the best of both worlds and far more robust than fully manual. On Raspberry Pi OS Bookworm or newer, the old dhcpcd.conf edits no longer apply because NetworkManager is now in charge — run nmtui for a menu-driven editor, or list your connections with nmcli con show and then modify the one you want with nmcli con mod, setting ipv4.addresses to your address with a /24 suffix, ipv4.gateway, ipv4.dns and ipv4.method to manual, then bring the connection down and up. Whatever the platform, keep a way back in: a monitor and keyboard, a serial console, or a second network interface, because a typo in the gateway takes the device off the network completely.
- 9
Verify it stuck — four checks in under a minute
Check the address first: run ipconfig on Windows or ip addr on macOS and Linux, or read it off the device's own status page, and confirm it matches what you set. Then ping the gateway; a reply proves the address and subnet mask are coherent with the rest of the network. Then ping 1.1.1.1, which proves routing out to the internet works. Finally resolve a name — ping netaudiohub.com or run nslookup — because a working ping to 1.1.1.1 alongside a failed name lookup is the classic signature of a wrong or missing DNS entry, and it is by far the most common mistake in a manual static configuration. Confirm on the router too: the client list should show the device sitting at its new address, flagged as reserved or static. Last, reboot the device once and re-check, since the whole point is that the address survives a restart. If you pinned a device that other things depend on, restart one of those consumers as well and confirm it still connects.
- 10
Update anything that pointed at the old address, then write the plan down
Changing a device's address breaks every reference to the old one, and those references are easy to forget. Work through the list: port-forwarding rules that target an internal IP, the DNS server field in your router's DHCP settings if you pinned a Pi-hole or AdGuard Home box, mapped network drives and backup jobs aimed at a NAS, printer ports on every computer that prints, camera or NVR entries, home-automation integrations, and any bookmark or app that stores a bare IP. A Pi-hole is the one that bites hardest — if your whole network points at it for DNS and its address moves, name resolution stops for everyone until you fix the router entry. Then record what you did: device name, MAC, assigned address, and whether it is a reservation or a manual static. A note in your password manager or a text file on the NAS is enough. Do this for two reasons. Future you will not remember why .20 is spoken for, and the next time you replace a router you will want to rebuild the reservation table in ten minutes rather than rediscover it device by device.
Where this fits with the rest of your setup
A fixed address is a prerequisite, not a destination. It is the first step in several other guides on the site.
- Port forwarding — a forwarding rule points at an internal IP, so if that IP moves the rule silently points at nothing, or worse, at a different device
- Pi-hole and AdGuard Home — you enter the box's address as your network's DNS server, so it must never move
- WireGuard VPN — the tunnel endpoint and the forwarded port both depend on a fixed internal address
- Plex on a NAS — mapped drives, remote access and client bookmarks all hold onto the address
- Adding a wired access point — you need its management address to stay put to configure it later
- IoT VLANs — each VLAN gets its own subnet and its own pool, so plan addresses per-VLAN
Worth reading alongside: modem vs. router vs. gateway if you are unsure which box actually runs DHCP on your network, double NAT explained if you find two devices handing out addresses, and VLANs explained before you start segmenting.