How to Set Up a WireGuard VPN on a Raspberry Pi (PiVPN) for Secure Remote Access
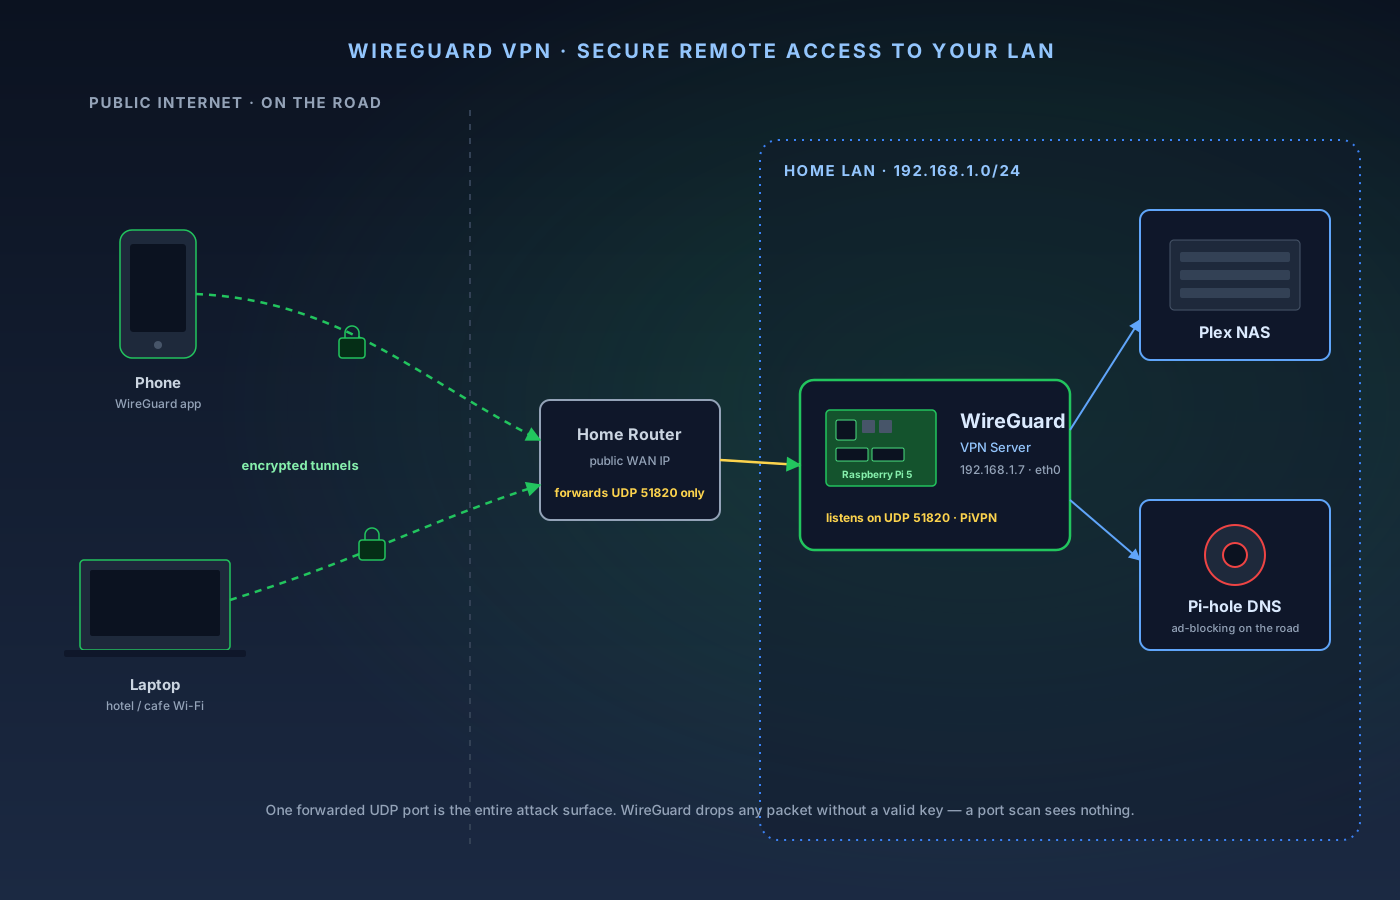
A self-hosted VPN is the piece that ties a home lab together. Once you've put media on a Plex NAS and DNS-level ad-blocking on a Pi-hole, the natural next question is how to reach all of it — safely — when you're not home. A commercial VPN answers the wrong question: it hides your traffic from the coffee-shop network, but it drops you out onto its servers, not your house. A WireGuard VPN running on a Raspberry Pi builds an encrypted tunnel back to your own LAN, so from a hotel room you can stream Plex, hit your NAS, load your router's admin page, and run every DNS lookup through Pi-hole for ad-blocking on cellular — all as if you were on the couch.
What you’ll need
- Raspberry Pi 5 (4 GB)
- Official Raspberry Pi 5 power supply (27W USB-C PD)
- microSD card, 32 GB or larger, A2 rated
- Cat6 Ethernet cable
- A router you can configure port forwarding on
- A computer with a microSD reader to image the card
11-Step Overview
- 1
Decide what your VPN is for
A self-hosted WireGuard VPN gives you an encrypted tunnel back to your own house from anywhere, and it does three things a rented commercial VPN can't. It reaches LAN-only services — Plex, a NAS share, Home Assistant, a printer, your router's admin page — anything that only answers on your home network becomes reachable over the tunnel. It lets you browse safely on untrusted Wi-Fi, because on hotel, airport, or cafe networks a full tunnel encrypts everything back to your house so the local network sees nothing but WireGuard traffic. And it takes Pi-hole with you: point the VPN's DNS at your Pi-hole and every lookup on your phone, even on cellular, gets ad- and tracker-blocked. Unlike a commercial VPN you rent, this one exits through your home connection and costs nothing to run. The one decision that flows from all this is split-tunnel vs. full-tunnel (covered in Step 9): split-tunnel routes only home-bound traffic through the tunnel and is lighter on battery, while full-tunnel routes everything home and is what you want on untrusted Wi-Fi and for Pi-hole everywhere. You can change it per client at any time, so don't overthink it now — just know it's the lever.
- 2
Pick the Pi and parts (or reuse your Pi-hole Pi)
WireGuard is a lightweight kernel module and barely registers on modern hardware — a Raspberry Pi 5 with 4 GB RAM will saturate most home upload links long before the Pi breaks a sweat, and even a Pi 4 or Pi Zero 2 W can serve a couple of clients. The 4 GB Pi 5 is the right baseline because it leaves room to run Pi-hole on the same box. Use the official 27W USB-C PD power supply (substitute bricks are the top source of Pi reliability complaints), a 32 GB or larger A2-class microSD card, and a Cat6 cable — the VPN server should be wired. The parts are identical to the Pi-hole build, so if you followed that guide you already own everything: just add PiVPN to the existing Pi and skip to Step 6. A VPN server runs 24/7, so active cooling is worth having to keep a Pi 5 from thermal-throttling on warm days.
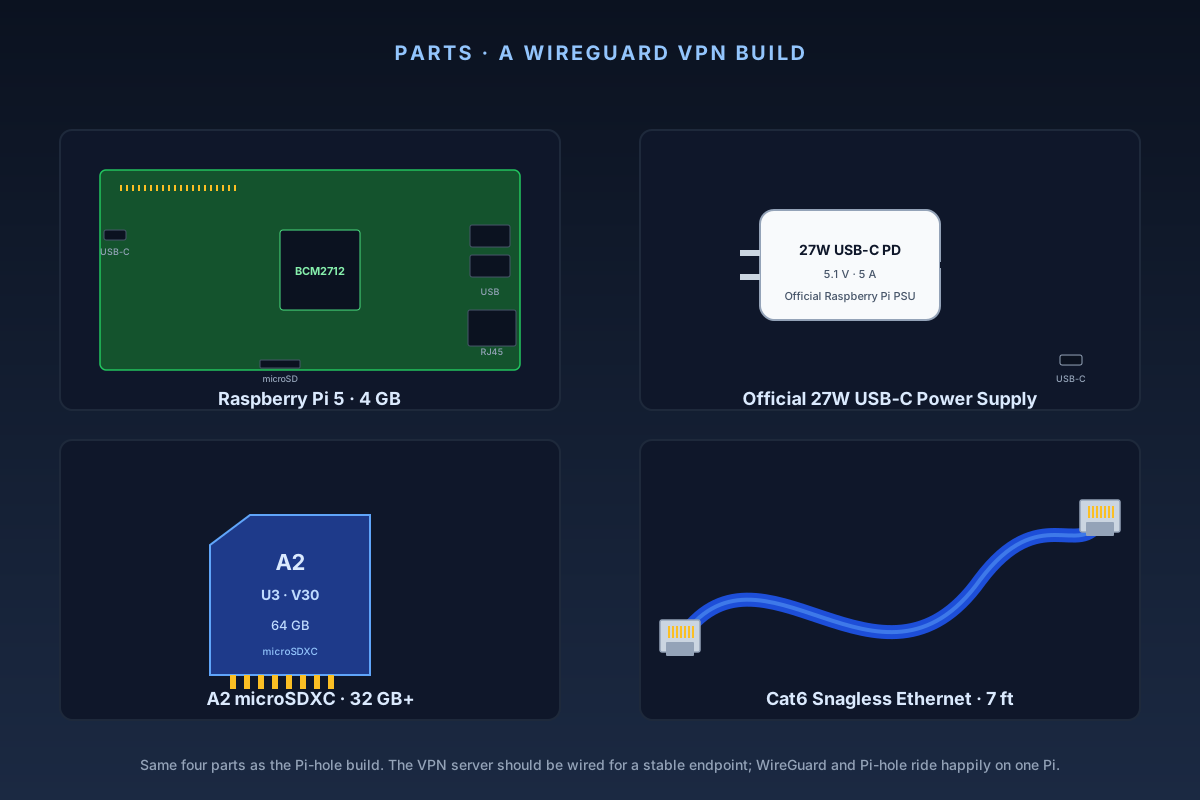
Same four parts as the Pi-hole build: Pi 5 (4 GB), the official 27W PSU, an A2-class microSD card, and a wired Ethernet patch cable. WireGuard and Pi-hole can share one Pi. Check Price on Amazon →Recommended Product
CanaKit Raspberry Pi 5 Starter Kit (4 GB)
Official-PSU bundle with active cooling and a case. A VPN server runs 24/7; active cooling keeps a Pi 5 from thermal-throttling on warm days.
- 3
Flash Raspberry Pi OS Lite and boot headless
Download Raspberry Pi Imager from raspberrypi.com/software and insert the microSD card. In the Imager, pick Raspberry Pi 5 as the device, choose Raspberry Pi OS (other) → Raspberry Pi OS Lite (64-bit) — no desktop, this box is headless — and select your card as storage. Click Next, then Edit Settings to apply OS customisation: set a hostname (e.g. wireguard), a personal username (avoid the deprecated pi default) with a strong password, enable SSH with password authentication, set your locale and timezone, and leave wireless LAN disabled since the VPN server is wired. Write and verify the card, put it in the Pi, connect Ethernet, and power up. Find the Pi's IP in your router's DHCP client list and SSH in with `ssh yourusername@192.168.1.7` (substitute your Pi's IP). Then patch the base OS before anything else: `sudo apt update && sudo apt full-upgrade -y && sudo reboot`.
Check Price on Amazon →Recommended Product
SanDisk Extreme 64GB microSDXC (A2, U3)
A2-class random IOPS keep the OS responsive; 64 GB is ample for a headless server that stores only configs.
- 4
Give the Pi a static LAN IP via DHCP reservation
Your VPN's port forward (Step 6) will point at exactly one LAN IP, so if the Pi's address changes the tunnel goes dark. Pin it with a DHCP reservation in your router — bind the Pi's MAC address to a fixed IP such as 192.168.1.7 — then reboot the Pi and confirm it comes back on the reserved address. Prefer a router reservation over a static IP set inside the OS: reservations are centralized, easy to audit, and simple to change if you re-address your LAN later. The VPN server should stay on wired Ethernet for a stable endpoint — Wi-Fi adds a failure mode you don't want on the one device your remote access depends on.
Check Price on Amazon →Recommended Product
Cable Matters Snagless Cat6 Ethernet Cable, 7 ft
The VPN server should be wired for a stable endpoint; snagless boots and reliable terminations survive years behind furniture.
- 5
Solve reachability: dynamic IP and CGNAT
This is the step that quietly decides whether a home VPN works at all, and most guides skip it. Two problems stand between a remote phone and your Pi. First, your public IP probably changes: most residential ISPs hand out a dynamic public IP that can rotate on any reboot or lease renewal, so if you bake today's IP into your client configs they break the next time it changes. The fix is a free dynamic-DNS hostname — sign up for DuckDNS (the common choice), create a hostname like myhome.duckdns.org, and run its updater on the Pi via cron so the name always resolves to your current public IP. You'll hand this hostname, not a raw IP, to PiVPN in Step 7, so client configs survive IP changes untouched. Second, and more serious, is CGNAT. Before you go further, log into your router and note its WAN IP, then visit a "what's my IP" site from a device on the LAN. If they match, you have a real public IP and port forwarding will work. If they differ, your ISP has you behind Carrier-Grade NAT: you share a public IP with other customers and no inbound port forward can reach you. This is common on many fiber, 5G-home, and cellular ISPs. If you're behind CGNAT you have two options — ask your ISP for a public/static IP (often free or a small monthly add-on), or skip the self-hosted-server model and use a mesh VPN like Tailscale, which brokers connections through its coordination service and needs no port forward. Tailscale is the pragmatic answer for CGNAT and dorm or apartment networks.
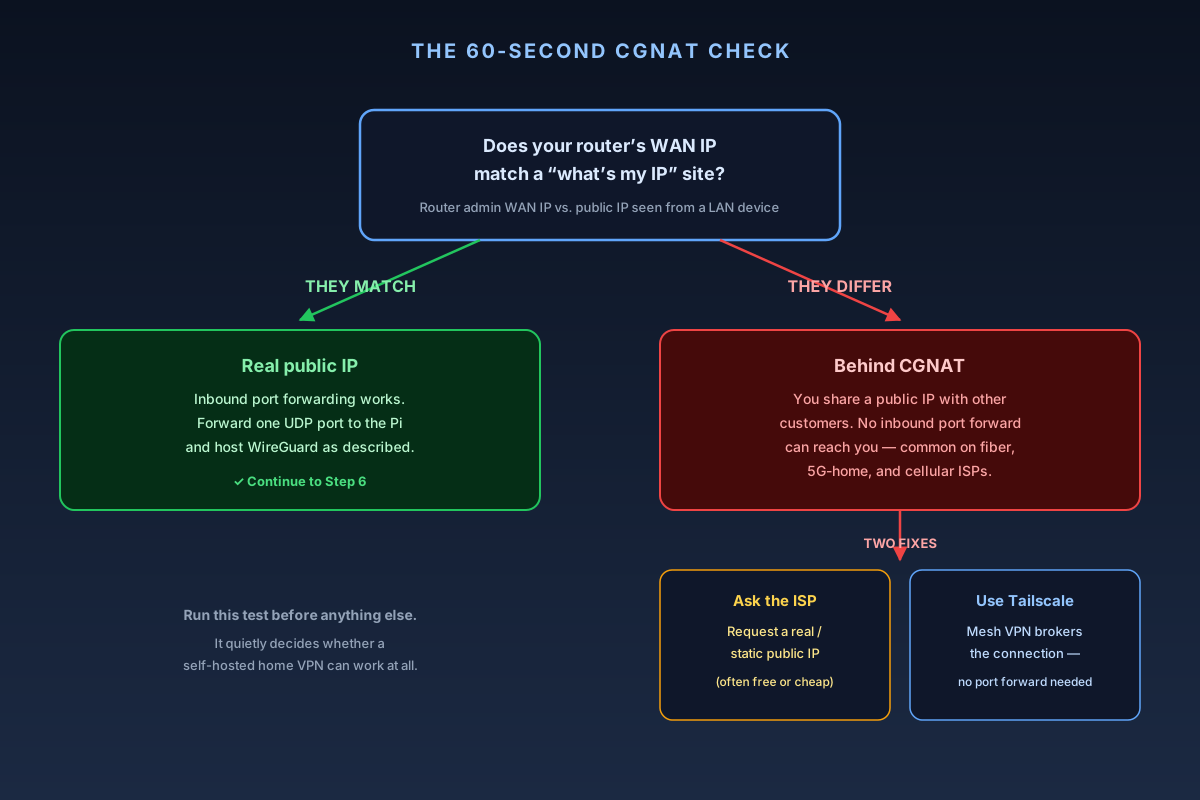
The 60-second CGNAT test. If your router's WAN IP doesn't match your public IP, no port forward will reach home — ask the ISP for a public IP, or use a mesh VPN like Tailscale that needs no forwarding. - 6
Forward a single UDP port to the Pi
WireGuard listens on one UDP port — 51820 by default, though you can choose a custom one during install for a little obscurity. In your router's port-forwarding section, create exactly one rule: protocol UDP (not TCP, not both), external port 51820 (or your custom choice), internal IP the Pi's reserved address (e.g. 192.168.1.7), and internal port the same number. That single rule is your entire exposed attack surface. WireGuard is designed for exactly this: it never responds to a packet that isn't signed by a peer key it already trusts, so a port scan of your home IP sees nothing — the port appears closed. Least-privilege matters here: do not forward a port range, place the Pi in a DMZ, or forward SSH (port 22) to the internet. One UDP port to one device is all WireGuard needs.
- 7
Run the PiVPN installer and choose WireGuard
On the Pi, launch the guided installer with `curl -L https://install.pivpn.io | bash` and step through the prompts. Confirm the static IP (the reserved address from Step 4). Pick the local user account that will hold client configs. For VPN type, choose WireGuard — OpenVPN is offered but is slower, heavier, and has a vastly larger codebase, so WireGuard is the right default. Accept 51820 or set the custom port you forwarded in Step 6; they must match. For DNS, this is the ad-blocking payoff: enter your Pi-hole's LAN IP so tunneled clients resolve through Pi-hole and get network-wide blocking on the road (no Pi-hole? pick a public resolver like Cloudflare 1.1.1.1 or Quad9 9.9.9.9). For the public endpoint, choose the DNS-entry option (not "use this public IP") and enter your DuckDNS hostname, e.g. myhome.duckdns.org — this is why client configs survive an IP change. Enable unattended-upgrades when offered, then reboot. PiVPN configures the WireGuard interface, enables IP forwarding, and sets the firewall rules for you — no hand-editing. If you're reusing your Pi-hole Pi, point PiVPN's DNS at 127.0.0.1 so one box does both jobs: DNS ad-blocking at home and encrypted remote access.
- 8
Add your first client and scan the QR code
Create one profile per device so you can revoke a single lost phone without re-enrolling everything else: `pivpn add -n phone` and `pivpn add -n laptop`. Each command writes a `.conf` file to `~/configs/`. On a phone, install the official WireGuard app (iOS App Store or Google Play), then on the Pi run `pivpn -qr`, pick the phone profile, and it prints a QR code right in the terminal; in the WireGuard app tap + → Create from QR code, scan it, name the tunnel, and toggle it on. On a laptop or desktop, install the WireGuard client, copy the matching `.conf` from `~/configs/` (via scp or a copy-paste of `pivpn -c`), and import it, then toggle the tunnel on. List and manage profiles anytime with `pivpn -l`.
- 9
Choose split-tunnel or full-tunnel
Every client config has an AllowedIPs line that controls what traffic goes through the tunnel — this is the split/full decision from Step 1, and it's edited in the client config, not on the server. Full tunnel is AllowedIPs = 0.0.0.0/0, ::/0: everything the device does routes home, LAN access and all internet traffic, which is what you want on untrusted Wi-Fi and to get Pi-hole ad-blocking everywhere. PiVPN's generated configs default to this. Split tunnel is AllowedIPs = 192.168.1.0/24 (set it to whatever your LAN subnet actually is): only traffic bound for your home subnet uses the tunnel and everything else uses the device's normal connection — lighter on battery and your home upload bandwidth when all you need is to reach the NAS or Plex. You'll also see PersistentKeepalive = 25 in each config; PiVPN adds it to keep the tunnel alive through NAT on the client side, essential on mobile networks, so leave it. Switching later is a one-line edit in the client app's tunnel config — no server change and no re-enrollment.
- 10
Verify from off-network
The only honest test is from genuinely off your LAN. Turn Wi-Fi off on your phone so it's on cellular, enable the WireGuard tunnel, and work through three checks. Check the handshake: in the WireGuard app the tunnel should show a recent "latest handshake" timestamp that updates; no handshake means the packets aren't reaching the Pi. Reach something LAN-only: load your router's admin page or Plex at http://NAS-IP:32400/web — these only answer if the tunnel is up. On full tunnel, confirm the exit: a "what's my IP" site should now show your home IP, and if you pointed DNS at Pi-hole your phone's lookups should appear in the Pi-hole dashboard. If the handshake never completes, work down this list in order: CGNAT (the number-one cause — re-run the WAN-IP-vs-public-IP check from Step 5); a port mismatch or missing forward (the router must forward the exact UDP port PiVPN uses, to the Pi's reserved IP); DuckDNS not updating (`nslookup myhome.duckdns.org` from off-network should return your current public IP; if it's stale, the updater cron isn't running); and, rarely, MTU (on some links dropping the client's MTU to 1420 fixes tunnels that connect but stall).
- 11
Harden and maintain
You've already done the biggest security win by exposing a single UDP port on an audited protocol — keep it that way. Never forward SSH to the internet: administer the Pi from the LAN or through the VPN itself, and if you want remote SSH, reach it over the tunnel rather than a second forwarded port. Stay patched — unattended-upgrades handles most of it, and check in occasionally with `sudo apt update && sudo apt full-upgrade`. Use key-based SSH auth and disable password login on the Pi once you're comfortable. Revoke cleanly: when a device is lost or someone leaves, kill just that profile with `pivpn -r phone` and the key stops working immediately while every other client is untouched — confirm with `pivpn -l`. Back up the contents of /etc/wireguard and ~/configs so you can rebuild the server without re-enrolling every device. One principle worth stating plainly: never weaken these controls to "make it work." If a client won't connect, fix the actual cause — CGNAT, the wrong port, a stale DDNS record — rather than opening a port range, exposing SSH, or dropping the Pi into a DMZ. The whole value of this setup is that it's a small, private door, not a hole in the wall.