How to Set Up a Plex Media Server on a NAS (Synology & QNAP)
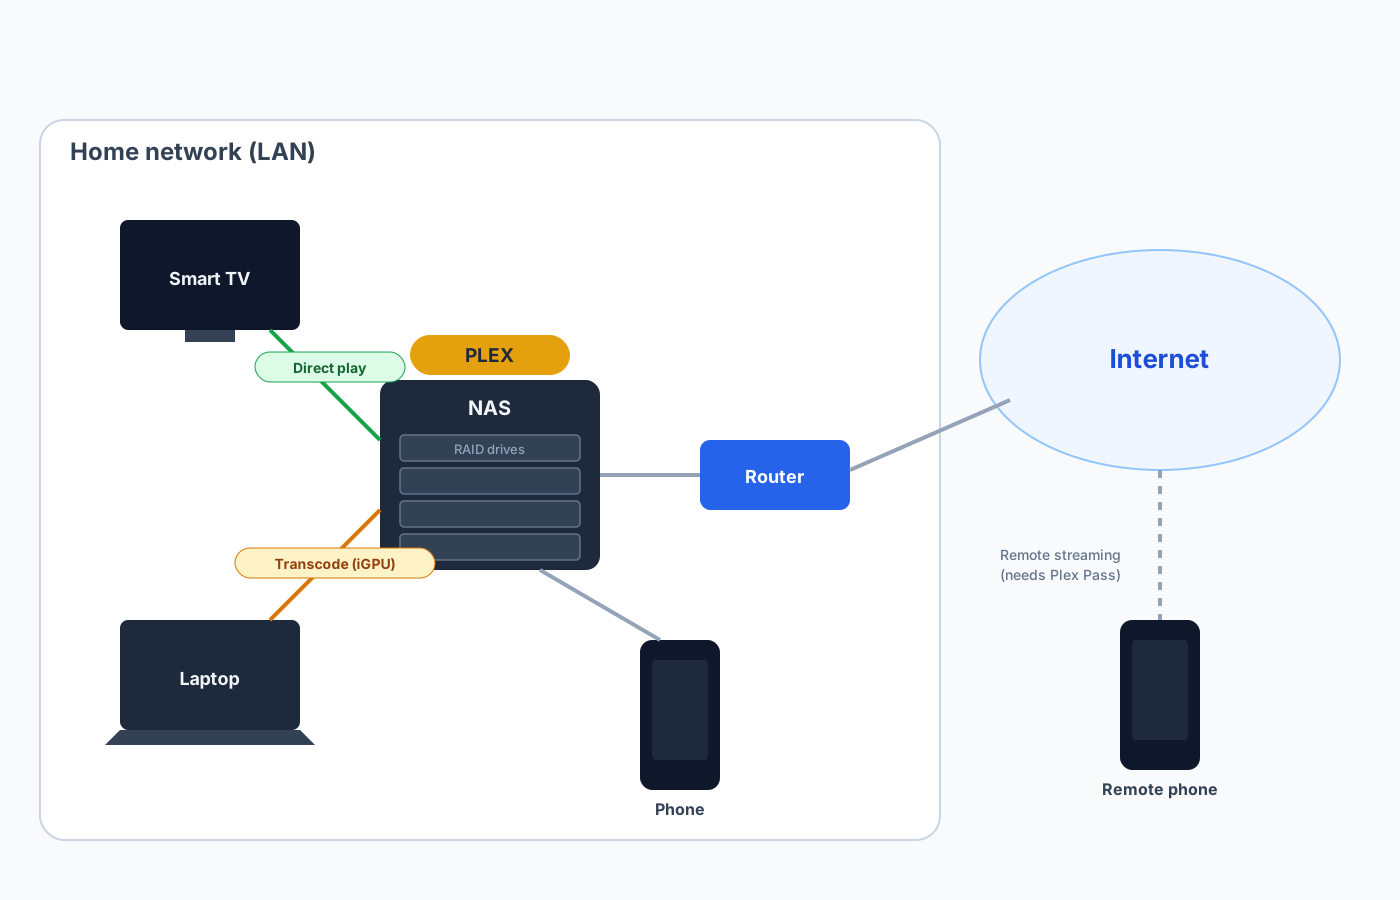
Plex Media Server turns a pile of movies, TV shows, and music sitting on a network-attached storage box into a private, Netflix-style library you can stream to any TV, phone, tablet, or browser in the house — and, with a paid pass, from anywhere. A NAS is the ideal home for it: the drives already live there, the box is already on 24/7, and it's already wired into your network. Put Plex on the same device that stores the files and you cut out the copy step, the second always-on computer, and most of the "why won't it play" headaches.
What you’ll need
- A NAS with an x86 Intel CPU (for hardware transcoding) or any modern NAS (for direct play)
- NAS hard drives (CMR NAS-rated, e.g. WD Red Plus or Seagate IronWolf)
- A free Plex account
- Plex Pass (required for hardware transcoding and for remote streaming since April 2025)
- A wired Gigabit or 2.5G Ethernet connection between the NAS and your router
11-Step Overview
- 1
Understand direct play vs. transcoding first
Everything about which NAS you buy comes down to one question: how will Plex actually deliver video to your screens? There are three modes with very different costs. Direct Play hands the original file to the client untouched — the client does all the decoding and the NAS uses almost no CPU. It happens when the client app (a modern TV, Apple TV, NVIDIA Shield, or the Plex mobile app) natively supports the file's container, video codec, audio codec, and resolution. Direct Stream repackages the file into a different container but leaves the video codec alone — a light CPU cost, common when the video is fine but the container or audio track isn't supported. Transcode decodes the video and re-encodes it in real time into something the client can play, or into a lower bitrate to fit a slow connection — this is the expensive mode, and a single 4K HDR transcode can pin a weak CPU at 100%. Transcoding gets triggered by things you don't always control: a client that can't decode the codec (older TVs choke on HEVC/H.265 or AV1), remote streaming capped at a bandwidth limit (a 4 Mbps cap forces a 40 Mbps file to transcode down), image-based subtitle burn-in (turning on a PGS subtitle from a Blu-ray forces the whole video to transcode so the subtitle can be painted onto each frame — this surprises a lot of people), and audio downmixing for stereo-only devices. The cheapest, smoothest Plex setup is one where everything direct-plays: if all your clients are modern and your files stay in widely supported codecs, you may transcode almost never, and even a modest NAS is plenty — so build your client list first, then buy the NAS to match. If you know you'll transcode — you share with friends on old devices, watch 4K remotely on cellular, or burn in subtitles — you need hardware transcoding, and that dictates the CPU in the next step.
- 2
Pick the right NAS for your transcoding needs
This step quietly determines whether your Plex server is a joy or a slideshow, and the CPU matters far more than the number of bays. Plex's hardware acceleration on a NAS relies almost entirely on Intel Quick Sync Video, the video engine built into Intel's integrated GPUs. A NAS with an x86 Intel CPU that has an iGPU can offload transcoding to Quick Sync and handle multiple 4K streams while barely warming up; a NAS without Quick Sync must software-transcode on general-purpose cores — slow, hot, and limited to one stream on low-end chips. That splits the market into three camps. Intel + Quick Sync (best for transcoding): the QNAP TS-464 (Intel Celeron N5095, Intel UHD Graphics) and the Synology DS224+ (Intel Celeron J4125, Intel UHD Graphics 600 on DSM 7.2) do real hardware transcoding, including 4K HEVC. AMD x86, no iGPU (great for direct play, software-only transcode): the Synology DS923+ (AMD Ryzen R1600) has no integrated GPU and no Quick Sync, so it cannot hardware-transcode — but it is a superb direct-play server with room for NVMe cache and a 10GbE upgrade. ARM (avoid for transcoding): many entry units use ARM CPUs with no Quick Sync and weak software transcoding — fine as a pure direct-play file server, poor as a transcoder. One critical caveat: in 2025 Synology refreshed several "x25" Plus models (the DS225+ and DS425+) that still ship the same Intel Celeron J4125 but removed the i915 graphics kernel driver from DSM, disabling Quick Sync hardware transcoding in Plex, Jellyfin, and Emby out of the box (Synology cited HEVC licensing costs). A community SSH workaround exists but must be re-applied after some updates and carries risk. Synology's driver policy has shifted repeatedly, so if hardware transcoding matters, verify the exact model and DSM version before buying — a 2024 DS224+ transcodes; a 2025 DS425+ may not without hacking. On RAM, 2 GB is the floor and 4 GB or more is comfortable, since the NAS OS, thumbnails, and other apps compete with Plex. For bays, a 2-bay is fine for a starter library on a budget, while a 4-bay gives RAID 5-style redundancy with better usable-capacity efficiency and room to grow.
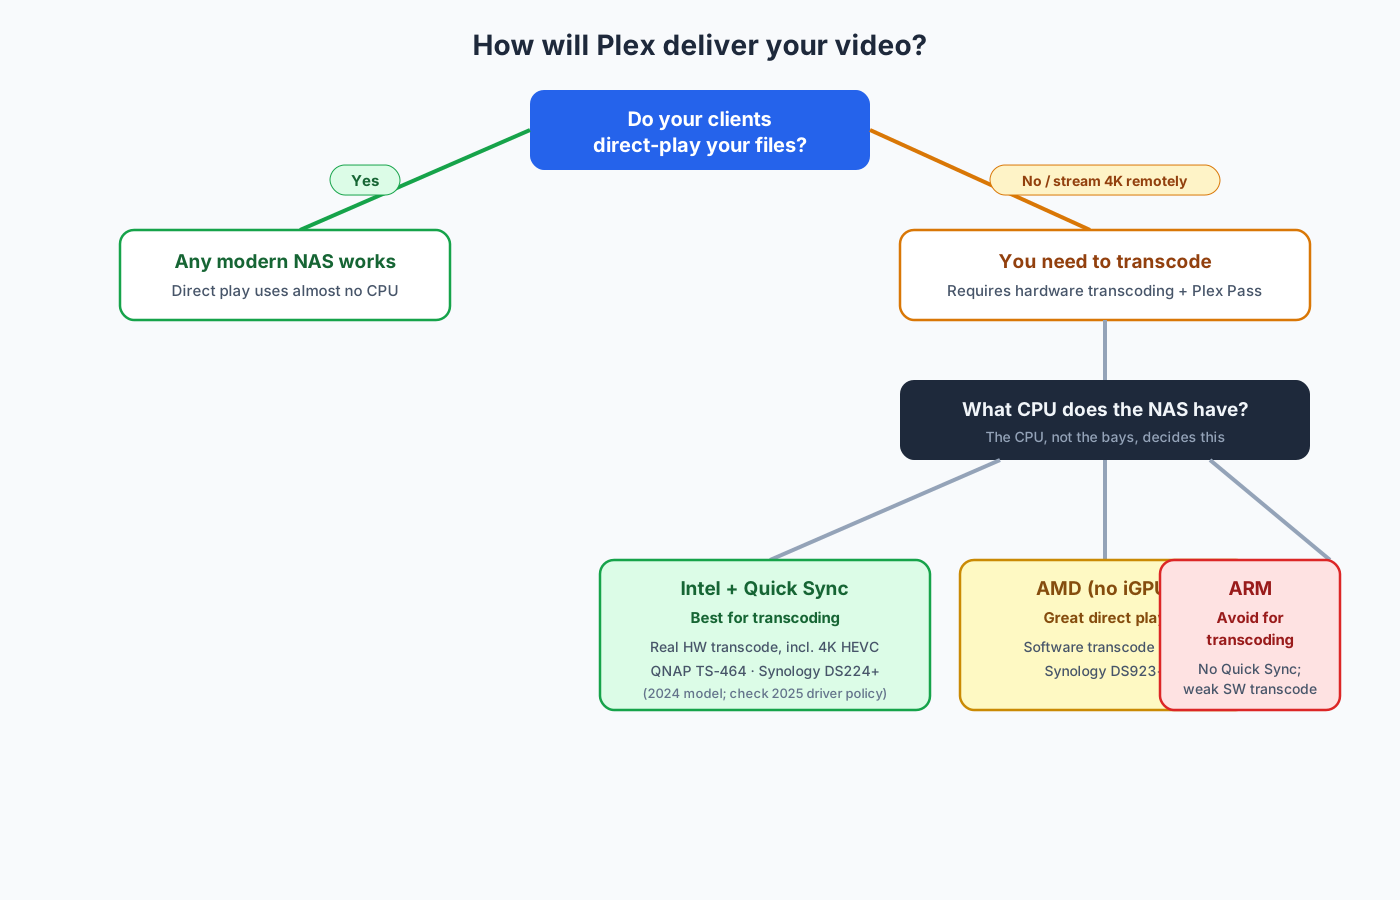
Buy the CPU to match how you'll stream. Direct-play-only setups run on almost anything; anyone who must transcode needs an Intel Quick Sync x86 CPU plus Plex Pass. Check Price on Amazon →Recommended Product
QNAP TS-464 (4-bay, Intel Celeron N5095, 8 GB)
The strongest mainstream transcoding pick here. The N5095's Intel UHD Graphics does Quick Sync hardware transcoding including 4K HEVC, it has dual 2.5GbE, two M.2 NVMe cache slots, HDMI 2.0 4K60 out, and 8 GB RAM (expandable to 16 GB) — x86, so no driver-removal surprises. (Alternatives: the 2024 Synology DS224+ / ASIN B0C6927XPX for a friendlier 2-bay Quick Sync box, or the AMD Synology DS923+ / ASIN B0BM7KDN6R for direct-play only.)
- 3
Plan your drives and storage
The NAS enclosures above are usually sold diskless, and Plex is unforgiving of cheap drives over the long haul. Use CMR, NAS-rated drives and avoid SMR (shingled) desktop drives, which choke during RAID rebuilds — NAS-rated drives like WD Red Plus and Seagate IronWolf use CMR, add vibration tolerance for multi-bay chassis, and carry higher workload ratings for 24/7 duty. Build a redundant array: on a 2-bay use Synology SHR or RAID 1 (mirror) so one drive can fail without data loss; on a 4-bay, SHR or RAID 5 gives single-drive redundancy with better usable capacity. Match drives — same model and capacity across bays keeps rebuilds predictable — and leave headroom, because a single 4K movie can be 40–80 GB and libraries balloon fast. Remember that RAID is redundancy, not a backup: an array protects against a drive dying, but not against ransomware, accidental deletion, a failed rebuild, or the NAS being stolen or fried. Keep a separate backup of anything irreplaceable — an external USB drive rotated offsite, or a cloud copy of the true originals. One Synology-specific note: a 2025 policy pushed users toward Synology-branded or certified drives on new Plus models, then was walked back with DSM 7.3 in October 2025, restoring full support for third-party 3.5-inch HDDs and 2.5-inch SATA SSDs from brands like WD and Seagate; M.2 NVMe drives for storage pools may still require drives on the official compatibility list, so verify the current drive-compatibility policy and HCL for your specific model and DSM version before buying.
Check Price on Amazon →Recommended Product
WD Red Plus 8TB NAS HDD (WD80EFPX, CMR)
CMR recording, NASware firmware with TLER for clean RAID behavior, a workload rating built for 24/7 duty, and broad NAS compatibility. Buy two for a 2-bay mirror or three to four for a 4-bay array, and pick the capacity that best fits your library.
- 4
Create a Plex account and decide on Plex Pass
Head to plex.tv and create a free Plex account — you'll use it to claim the server, sign in on client apps, and manage remote access, and a Plex server must be linked to an account. Then face the money question, because the two features most NAS owners want are paid. Hardware transcoding has always required Plex Pass; without it, transcoding falls back to software and the reason to buy a Quick Sync NAS evaporates. Remote streaming now requires payment too: since April 29, 2025, streaming your own media outside your home network requires either a Plex Pass or the cheaper, remote-only Remote Watch Pass — this used to be free and isn't anymore. Plex has changed its pricing repeatedly (including a lifetime-tier increase on July 1, 2026), so check the current Plex Pass monthly, annual, and lifetime prices, and the current Remote Watch Pass price, before you buy. If you only ever watch at home on direct-play devices, you may need neither paid tier; if you want hardware transcoding you need Plex Pass specifically, since Remote Watch Pass covers remote viewing but not hardware transcoding. Decide now — it changes whether remote access and hardware transcoding will even work for you later.
- 5
Install Plex Media Server on the NAS
Pick the path for your platform; across all of them the Docker/container route is the most portable and self-updating, while the native package is the simplest for beginners. On Synology (DSM 7), the version in some regional Package Centers lags, so the cleanest approach is to download the latest package from plex.tv/media-server-downloads (choose Synology and match your NAS's CPU architecture — check Control Panel → Info Center if unsure), then in DSM open Package Center → Manual Install, upload the .spk, and confirm the trust prompt; Plex then appears in the DSM app menu. Alternatively, run Plex in Container Manager (Docker) using the official plexinc/pms-docker image, which self-updates and survives DSM upgrades at the cost of mapping volumes for config and media and passing a claim token. On QNAP (QTS/QuTS hero), open the App Center, search Plex Media Server, and click Install (or grab the latest .qpkg from plex.tv and use App Center → Install Manually); for the self-updating route use Container Station with plexinc/pms-docker. On TrueNAS SCALE, open Apps, go to the Discover/Available Applications tab, search Plex, and click Install — TrueNAS SCALE's app framework has changed across releases, so verify the current Plex install flow for your version. Whichever platform you use with Docker, point the transcode scratch directory at fast storage (an SSD volume or RAM), not a slow single HDD — transcoding hammers that folder, and putting it on an SD-card-class device is a classic cause of stutter.
- 6
Claim the server and run first-time setup
A newly installed server has to be claimed by your Plex account before it's yours. From a computer on the same LAN as the NAS, browse to http://NAS-IP:32400/web (replace NAS-IP with your NAS's local address, e.g. http://192.168.1.20:32400/web), sign in with the account from the previous step — signing in on the local network automatically claims the server — and give it a friendly name like Living-Room-NAS. Leave "Allow me to access my media outside my home" checked if you plan to stream remotely, then step through the setup wizard; you can skip library creation for now since we'll organize files first. If you used Docker and the container refuses to bind to your account, get a token from plex.tv/claim (valid for a few minutes) and set it as the PLEX_CLAIM value in the container's environment before starting — this is the single most common Docker-Plex setup snag. Always claim from the local network: if you try to claim for the first time over the internet or through a VPN, Plex often can't confirm you own the box and remote access won't light up correctly.
- 7
Organize and name your media files
Plex identifies content by scanning filenames and folder structure against online metadata agents, so good naming is the difference between a gorgeous library and a mess of "unmatched" files — do this before you add libraries. Create top-level shared folders on the NAS (for example /Movies, /TV, /Music) using DSM's Shared Folder tool on Synology, the equivalent on QNAP, or a dataset on TrueNAS. Name movies as one folder per movie with the title and release year, like /Movies/Blade Runner (1982)/Blade Runner (1982).mkv, and name TV as a show folder with season subfolders and sXXeYY episode numbering, like /TV/Severance/Season 01/Severance - s01e01.mkv. Organize music by Artist/Album/Track and let Plex read the embedded tags, like /Music/Radiohead/In Rainbows/01 - 15 Step.flac. The year in parentheses for movies and the sXXeYY pattern for TV fix the vast majority of "Plex matched the wrong thing" problems; if a title still mismatches, use Fix Match in Plex to search manually rather than renaming endlessly.
- 8
Add and configure libraries
Back in the Plex web app at http://NAS-IP:32400/web, click the + next to Libraries (or Settings → Manage → Libraries → Add Library) and choose the library type — Movies, TV Shows, Music, or Photos — since the type selects the right scanner and metadata agent. Add folders and browse to the matching NAS path: inside a container this is the path you mapped in (e.g. /media/Movies), and on a native install it's the NAS shared folder. Add multiple folders to one library if your media is spread across volumes rather than creating a second "Movies 2" library. Set the language and, under Advanced, tune options like whether to use local subtitle files and how aggressively to gather artwork, then save and Plex will scan and start pulling posters, summaries, and cast. In Settings → Library, enable "Scan my library automatically" so new files appear without a manual refresh, "Run a partial scan when changes are detected" for faster incremental scans, and set scheduled tasks to an off-peak window (e.g. 3 a.m.) so heavier metadata and optimization jobs don't compete with prime-time streaming. Don't point a library at a shared folder that also holds non-media junk (downloads-in-progress, .nfo sidecars, sample clips) — partial and hidden files confuse the matcher and clutter your library.
- 9
Set up remote access
Remote access lets you and anyone you share with stream from outside the house, and since April 2025 it requires Plex Pass or Remote Watch Pass. First, pin the NAS's IP with a DHCP reservation in your router (bind the NAS's MAC to a fixed LAN IP) — Plex's port forward breaks the moment the NAS's IP changes, so this is not optional. In Plex, open Settings → Remote Access and click Enable Remote Access; if your router supports UPnP, Plex will often open the port automatically and report "Fully accessible outside your network." If UPnP is off (many security-minded setups disable it, reasonably), forward TCP port 32400 on your router to the NAS's reserved IP manually, then set the same port in Plex's "Manually specify public port" field and confirm the green "fully accessible" status. Watch out for CGNAT: if your ISP puts you behind Carrier-Grade NAT (common on many fiber, 5G-home, and cellular ISPs) you don't have a real public IP and no amount of port forwarding will work — Remote Access simply stays "not available." The fixes are to ask the ISP for a public/static IP or to route around it with a mesh VPN like Tailscale on the NAS and clients; a quick tell for CGNAT is that your router's WAN IP differs from the public IP shown by a "what's my IP" site. For security, keep Plex's secure connections enabled (Settings → Network), keep the server updated, share libraries only with named Plex accounts rather than handing out your password, and forward a single specific port (32400) to one device rather than opening a range or a DMZ.
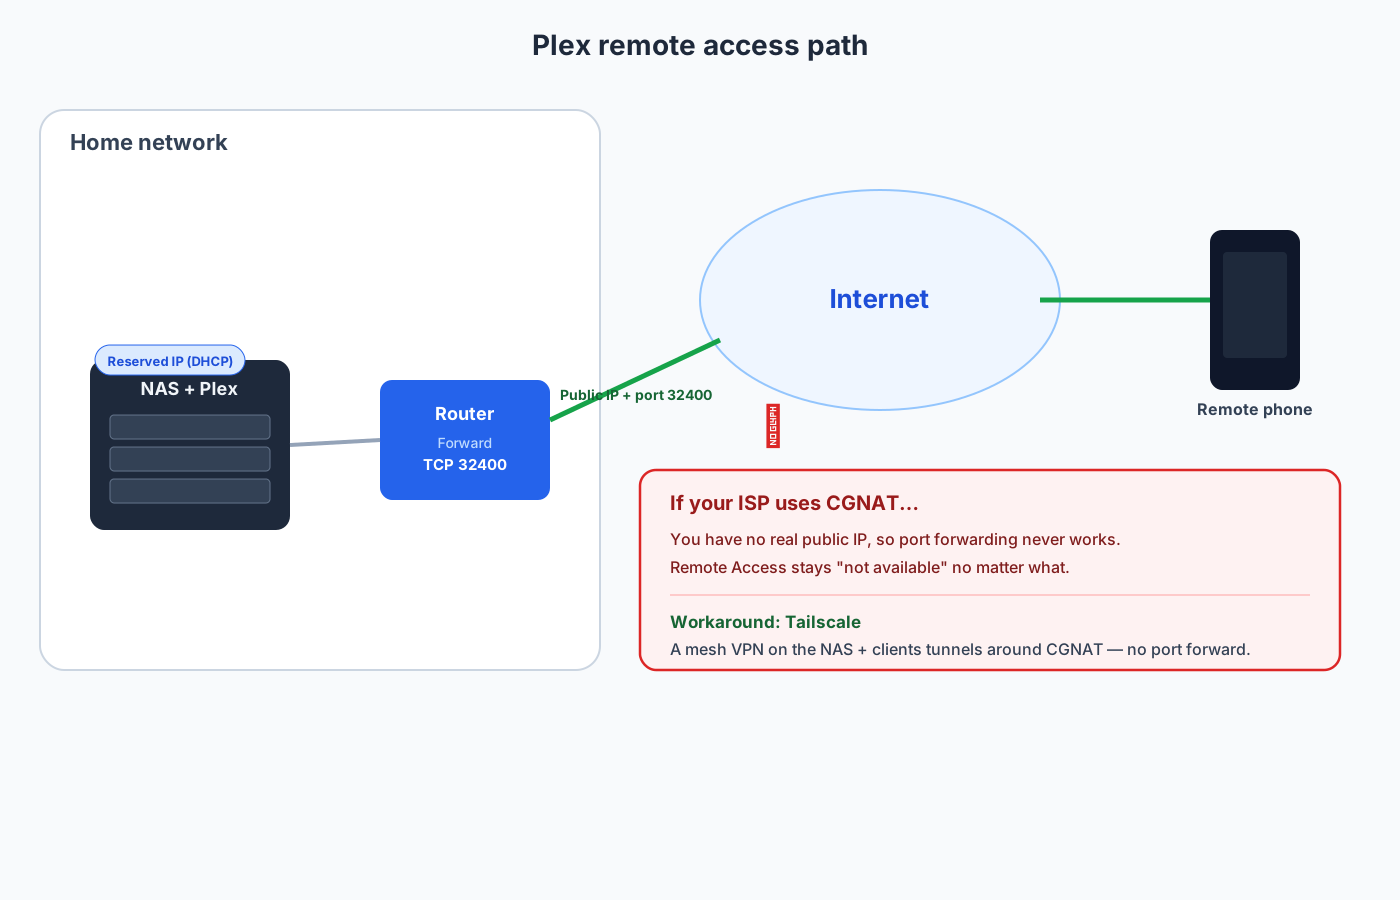
Remote access needs a reserved NAS IP, port 32400 reachable from the internet, and a real public IP. Behind CGNAT the direct path fails and a mesh VPN like Tailscale is the workaround. - 10
Enable hardware transcoding
This is the payoff for buying a Quick Sync NAS and paying for Plex Pass. Confirm Plex Pass is active on your account (Settings → your account, or the crown icon in the app), open Settings → Transcoder, and enable "Use hardware acceleration when available"; optionally enable "Use hardware-accelerated video encoding" and, on capable Intel chips, HDR tone mapping, then save. Verify it's actually using hardware by forcing a transcode — play a file to a client set to a lower quality than the source (the web player's quality dropdown is easy for this) and open Settings → Dashboard (or Status → Now Playing). A session that reads "Transcode (hw)" confirms Quick Sync is engaged; if it just says "Transcode" with no (hw), hardware acceleration isn't kicking in. If (hw) never appears, run down this list in order: Plex Pass isn't active (hardware transcoding is Plex Pass-only); the NAS has no Quick Sync (it's an AMD or ARM unit, so software transcoding is all you get); the NAS is a 2025 Synology with the graphics driver removed (hardware transcoding is disabled at the kernel level); for Docker you didn't pass the iGPU device into the container (map /dev/dri in); or the specific codec (e.g. AV1) isn't supported by that chip's Quick Sync generation.
- 11
Verify, then avoid the common pitfalls
Two quick checks prove the server works. For direct play, open the Plex app on a smart TV, Apple TV, or Shield and play a movie — it should start near-instantly with the NAS CPU near idle (watch the Dashboard). For transcode, force a lower quality in a browser and play again — it should keep up, ideally showing (hw) in the Dashboard if you enabled hardware acceleration. Then watch for the failure modes that fill Plex's forums. The number-one regret is buying the wrong CPU — an ARM or AMD NAS that can't hardware-transcode when the owner later needs it — so re-read the CPU step, since direct-play plans change when you add friends on old TVs. The 2025-Synology trap is the same J4125 chip with no working hardware transcode because the driver was stripped, so confirm the model and DSM version before you buy. Slow transcode scratch storage (a single HDD or SD-card-class volume) causes buffering, so point the transcode temp directory at an SSD or RAM. A changed NAS IP breaks remote access and even LAN discovery, so use a DHCP reservation. CGNAT blocks remote access entirely — use Tailscale or get a real IP. Subtitle burn-in with image-based (PGS/VOBSUB) subtitles transcodes the entire video even on an otherwise direct-play file, so prefer text subtitles (SRT) that the client can render without a transcode. Too little RAM with too many apps — Plex plus a download client, surveillance, and backups on a 2 GB NAS — will thrash, so give Plex breathing room. RAID is not a backup, so keep a separate copy of anything you can't re-rip. And remember the paid tier: remote access silently won't work without Plex Pass or Remote Watch Pass since April 2025, and hardware transcoding won't work without Plex Pass — that's policy, not a bug.