How to Set Up Tailscale for Secure Remote Access to Your Home Network (No Port Forwarding, Works Behind CGNAT)
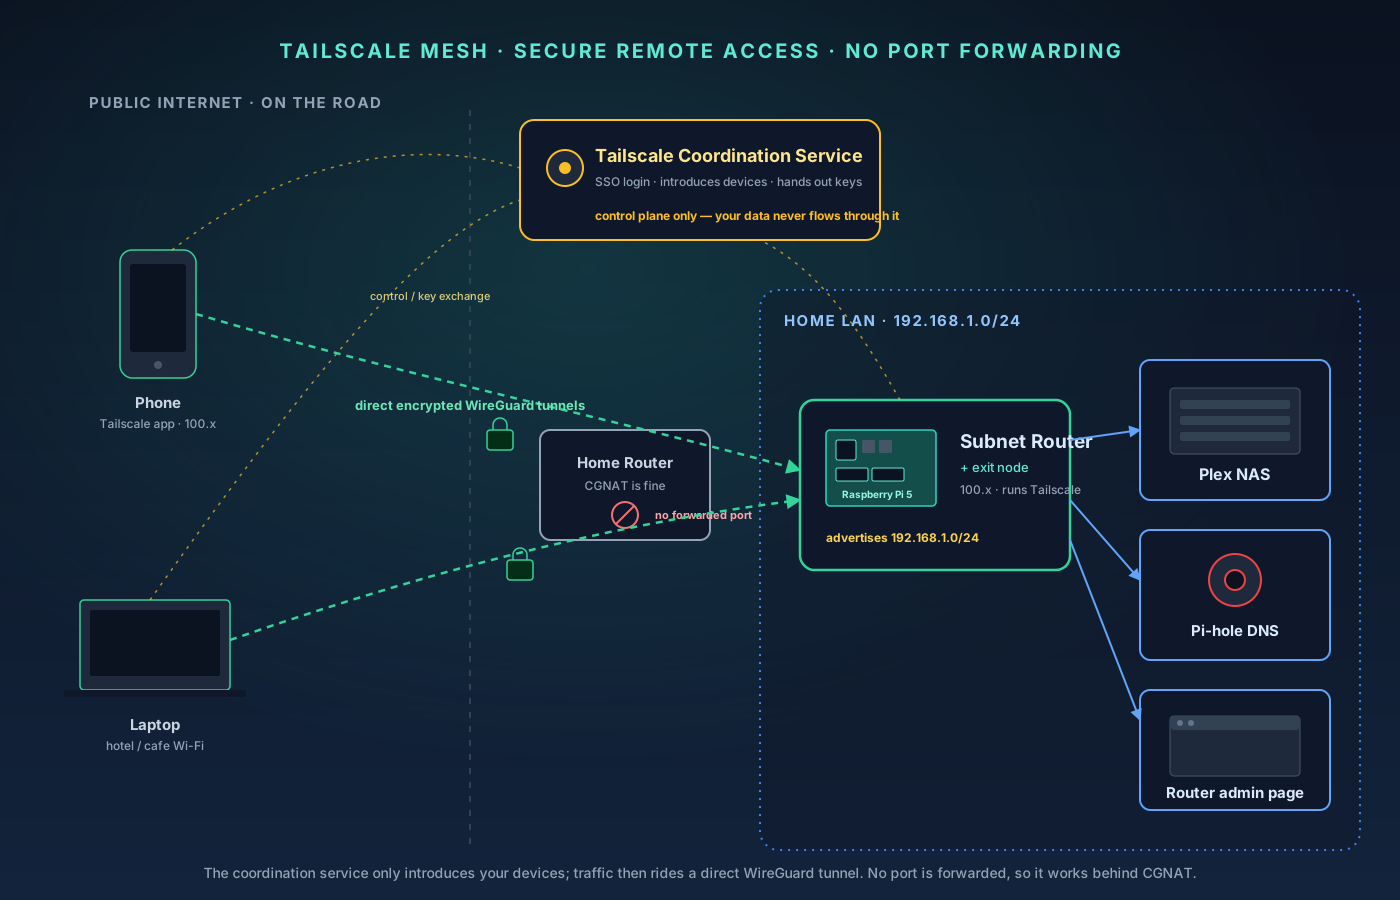
If you followed our WireGuard-on-a-Raspberry-Pi guide and hit a wall at the CGNAT check — your router's WAN IP didn't match your public IP, so no forwarded port could ever reach home — this is the guide that gets you unstuck. Tailscale is a mesh VPN built on the same WireGuard protocol, but instead of you opening a port and pointing the world at your house, a lightweight coordination service quietly introduces your devices to each other and then gets out of the way. The traffic still rides a direct, encrypted WireGuard tunnel; you just never have to touch your router.
What you’ll need
- A device you can log in from (laptop or desktop)
- A phone (iOS or Android)
- An always-on Linux box on the home LAN for the subnet router/exit node (e.g. Raspberry Pi 5)
- An existing Google, Microsoft, GitHub, or Apple account to sign in with
10-Step Overview
- 1
Decide what Tailscale is for
Tailscale builds a private mesh — a tailnet — over the public internet. Every device you enroll gets a stable 100.x.y.z address and can reach every other enrolled device directly, no matter what network it's sitting on. Practically, that means from a hotel room you can reach a Plex server, a NAS, Home Assistant, or your router's admin page, and you can browse the web as if you were home. The single decision that shapes the rest of the setup is whether you also want to reach LAN gear that can't run Tailscale itself (almost everyone does) — that's what the subnet router in Step 5 is for.
- 2
Create your tailnet with an existing identity
Go to tailscale.com and sign up. There's no new VPN password to invent — you log in with an identity you already have (Google, Microsoft, GitHub, or Apple), and that identity becomes the owner of your tailnet. The free Personal plan is generous enough for an entire household: as of this writing it covers up to six users and unlimited personal devices (check tailscale.com/pricing for the current numbers, which Tailscale adjusts from time to time). Signing in with SSO means there's no standalone VPN credential to leak, and you inherit whatever two-factor you already have on that account — turn on 2FA there if you haven't.
- 3
Install Tailscale on your first two devices
Start with the device you're on and your phone. On Windows or macOS, download the installer from tailscale.com/download, run it, and log in with the identity from Step 2. On iOS or Android, install the Tailscale app from the App Store or Play Store, open it, and sign in. On a Linux box, run `curl -fsSL https://tailscale.com/install.sh | sh`, then `sudo tailscale up`, and follow the login URL it prints. Each device authenticates in a browser and then appears in your admin console at login.tailscale.com with its own 100.x address. Two devices signed into the same tailnet can already talk to each other — you have a working VPN with zero router changes.
- 4
Verify the mesh by MagicDNS name
In the admin console, open the DNS tab and enable MagicDNS so every device is reachable by a short name instead of a 100.x number. Test it the honest way: put your phone on cellular (genuinely off your home Wi-Fi), then reach a service on your laptop by name — `ping my-laptop`, or open `http://my-laptop:<port>` for anything it's serving. If it answers, the two ends built a direct tunnel across two different networks, which is the whole ballgame; everything below just extends that reach. One thing worth knowing: Tailscale tries hard to punch a direct connection between two devices, but when a network is too restrictive it falls back to an encrypted DERP relay so the connection still works, just with a little more latency. Run `tailscale status` on a computer to see whether a peer is direct or relay — either way your traffic stays end-to-end encrypted.
- 5
Turn a home Linux box into a subnet router
Most home gear can't run Tailscale — a smart TV, a printer, the router's own admin page, a NAS you'd rather not install anything on. A subnet router solves this: one always-on Linux box advertises your entire LAN into the tailnet, so everything behind it becomes reachable. A Raspberry Pi is the ideal host, and if you already built a Pi-hole or WireGuard box, this rides on the same hardware. First enable IP forwarding on that box by adding `net.ipv4.ip_forward = 1` (and `net.ipv6.conf.all.forwarding = 1` if you use IPv6) to `/etc/sysctl.d/99-tailscale.conf` and applying it with `sudo sysctl -p /etc/sysctl.d/99-tailscale.conf`. Then advertise your LAN subnet — substitute your real subnet, checking your router if unsure — with `sudo tailscale up --advertise-routes=192.168.1.0/24`.
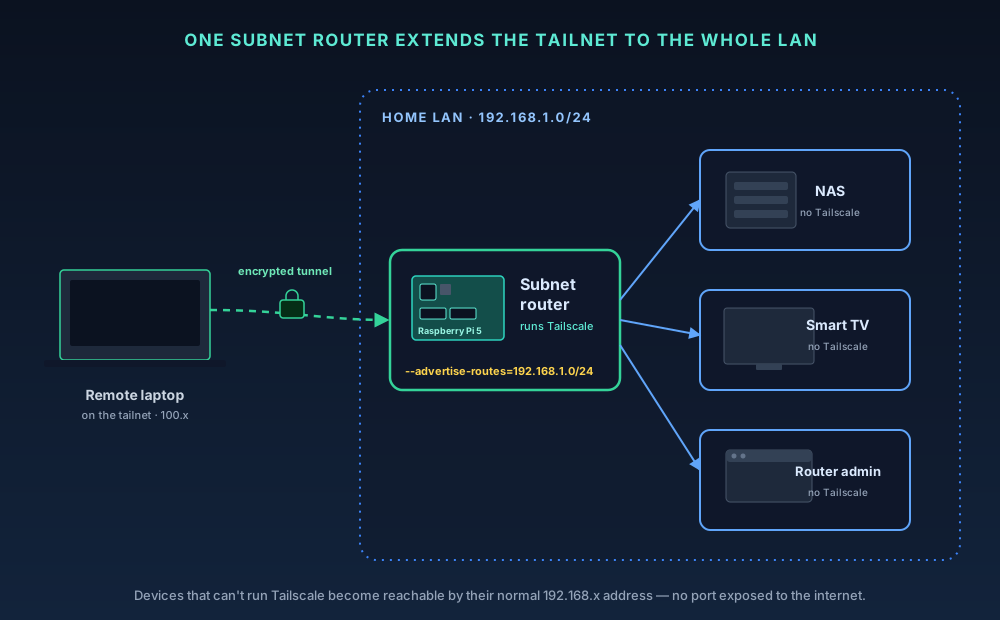
A single subnet router advertises the whole 192.168.1.0/24 LAN into the tailnet. Devices that can't run Tailscale — the NAS, the TV, the router's admin page — become reachable through it. Check Price on Amazon →Recommended Product
CanaKit Raspberry Pi 5 Starter Kit (4 GB)
A subnet router runs 24/7, so you want the official 27W PSU and active cooling this kit includes to keep a Pi 5 from thermal-throttling on warm days. Already run Pi-hole or WireGuard on a Pi? Add Tailscale to that box and skip the purchase.
- 6
Approve the route
Advertised routes stay off until you approve them in the admin console — a deliberate safety gate so a compromised device can't silently expose a network. Open the subnet router's machine in the console, find the Subnets (route settings) section, and enable the route you advertised in Step 5. From then on, any device in your tailnet can reach anything on your home LAN by its normal 192.168.x address — with no port exposed to the internet. While you're there, disable key expiry on the subnet router specifically, so it doesn't quietly drop off the mesh when its key would otherwise expire while you're away from home. (Leave key expiry on for laptops and phones — see Step 10.)
Check Price on Amazon →Recommended Product
SanDisk Extreme 64GB microSDXC (A2, U3)
A2-class random IOPS keep an always-on subnet router responsive; 64 GB is ample for a box that stores only the OS and configs.
- 7
Add an exit node for safe browsing
An exit node routes a client's entire internet traffic out through your home connection — the same thing a full-tunnel VPN does, but again with no port to forward. On the same Pi, re-run `tailscale up` adding the exit-node flag: `sudo tailscale up --advertise-routes=192.168.1.0/24 --advertise-exit-node`. Approve it as an exit node in the admin console (same machine settings page as the subnet route). Then, on a phone or laptop sitting on untrusted Wi-Fi, pick that exit node in the Tailscale app. All traffic now leaves from your house; the local hotel or airport network sees only encrypted WireGuard packets. Toggle the exit node off when you want normal local speeds again.
- 8
Point tailnet DNS at Pi-hole (optional)
If you run Pi-hole, you can carry ad- and tracker-blocking to every device in the tailnet, even on cellular. In the admin console DNS tab, add your Pi-hole's LAN IP as a global nameserver and enable Override local DNS. Because the subnet router already makes that LAN IP reachable, every tailnet device now resolves through Pi-hole. Confirm your Pi-hole is set to answer queries coming from the Tailscale interface — permit the 100.64.0.0/10 range or set its interface listening behavior accordingly.
- 9
Reach Plex, your NAS, and the router from anywhere
With the subnet route approved, LAN-only services answer by their normal addresses from anywhere in the world. Open Plex at `http://NAS-IP:32400/web` — and you can now leave Plex's own Remote Access turned off, keeping your media server entirely off the public internet while still reaching it over Tailscale. Your NAS web UI, Home Assistant, and the router admin page work the same way: hit the 192.168.x address you'd use at home. Everything travels over the encrypted tunnel, and nothing is exposed to a port scanner.
- 10
Lock it down and maintain it
Tailscale is secure by default, but tighten a few things. Keep key expiry on for laptops and phones so a lost or stolen device stops working on its own; the one machine to exempt is the always-on subnet router (Step 6), so it doesn't drop while you travel. Turn on device approval so a newly signed-in machine can't join your tailnet until you approve it. When a device is lost or a person leaves, delete just that machine in the admin console — its access ends immediately, and no other device is disturbed. For finer control, edit your tailnet's access-control policy (ACLs) so, for example, a guest's device can reach only the Plex server and nothing else on the LAN; start permissive and tighten deliberately. Never widen an ACL or disable device approval just to make a stubborn device connect — fix the specific device (re-authenticate it, check its route approval, look at `tailscale status`) rather than loosening a control for the whole network.