How to Set Speaker Levels and Distances by Hand (SPL Meter Method)
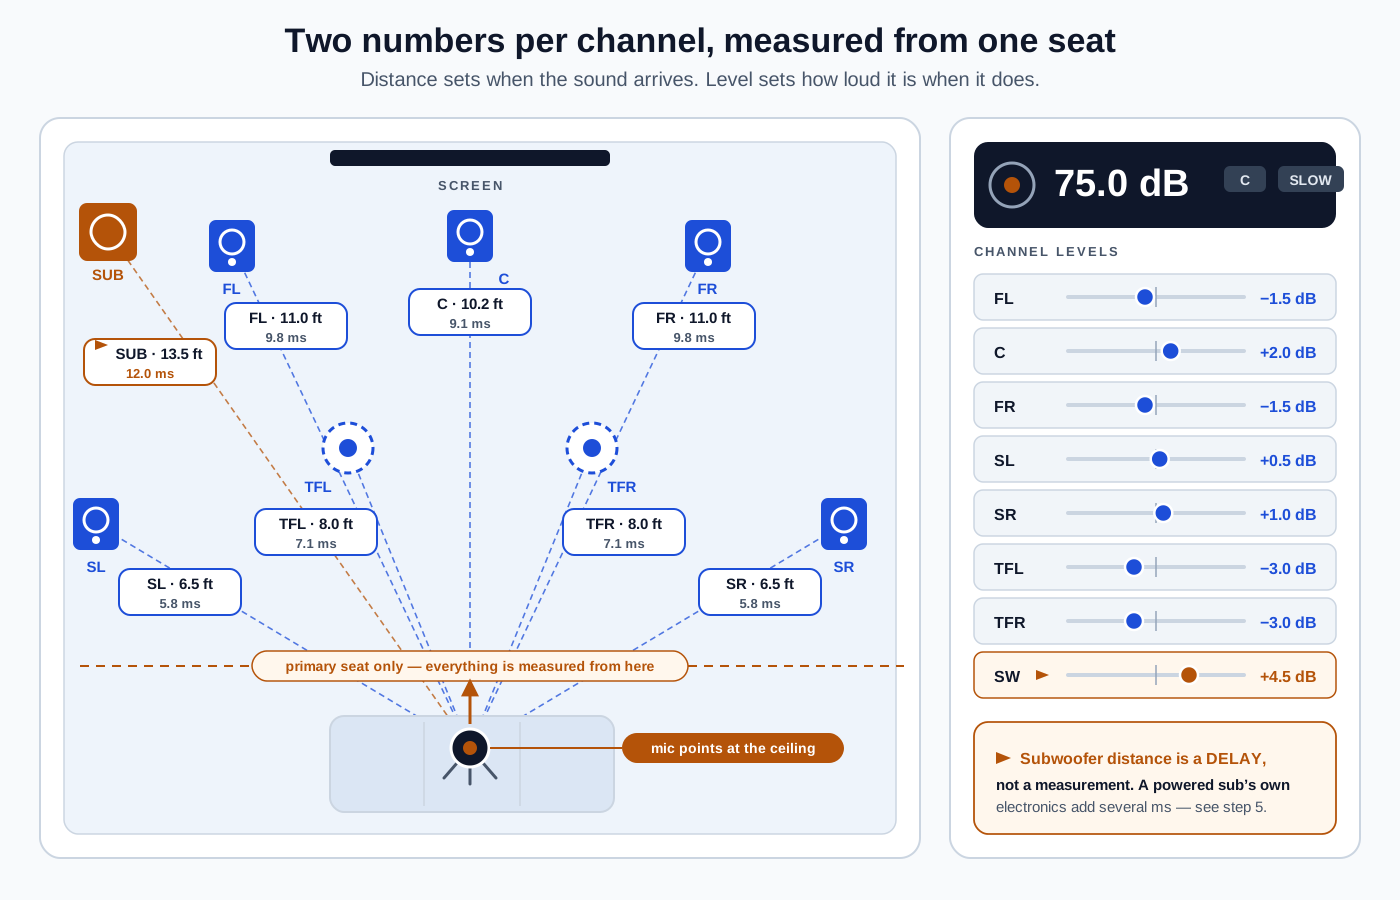
An AV receiver only needs two numbers from every speaker you own: how far away it is, and how loud it plays. Get those two wrong and no amount of expensive gear rescues the result — the center channel sits behind the screen instead of on it, a pan from left to right lurches rather than sweeps, and the subwoofer either disappears or swallows the dialogue. Get them right and a modest five-speaker system collapses into one continuous sound field. This is the highest-value hour you can spend on a home theater, and it costs the price of a meter.
Most people let automatic room correction handle this. That is a reasonable default, and if you own a Denon or Marantz you should read our guide to running Audyssey properly first. But auto-calibration is not available on every receiver, it fails in predictable ways, and it gives you no way to check its own work. This guide covers the manual method: choosing a meter that can actually measure a test tone, measuring distances from the primary seat, matching every channel to the 75 dB reference target, dealing with the fact that a subwoofer's distance setting is not a distance at all, and recognising when a large trim value is telling you something is wired wrong rather than just quiet. It works on any receiver made in the last twenty years, and it is also the fastest way to sanity-check an auto-calibration result you do not trust.
What you’ll need
- An SPL meter with a C-weighting setting and a Slow response setting — this is the one piece of gear you cannot substitute
- A camera tripod or microphone stand that reaches seated ear height, roughly 36 to 42 inches
- A tape measure, or a laser distance measure if your speakers are spread across a large room
- Your AV receiver's remote and its built-in channel-level test tone (every receiver has one, usually under Speakers, Levels, or Manual Setup)
- A quiet room: HVAC off, fridge in a different room if possible, nobody else in the house running anything
- A written record of your current settings before you change them, so you can get back
10-Step Overview
- 1
Decide whether you should be doing this by hand at all
Manual calibration is not automatically better than automatic room correction, and it is not automatically worse. They do different jobs. Auto-calibration systems like Audyssey, Dirac, YPAO, and AccuEQ measure levels and distances and build equalisation filters that correct the room's frequency response — manual calibration only does the first part. If you have a capable auto-cal system and it produced a sensible result, leave it alone.
Do this by hand when one of these is true:
- Your receiver has no room correction at all. Entry-level and older receivers, most stereo integrated amps with a sub output, and a lot of pro-style processors expect you to set levels and distances yourself.
- Auto-cal produced an obviously wrong number. A surround speaker reported at 40 feet in a 15-foot room, a center channel trimmed to +11 dB, a subwoofer set to Large — these are measurement failures, usually from background noise or a microphone in the wrong place, and the fix is to re-run it and then verify by hand.
- You want to check the machine's work. Auto-cal gives you a result with no error bars. Ten minutes with a meter tells you whether to trust it.
- You changed one thing. Added a second subwoofer, moved the couch, swapped a surround speaker. A full re-run is overkill; re-measuring two numbers is not.
One thing manual calibration will not do is fix a room problem. If bass is uneven from seat to seat or a reflection is smearing dialogue, the answer is speaker and subwoofer placement, not a trim control. Start with subwoofer placement and then come back here.
- 2
Get a meter that can actually measure this
The meter is the entire method, so it is worth understanding what makes one adequate. You need two specific features, and a phone is only partly a substitute for them.
C-weighting, not A-weighting. Weighting curves are filters that reshape what the meter hears before it reports a number, and A-weighting — the default on nearly every cheap meter and every phone app — deliberately throws away bass. That is correct for measuring workplace noise exposure and catastrophic for calibrating a home theater.
Frequency A-weighting C-weighting 31.5 Hz −39.4 dB −3.0 dB 63 Hz −26.2 dB −0.8 dB 125 Hz −16.1 dB −0.2 dB 1 kHz 0 dB 0 dB Read the 31.5 Hz row again. An A-weighted meter reports a deep bass tone as almost 40 dB quieter than it actually is. Calibrate a subwoofer that way and you will end up running it roughly 20 to 30 dB hot. C-weighting is nearly flat where it matters.
Slow response, not Fast. Response time sets the meter's averaging window — Fast is 125 ms, Slow is 1 second. The receiver's test tone is band-limited pink noise, which is random by nature, so a Fast reading jitters across several dB and you end up guessing. Slow settles into a number you can actually read.
About phone apps. A phone SPL app is genuinely useful for one thing: comparing two full-range channels to each other. Play the tone through the front left, note the reading, play it through the front right, and a 2 dB difference is a real 2 dB difference even if neither absolute number is accurate. What a phone cannot do is measure a subwoofer. Phone microphones are high-passed in hardware to reject wind and handling noise, they are uncalibrated at the low end, and automatic gain control will quietly compress a loud tone. Use one to check channel balance in a pinch; do not use one to set a subwoofer level.
Search on Amazon →Recommended Product
SPL meter with C-weighting
The one purchase this guide actually requires. Confirm the listing states C-weighting and a Slow response setting before buying — plenty of cheap meters are A-weighted only.
- 3
Set speaker sizes and crossovers before you touch a level
This is the step people skip, and skipping it makes everything afterwards wrong.
Your receiver's bass management decides which speakers get the low frequencies and which hand them to the subwoofer. Change a crossover and you change how much energy a speaker is radiating, which changes what the meter reads — so a level set before the crossover is a level you will have to set again.
Work through it in this order:
- Set every speaker to Small unless you have a specific reason not to. "Small" is not a comment on the cabinet; it means "send the bass to the sub." Almost every system sounds better this way. Our explainer on the 80 Hz crossover covers why.
- Set the crossover for each speaker group. 80 Hz is the correct default and the THX standard. Small satellites want 120 to 150 Hz, bookshelves 80 to 100 Hz, large towers 40 to 60 Hz. The full method is in how to set your speaker crossover frequency.
- Set the subwoofer to Yes or LFE, not "LFE + Main" — that setting sends bass to both the sub and the mains and reliably produces a lumpy, doubled bottom end.
- Bypass the subwoofer's own low-pass filter. If your sub has a crossover knob, turn it fully clockwise or use the LFE/bypass input. Two crossovers in series roll off the bass far faster than either one alone, and you will spend the rest of this guide chasing a dip that is your own doing.
If you are also switching on height channels, set them up now as well — the Dolby Atmos setup guide covers assignment and crossovers for ceiling and upfiring speakers.
- 4
Measure the distances from the primary seat
Distance settings are not a courtesy. The receiver converts each one into a delay so that sound from every speaker arrives at your seat at the same instant, and the conversion is straightforward: sound travels about 1,125 feet per second at normal room temperature, so one foot is roughly 0.89 milliseconds.
Distance error Timing error 1 ft 0.9 ms 3 ft 2.7 ms 5 ft 4.4 ms 10 ft 8.9 ms Measure from the primary listening seat — one seat, the one you actually use — to each speaker, and follow these rules:
- Measure to the driver, roughly the tweeter or the midrange, not to the nearest corner of the cabinet or the wall behind it.
- Measure in a straight line through the air, not around furniture. If a ceiling speaker is 6 feet up and 5 feet forward, the distance is the diagonal, about 7.8 feet — not 11.
- Measure from your ears, which is roughly 38 inches off the floor in a normal couch, not from the floor or the top of the headrest.
- Enter the value in whatever units your receiver uses, and do not agonise over precision. Most receivers accept steps of about 0.1 to 1 foot, and getting within half a foot of correct is well beyond the point of diminishing returns for everything except the subwoofer.
A laser distance measure makes ceiling speakers and far surrounds much easier than a tape measure and a helper, especially in rooms where you cannot get a straight run along the floor.
The one thing you must not do is enter a guess. A center channel entered 3 feet short pulls dialogue forward and detaches it from the screen; surrounds entered long smear the rear image. If you have no measuring tool at hand, stop here and get one — every other number in this guide depends on these.
Search on Amazon →Recommended Product
Laser distance measure
Optional, but far easier than a tape measure for ceiling speakers and far surrounds where you cannot get a straight run along the floor.
- 5
Your subwoofer's distance is a delay, not a distance
Here is the detail that confuses almost everyone who calibrates by hand for the first time, and the reason so many people assume their auto-calibration is broken.
A passive speaker produces sound essentially the moment the signal arrives. A powered subwoofer does not. Between the input jack and the cone there is a low-pass filter, usually a class-D amplifier, and on most modern subs a DSP stage doing limiting and room EQ. Each of those takes time. The total is commonly 1 to 5 milliseconds, and on a heavily processed sub it can be more. The receiver does not know or care where the box physically is — it only needs to know when the sound arrives. So the correct setting is the physical distance plus the equivalent distance of that internal delay, which is why a tape measure reading 11 feet often wants a setting of 14, 15, or more.
This is also why an auto-calibration result that reports the subwoofer at 22 feet in a 14-foot room is usually correct rather than broken. Do not "fix" it.
To set it by hand:
- Start by entering the physical distance you measured.
- Play a bass-heavy passage with strong content right around your crossover — a sustained bass line or a low synth note works better than an explosion, because you need something steady enough to compare.
- Flip the subwoofer's 0/180 phase switch (some subs have a continuously variable phase dial instead) and listen at the seat. Keep whichever position sounds louder and fuller through the crossover region. Louder is right: when the sub and the mains are out of phase they cancel each other near the crossover, producing a dip exactly where you cannot afford one.
- With the better phase position selected, nudge the distance setting up in 1-foot steps, listening each time. You are looking for the setting where the bass sounds most connected to the rest of the music rather than sitting behind it. Most people land somewhere between the physical distance and about 6 feet beyond it.
- If you have two subwoofers, do this for each one independently if your receiver supports separate distance settings, and together if it does not. Whether a second sub is worth it covers the trade-offs.
If this feels imprecise, it is — the by-ear version gets you close, and a measurement rig gets you exact. If you own or are willing to buy a measurement microphone, calibrating a subwoofer with a miniDSP shows the version of this process where you can actually see the crossover region on a graph.
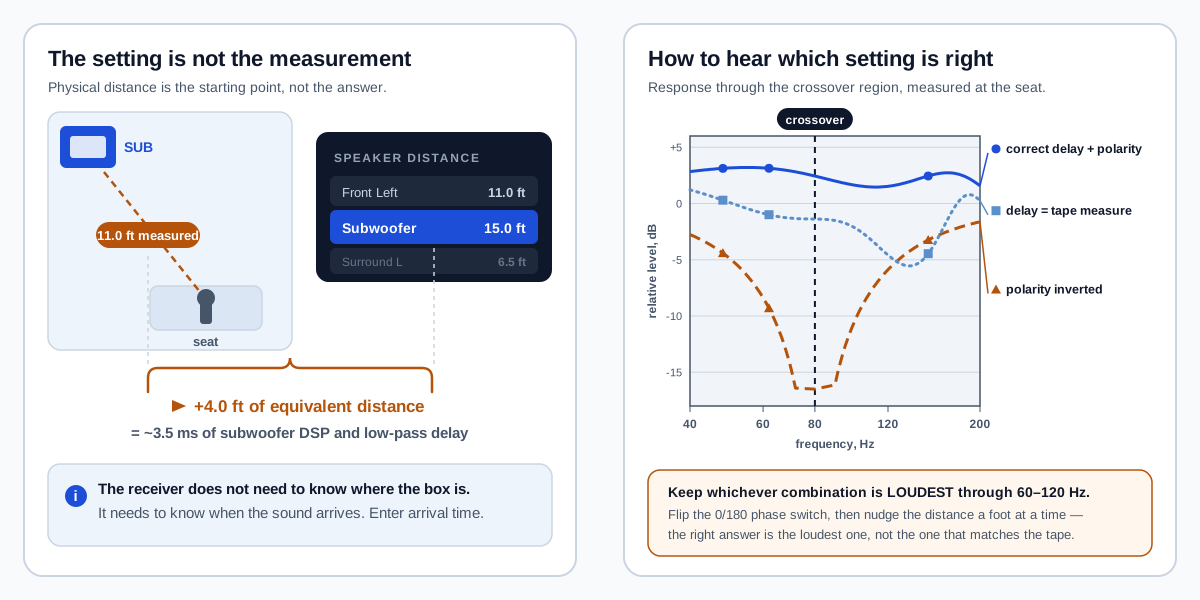
The number your receiver wants is arrival time, and a powered subwoofer's own electronics add several milliseconds before any sound leaves the cone. If auto-calibration reports a subwoofer distance well beyond the physical one, it is not a bug. - 6
Set up the meter and get out of its way
Levels are now the only thing left, and the measurement is only as good as where the meter sits.
Put it on a tripod at the primary seat, at seated ear height. Holding the meter in your hand puts a large reflective object — you — directly next to the microphone, and the reading changes by a couple of dB depending on how you are standing. A tripod costs less than the error is worth.
Point the microphone at the ceiling. This is the convention auto-calibration microphones use, and the reason is consistency: with the mic vertical, a front speaker, a surround, and a ceiling speaker are all measured at a comparable angle of incidence. Aim the meter at each speaker in turn and you are measuring each one on-axis, which flatters the ones you point at and penalises the ones you do not. (If your meter's manual explicitly specifies frontal incidence and supplies a correction, follow the manual — but be consistent across every channel either way.)
Get out of the seat. Stand off to the side, or better, behind the meter and low. Your body is an absorber, and sitting in the seat next to the microphone will skew the surrounds in particular.
Check the noise floor before you start. Switch the meter on with nothing playing and read the room. A quiet living room sits around 30 to 40 dB. If it reads above about 50 dB — an HVAC cycle, a dishwasher, traffic — stop and wait. You need the test tone to be at least 20 dB above the noise floor for the reading to mean anything, and the 75 dB target does not leave much margin against a noisy room.
Search on Amazon →Recommended Product
Adjustable tripod or mic stand
Holding the meter by hand adds a couple of dB of error that varies with how you are standing. Any tripod that reaches 36–42 inches works.
- 7
Put the master volume at the receiver's reference point
You can match channels to each other at any volume — relative balance does not care. What the master volume position determines is whether your volume dial means anything afterwards.
The reference standard works like this: the pink-noise test tone a consumer receiver generates internally sits at −30 dBFS, and the film industry's calibration target is that a −20 dBFS tone produces 85 dB SPL at the seat. Ten dB down from that gives 75 dB, which is why 75 is the number every consumer calibration guide uses. Calibrate to 75 dB with the volume at reference and your receiver's dial becomes an absolute scale: 0 dB is the level the film was mixed and monitored at, −10 dB is ten decibels below it, and a mixing decision made on a dub stage reaches you intact.
Finding reference on your receiver:
- Relative scale (most Denon, Marantz, and Yamaha receivers, displaying values like −40.0 dB): reference is 0.0 dB. That is loud — it is meant to be.
- Absolute scale (0 to 100, common on Onkyo and Integra): reference is usually around 82. Check the manual rather than guessing.
- Some receivers ignore the master volume entirely during the channel-level test tone. If you raise the volume and the meter reading does not move, that is what is happening, and it is fine — just match every channel to the same number and accept that your dial's reference point lands wherever the receiver put it.
Before you run the tones, switch off every loudness feature: Dynamic EQ, Dynamic Volume, Audyssey Dynamic anything, Yamaha's YPAO Volume, Onkyo's Music Optimizer, and any night or dialogue-enhancement mode. Those features apply level changes that vary with the volume setting, and calibrating through them bakes their compensation into your trims. You can turn them back on in step 10.
- 8
Match every channel to 75 dB
Open the receiver's channel-level menu and start the internal test tone. It will step through each channel in turn, or let you select one at a time — either is fine, but go around the full circle at least twice, because adjusting one channel changes nothing about the others and you will still find yourself second-guessing the first one you did.
For each channel: let the meter settle for two or three seconds on Slow, then adjust the channel's trim until it reads 75 dB. Within ±0.5 dB is plenty. Then move on.
What the trim values tell you when you are done:
Trim required What it means Within ±3 dB Normal. Speaker sensitivity and placement differences, nothing to investigate. ±3 to ±6 dB Worth a look. Usually a sensitivity mismatch between a center or surrounds and the mains. ±6 to ±10 dB Something is off — a speaker much closer or further than the others, a much less sensitive model in the array, or a boundary effect from a wall or corner. Beyond ±10 dB, or the trim runs out of range A real fault. Check for a disconnected wire, a bi-wire jumper left off, an amp channel not assigned, or a speaker wired out of phase. Most receivers offer roughly ±12 dB of trim. Running out of it is a diagnosis, not an inconvenience. A speaker that needs +11 dB usually is not getting proper drive; a speaker that needs −11 dB is often a powered or much higher-sensitivity model in a mismatched set. Speaker sensitivity explained covers why two speakers fed the same signal can differ by 6 dB or more.
Three channel-specific notes:
- Dipole and bipole surrounds fire away from the seat by design, so the meter sits in a partial null and reads a few dB low. Set them to 75 anyway, then trust your ears over a couple of films — if the surrounds feel too present, take 1 to 2 dB back off.
- The center channel is worth being slightly generous with. Set it to 75 like everything else first. If dialogue is still hard to follow afterwards, the fix is usually not a trim — see why you can't hear movie dialogue and whether you need a center channel at all.
- Height and ceiling channels read high if you aim the meter at them, which is precisely the mistake step 6 is guarding against. Keep the microphone vertical. Our Atmos height speaker comparison covers what to expect from each type.
- 9
Set the subwoofer level last
Leave the subwoofer for the end, because it is the one channel where the target is a starting point rather than an answer.
Run the subwoofer test tone and trim it to 75 dB on the meter, C-weighted, Slow, exactly like the other channels. This is the technically correct calibration: the LFE channel is recorded 10 dB below the other channels and reproduced with 10 dB of gain, giving it 115 dB of peak headroom against each main channel's 105 dB, and your receiver already accounts for that internally. If your receiver's manual specifies a different target for the subwoofer test tone, follow the manual.
Then, knowing you are deviating from the standard, adjust to taste. Most people running a home theater end up somewhere between +2 and +4 dB above reference for movies, because 75 dB flat is measured at a cinema reference volume that almost nobody actually uses at home, and at −20 or −25 on the dial the perceived bass falls off faster than the midrange does. This is a legitimate preference, not a mistake — just make it deliberately, and note the offset so you know what you changed.
Two more things:
- With two subwoofers, level-match each one individually to 75 dB with the other unplugged, then run both. The pair will read roughly 3 to 6 dB higher than either alone, so re-trim the pair back down to your target afterwards.
- If your subwoofer needs its gain knob near maximum to reach 75 dB with the receiver's trim at 0, you are running out of subwoofer. If it needs the knob near minimum, you have headroom to spare. Aim for the sub's gain knob somewhere in its middle third with the receiver trim near zero, which leaves room to adjust in both directions later.
- 10
Verify with real content, then protect the settings
Test tones prove the numbers. Content proves the calibration.
Play something you know well — a film with a dialogue-heavy scene, a pan across the front stage, and a scene with real low end. Sit in the primary seat at a normal listening volume and check three things:
- Dialogue should come from the screen, not from a box below it. If you can localise the center speaker as a separate object, the center distance is usually wrong.
- A pan across the front should be continuous, with no lurch or hole in the middle. A hole between center and mains is a distance problem; an uneven sweep is a level problem.
- Bass should feel attached to the picture, arriving with the event rather than a beat behind it. Late bass is the subwoofer distance from step 5.
Then protect what you did:
- Turn the loudness features back on if you want them — Dynamic EQ and its equivalents are genuinely useful below reference volume. Turn them on after calibration, never before.
- Write the numbers down. Every distance, every trim, the subwoofer gain knob position, and the phase switch position. A firmware update, a power surge, or a factory reset will take all of it, and re-deriving it from memory is miserable.
- Save to a preset if your receiver has one. Many mid-range and higher receivers store multiple speaker configurations, which also lets you keep a movie calibration and a music calibration side by side.
- Re-check after any physical change. New speaker, moved couch, subwoofer relocated, room rearranged. Re-measuring two numbers takes ten minutes.
Where this fits
Manual level and distance calibration is the middle of a three-part sequence, and doing it out of order wastes the effort:
- Placement first. No trim value fixes a subwoofer in the wrong corner or surrounds pointed at a wall. Start with subwoofer placement and, if you are building from scratch, the 5.1 setup guide.
- Bass management second. Sizes and crossovers change what the meter reads, so they have to be settled before levels — how to set your speaker crossover frequency.
- Levels and distances third — this guide. Whether you set them by hand or let auto-calibration set them, verify them.
If your receiver has room correction, run it and verify it. Running Audyssey properly covers the Denon and Marantz process end to end, and Audyssey vs. Dirac vs. YPAO explains what each system actually corrects — the levels and distances they set are exactly the numbers this guide teaches you to check.
Common questions
Do I need to redo this if I add an Atmos height layer? Only for the new channels. Existing distances and trims do not change when you add speakers, though you should re-verify the surrounds if you physically moved them. Optimising an AV receiver for Atmos covers the channel assignment side.
My receiver only lets me set distance in metres. Same method, different units: sound travels about 343 metres per second, so one metre is about 2.9 milliseconds. Measure in metres and enter metres — do not convert by hand and introduce a rounding error.
Can I calibrate for two seats? Not really. Levels and distances are correct for exactly one position, and every other seat is a compromise. Calibrate for the primary seat, then check the secondary seats and accept what you hear. If the whole row has to work, that is a placement and room-treatment problem rather than a calibration one.
Is 75 dB going to be uncomfortably loud? The tone at 75 dB is about as loud as a vacuum cleaner in the next room — conversational. The reference volume setting it implies is a different matter: actual film content at 0 dB on the dial peaks far above that. Calibrate at reference, then listen wherever you like.
Related reading
- Where to place a subwoofer — the placement decision that sets the ceiling on everything a trim control can do
- The 80 Hz crossover, explained — why one number became the default, and when to move it
- Speaker sensitivity in dB, explained — why one speaker needs +6 dB of trim and the one beside it does not
- Dolby Atmos vs. DTS:X — what the object-based formats do with the channels you just calibrated
- How to wire speakers with banana plugs — if step 8 turned up a channel that is not getting proper drive
- Receivers we have tested that make this easier: the Denon AVR-X2800H, the Marantz Cinema 70s, and the Onkyo TX-NR6100