How to Set Up a 5.1 Surround Sound System
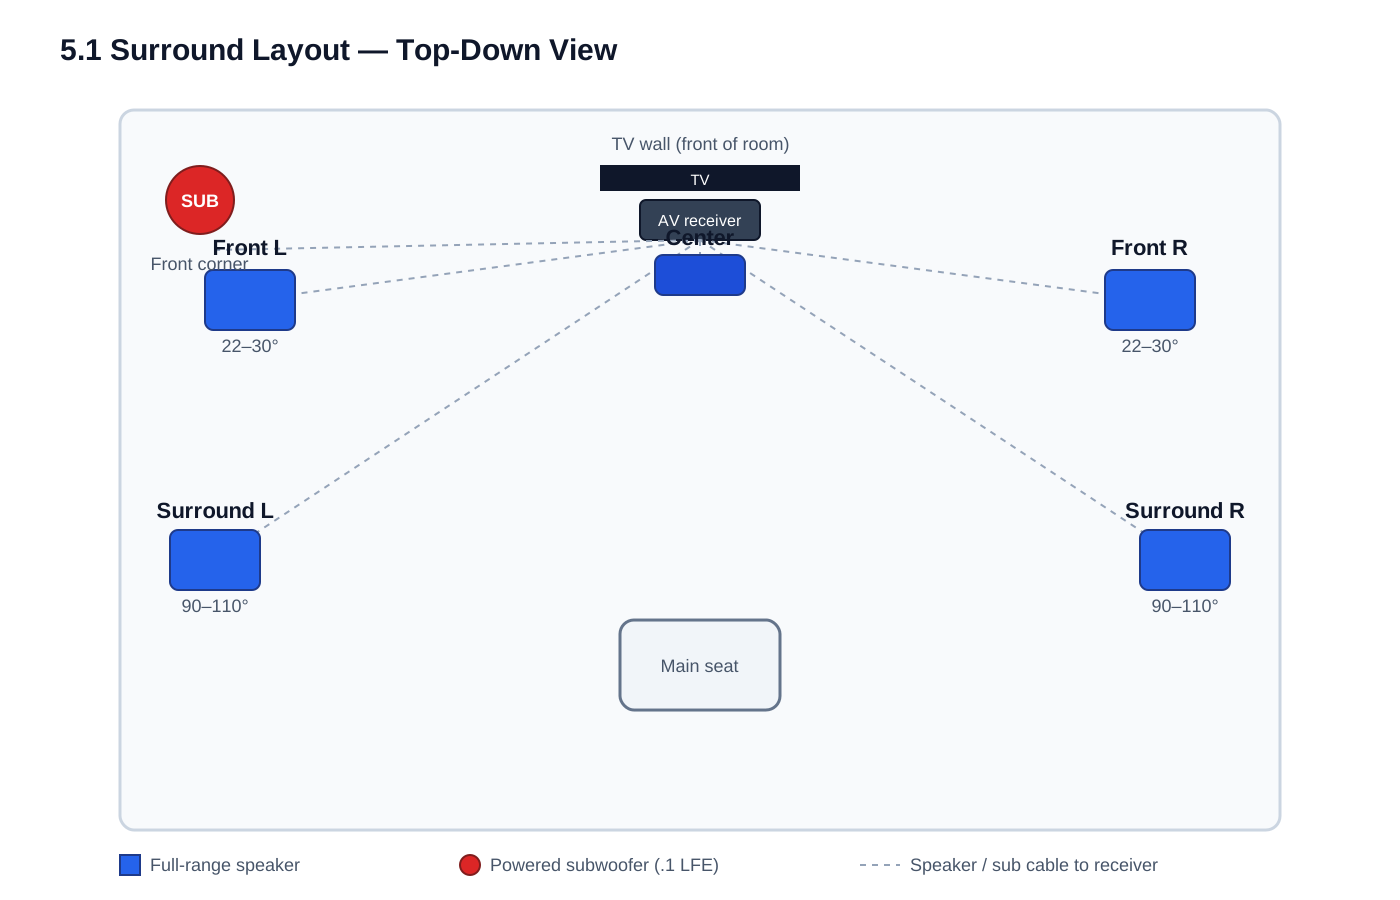
A 5.1 surround sound system is the baseline of real home theater: five speakers placed around the room plus one subwoofer, fed by an AV receiver that splits a movie's soundtrack into discrete channels so dialogue anchors to the screen, effects move around you, and bass shakes the couch. It is the format almost every Blu-ray, streaming service, and game console encodes for, it is dramatically better than any soundbar at placing sound in space, and — this is the part most people miss — it costs far less in performance to get the placement and calibration right than it does to buy more expensive speakers. A mid-priced 5.1 set positioned and calibrated correctly will out-perform a premium set dumped wherever the furniture allowed. Budget two to four hours the first time through — most of it spent on placement and calibration, not wiring — and you'll need only a tape measure, a little patience, and a willingness to move a subwoofer around the floor before you commit to where it lives.
What you’ll need
- AV receiver with at least 5.1 channels and HDMI eARC
- Front left and right speakers (bookshelf or tower)
- Center channel speaker
- Two surround speakers
- Powered subwoofer
- Speaker wire (14 or 16 AWG oxygen-free copper) and banana plugs
- One subwoofer RCA cable and one HDMI 2.1 cable
11-Step Overview
- 1
Understand what 5.1 actually is
Before you place anything, know what each of the six pieces does, because the names describe jobs, not just positions. The "5" is five full-range speakers, each fed a separate channel. The front left and front right carry the music, the score, and most on-screen effects, and together with the center they form the front soundstage. The center channel is the hardest-working speaker in the system: it reproduces the vast majority of dialogue, so it has to be clear and tonally matched to the fronts or voices will change character every time an actor moves across the screen. The surround left and surround right sit beside and behind you and carry ambience and moving effects — rain, a passing car, a spaceship crossing the room — that place you inside the scene. The ".1" is the subwoofer: a fractional channel called LFE (Low-Frequency Effects), a dedicated low-bass track for explosions, rumble, and impact. The sub also picks up the deep bass the receiver redirects away from the five main speakers (more on that crossover in Step 10). The mental model: five speakers place sound in a circle around you, and one subwoofer — which your ear can't easily locate — fills in the deep bass for the whole room.
- 2
Choose your receiver, speakers, and subwoofer
The AV receiver is the brain and the muscle: it decodes the surround soundtrack, powers the five speakers, and switches your video sources. Buy a receiver with at least 5.1 channels (most entry receivers today offer 7.2, leaving room to add height or rear speakers later) and, critically, HDMI with eARC so it can receive full-quality audio back from a modern TV's apps. For speakers, the single most important rule is timbre matching: the front left, center, and front right should be from the same brand and product line so a sound panning across the front doesn't change color as it crosses the center. Buy a matching center from the same series as your fronts — the most common corner people cut and the one that hurts dialogue most. Fronts can be bookshelf or tower; a good subwoofer makes bookshelves entirely viable for 5.1. Surrounds can be smaller but should ideally match the brand. The subwoofer should be powered (active) — it has its own amplifier — and sized to your room: a sealed sub is tighter and more accurate, a ported sub goes louder and deeper for the money. Avoid a passive "surround in a box" HTIB kit if you can; separate components you place yourself beat it and upgrade piece by piece.
Check Price on Amazon →Recommended Product
Denon AVR-S770H (7.2-channel, 8K, Audyssey)
A well-priced entry receiver that does everything a 5.1 build needs and then some: 7.2 channels (so you can grow into 5.1.2 Atmos later), HDMI 2.1 with eARC, 8K/60 and 4K/120 passthrough, and Audyssey MultEQ room correction. It decodes Dolby Atmos and DTS:X, so nothing about it limits you to 5.1 down the road.
- 3
Plan the room around the main seat
Surround sound is defined from one point: the main listening position (MLP), the seat you actually watch from. Every placement decision below is measured from that seat, so decide where you sit and build the circle of speakers around it. The two goals are symmetry and correct angles. Symmetry means the left and right speakers are mirror images relative to the seat — same distance, height, and toe-in — because your ears detect left/right timing differences of a fraction of a millisecond, and an asymmetric setup pulls the whole soundstage toward the closer speaker. For angles, Dolby's reference layout for 5.1, measured from the seat with the screen at 0 degrees, is: front left and right at 22–30 degrees off-center, center at 0 degrees directly ahead under the screen, and surrounds at 90–110 degrees — roughly to the sides of the seat and slightly behind it. Keep the front three roughly equidistant from the seat. Avoid seating anyone with their head against a back wall, where bass builds up and the surround effect collapses. If the room forces compromises, prioritize symmetry of the fronts, then a correctly placed center, then subwoofer position, then surrounds — the surrounds are the most forgiving of imperfect placement.
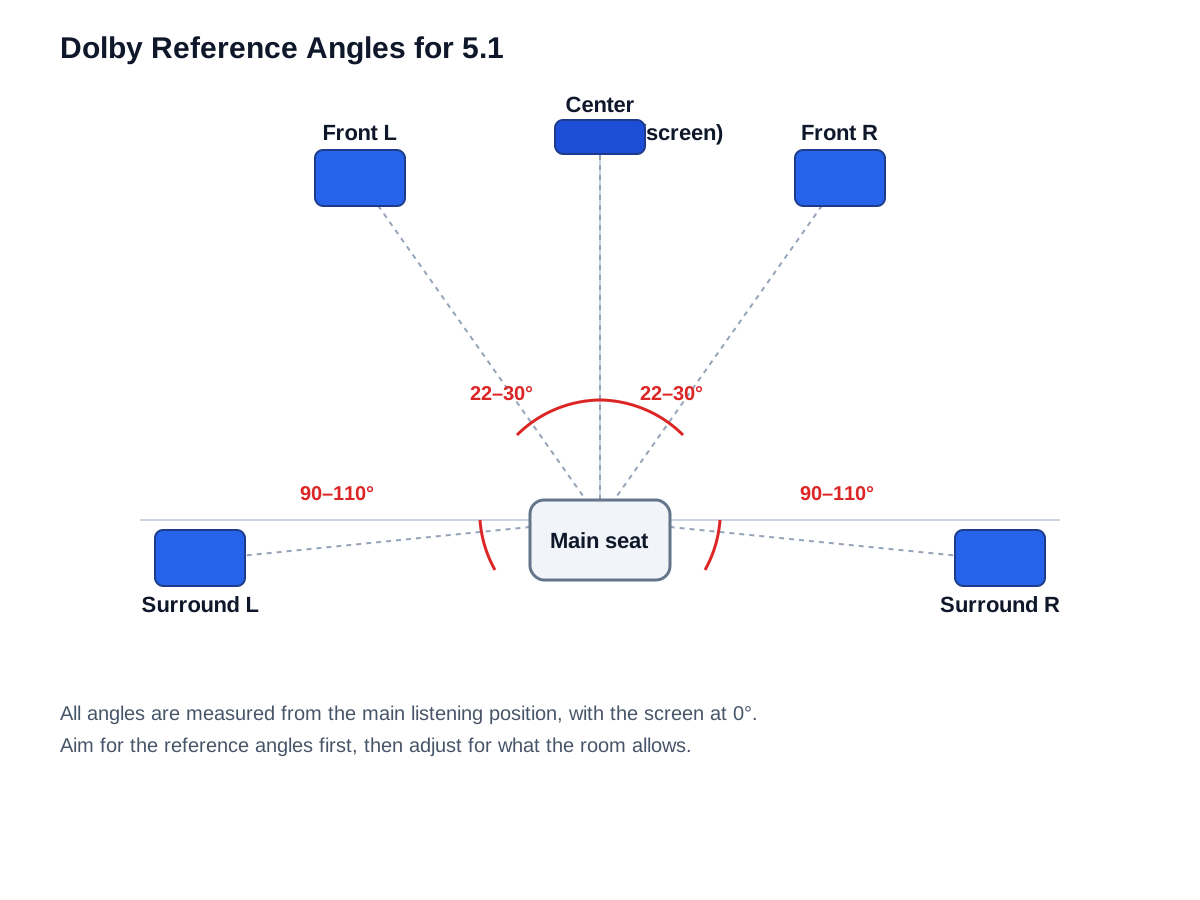
Dolby's reference angles for 5.1, measured from the main seat: fronts at 22–30°, surrounds at 90–110°. Aim for the angles first, then adjust for what the room allows. - 4
Position the front left, center, and right
Place the front left and right an equal distance from the main seat, spread so they sit at 22–30 degrees off-center, and toe them inward so each is aimed roughly at the seat (a good start is aiming them so their axes cross just behind your head). The tweeter should be at seated ear height — about 36–38 inches from the floor for most sofas — because the high frequencies that carry detail and localization are the most directional. If you're using bookshelf speakers, put them on stands or a shelf that hits that height; setting them flat on low furniture dulls the treble and smears the imaging. Keep rear-ported fronts a few inches to a foot from the wall behind them to keep bass from getting boomy. The center channel is the anchor for dialogue, so place it directly below the TV (or above, if below isn't possible), centered horizontally with the screen and aimed at the listeners — if it sits low in a cabinet, tilt it up toward ear height with a wedge or angled stand. Keep its front baffle roughly in line with the fronts, not recessed deep into a cabinet, so all three arrive at your ears together. Most importantly, the center should be the same brand and line as your fronts so voices don't change tone as they pan.
Check Price on Amazon →Recommended Product
Klipsch Reference Premiere RP-504C II center channel
A dedicated horn-loaded center built to match Klipsch's Reference Premiere line, so it timbre-matches RP-series bookshelf and tower fronts. Its horn tweeter keeps dialogue forward and intelligible even at low late-night volumes, and its four woofers give it output to keep up with tower mains. If your fronts are a different brand, buy the matching center from that brand's lineup instead — matching trumps any single-speaker spec.
- 5
Position the two surround speakers
The surrounds create the sense of being inside a scene rather than watching it from the front. For a 5.1 system, place them to the sides of the main seat and slightly behind it, at that 90–110 degree angle — not on the front wall, and not directly behind the seat (that's where rear speakers go in a 7.1 system). Raise them about 2 feet above seated ear height (roughly 6 feet from the floor) and angle them down toward the listening area; elevating and aiming them keeps the surround effect diffuse and enveloping rather than pinpointing the speaker, and it gets them above head height so they clear people on the couch. Wall-mounting is the usual solution, and most surround speakers include a keyhole mount or accept a bracket. Symmetry matters here too: put the left and right surround at the same height and distance from the seat. If you genuinely cannot get speakers beside and behind the seat — an open floor plan, a sofa against the back wall — mounting them high on the back wall firing forward is a reasonable compromise, and still vastly better than no surrounds. Bipole/dipole surrounds exist for difficult side placements, but standard bookshelf speakers work fine and keep the set timbre-matched.
Check Price on Amazon →Recommended Product
Klipsch Reference Premiere RP-600M II bookshelf (pair)
A strong, efficient bookshelf that works as front left/right or as surrounds, and buying the same model for both keeps the whole system timbre-matched — a coherent choice for a Klipsch-based 5.1 build. Sold as a matched pair, so one order covers both surround channels.
- 6
Place and dial in the subwoofer
The subwoofer's location changes its sound more than any other speaker, because deep bass interacts with the room's dimensions to create peaks and nulls — spots where bass piles up and spots where it cancels out. A common starting point is a front corner, which maximizes output, or along the front wall, which often smooths response at the cost of some level. But the reliable way to find the best spot is the subwoofer crawl: temporarily put the subwoofer up on the main seat, play a track with strong, continuous bass, then crawl slowly around the room's perimeter at floor level with your ear near the ground. Wherever the bass sounds smoothest and most even — not just loudest — is where the sub will sound best when you put it there. It feels silly; it works, because sound is reversible. Once the sub is placed, don't stuff it tight into a cabinet or behind heavy drapes, and keep its port (if it has one) clear of walls per the manufacturer's spacing. Two smaller subs placed asymmetrically smooth bass across multiple seats far better than one large sub, but that's an upgrade, not a requirement. For now, leave the sub's volume knob around halfway and its own crossover control turned all the way up (bypassed) or set to "LFE" — the receiver will manage the crossover.
Check Price on Amazon →Recommended Product
SVS SB-1000 Pro sealed subwoofer
A compact sealed 12-inch sub that punches well above its cabinet size, with a 325-watt (1000-watt peak) amplifier and a smartphone app for tuning level, phase, and parametric EQ once it's placed. Sealed means tight, accurate bass that blends cleanly with movies and music alike — an ideal single-sub anchor for a 5.1 room. If you want more low-end slam for the money and have the space, a ported sub trades some tightness for output.
- 7
Run and connect the speaker wire
With placement settled, wire each of the five speakers back to its matching channel on the receiver. Use 14 or 16 AWG oxygen-free copper speaker wire (16 AWG is fine for runs under about 25 feet; step up to 14 AWG for longer surround runs), and label both ends of every cable as you pull it so you don't have to trace a mystery wire behind furniture later. On the receiver's back panel you'll find five pairs of binding posts labeled Front Left, Center, Front Right, Surround Left, and Surround Right, each with a red (positive) and black (negative) terminal. Wire every channel with consistent polarity: the marked conductor to the red terminal at both the receiver and the speaker, the unmarked conductor to black. One reversed channel won't fail loudly — it will quietly hollow out the sound and smear the imaging, which is maddening to diagnose later, so get it right now. Terminating the wire with banana plugs makes these connections fast, secure, and easy to redo: strip the wire, twist the strands tight, clamp them into the plug, and push it straight into the center of the binding post — no stray copper whiskers, red to red, black to black, on all five channels. Do not connect the subwoofer here; a powered sub does not use speaker wire from these posts (that's the next step). Leave a service loop of slack behind the receiver so you can pull it out without yanking a connection loose.
- 8
Connect the subwoofer, TV, and sources
The subwoofer connects differently from the five speakers: it's powered, so it takes a line-level signal, not speaker wire. Run a single RCA subwoofer cable from the receiver's Subwoofer Pre-Out (sometimes labeled "SW" or "LFE") to the LFE input on the back of the powered sub. If the sub has two inputs, use the single LFE/mono input when your receiver has one sub out; that passes the full LFE channel without the sub applying its own crossover. Then plug the sub into wall power — that one cable plus power is the entire subwoofer connection. For video and sources, route everything through the receiver over HDMI. Connect the TV to the receiver's HDMI output labeled eARC/ARC with a high-speed HDMI cable — this single link lets the TV send audio from its built-in apps back to the receiver in full quality and lets the receiver control TV volume. Then plug your source devices — streaming box, 4K Blu-ray player, game console — into the receiver's HDMI inputs so their video passes through to the TV and their audio is decoded by the receiver. In the TV's settings, enable HDMI-CEC (Bravia Sync, Anynet+, Simplink, Viera Link depending on brand), set the audio output to the eARC/receiver, and choose the "auto"/"passthrough"/"bitstream" audio format rather than PCM so it sends the original Dolby/DTS surround track. If dialogue is only coming from the TV speakers, the TV audio output is still set to internal — fix it there.
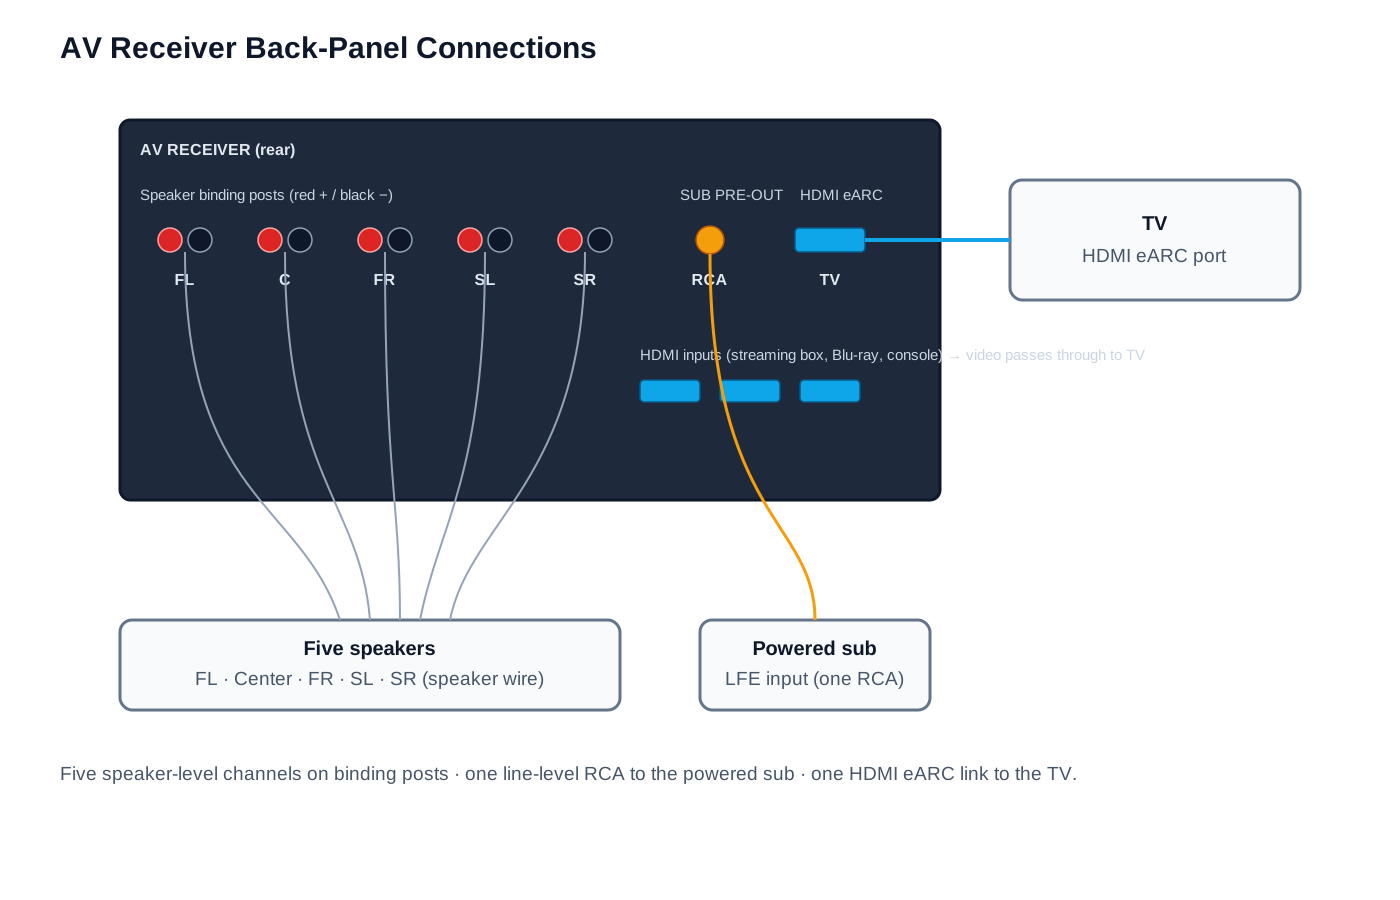
How it all lands on the receiver: five speaker-level channels on binding posts, one line-level subwoofer cable to the powered sub, and a single HDMI eARC link to the TV. - 9
Run automatic room correction
This is the step that separates a coherent surround field from a pile of speakers, and it's mostly automated. Every modern receiver ships with a calibration microphone and a routine — Audyssey (Denon/Marantz), YPAO (Yamaha), MCACC (Pioneer), or Dirac Live (higher-end models). Plug the supplied microphone into the receiver's setup/calibration jack and place it at the main listening position, at seated ear height, pointing straight up — a camera tripod or a stack of books works better than holding it, because a still, correctly positioned mic is the whole point. Silence the room (fridge, HVAC, fans off) and start the routine from the on-screen setup menu. The receiver sends test tones — sweeps, chirps, or pink noise — to each speaker in turn and listens through the mic. It automatically figures out which speakers are connected, measures the distance to each so it can time-align them to your seat, sets the relative level of each channel so they're equally loud at the seat, and measures the room's frequency response to EQ the biggest peaks and dips. Most routines ask you to move the mic to several positions around the seating area and measure at each — do all of them; the multi-position average is what makes the correction robust across the whole couch rather than one precise point. When it finishes, save/accept the results, and read the results screen first — some routines flag a speaker wired out of phase.
- 10
Set crossover, speaker size, and levels
Room correction gets you most of the way; a few manual settings finish the job. The most important is the crossover — the frequency below which bass is redirected from a speaker to the subwoofer. In the receiver's speaker setup menu, set each speaker's size to "Small" (this tells the receiver the speaker isn't meant to reproduce deep bass) and set the crossover to 80 Hz as the standard starting point. This routes everything below 80 Hz — which your ears can't localize anyway — to the subwoofer, freeing the smaller speakers from struggling with bass they can't handle cleanly and letting them play louder with less distortion. Setting speakers to "Large" (full range) is a common mistake that leaves bass thin and muddy; "Small" with an 80 Hz crossover is the right default for almost every 5.1 system, and you can raise the crossover to 100–120 Hz for very small satellite speakers. While you're in the menu, confirm the auto-calibration looks sane: the measured distances should roughly match a tape measure from each speaker to the seat, and the channel levels should be within a few dB of each other. If the automatic subwoofer level came out timid — many routines set it conservatively — nudge it up a few dB to taste; a small boost of 2–4 dB over the flat measurement is a common and pleasing choice. Leave any "Dynamic EQ"/loudness feature on if you often watch at low volumes; it compensates for how the ear loses bass and treble at quiet levels.
- 11
Test with real content and fine-tune
Finally, verify the system with material you know well before you call it done. Start with a movie scene with clear dialogue and directional effects — a conversation should come cleanly and specifically from the center speaker (if voices float above or beside the screen, the center isn't set right or the level is off), and panning effects like a vehicle crossing the frame should move smoothly from front to surround without a hole in the middle. Play a scene with heavy bass and confirm the subwoofer integrates — you should feel impact without the bass sounding like it's coming from one boomy corner; if it is, revisit the sub placement from Step 6 or trim the sub level. Then play stereo music (set the receiver to a straight stereo or "Direct" mode): the front left and right should throw a solid, centered phantom image between them, confirming the fronts are symmetric and in phase. If something's off, work the usual suspects in order: no sound from a speaker (check its wire at both ends and its assignment in the setup menu), dialogue too quiet relative to effects (raise the center level a couple dB or enable a dialogue-enhancement feature), surrounds barely audible (confirm they're not set low, and remember 5.1 surrounds carry ambience, not constant sound), or bass boomy at one seat (a placement issue the crawl in Step 6 addresses). Small manual tweaks after the automatic calibration are normal and encouraged — the calibration gets you a correct baseline, and your ears set the final balance. Once dialogue is clear, effects move around you, and bass is even across your seats, the system is done.