Room Treatment Explained: First Reflection Points, Bass Traps, and What Actually Helps
Published 2026-10-08 · By NetAudioHub Editorial
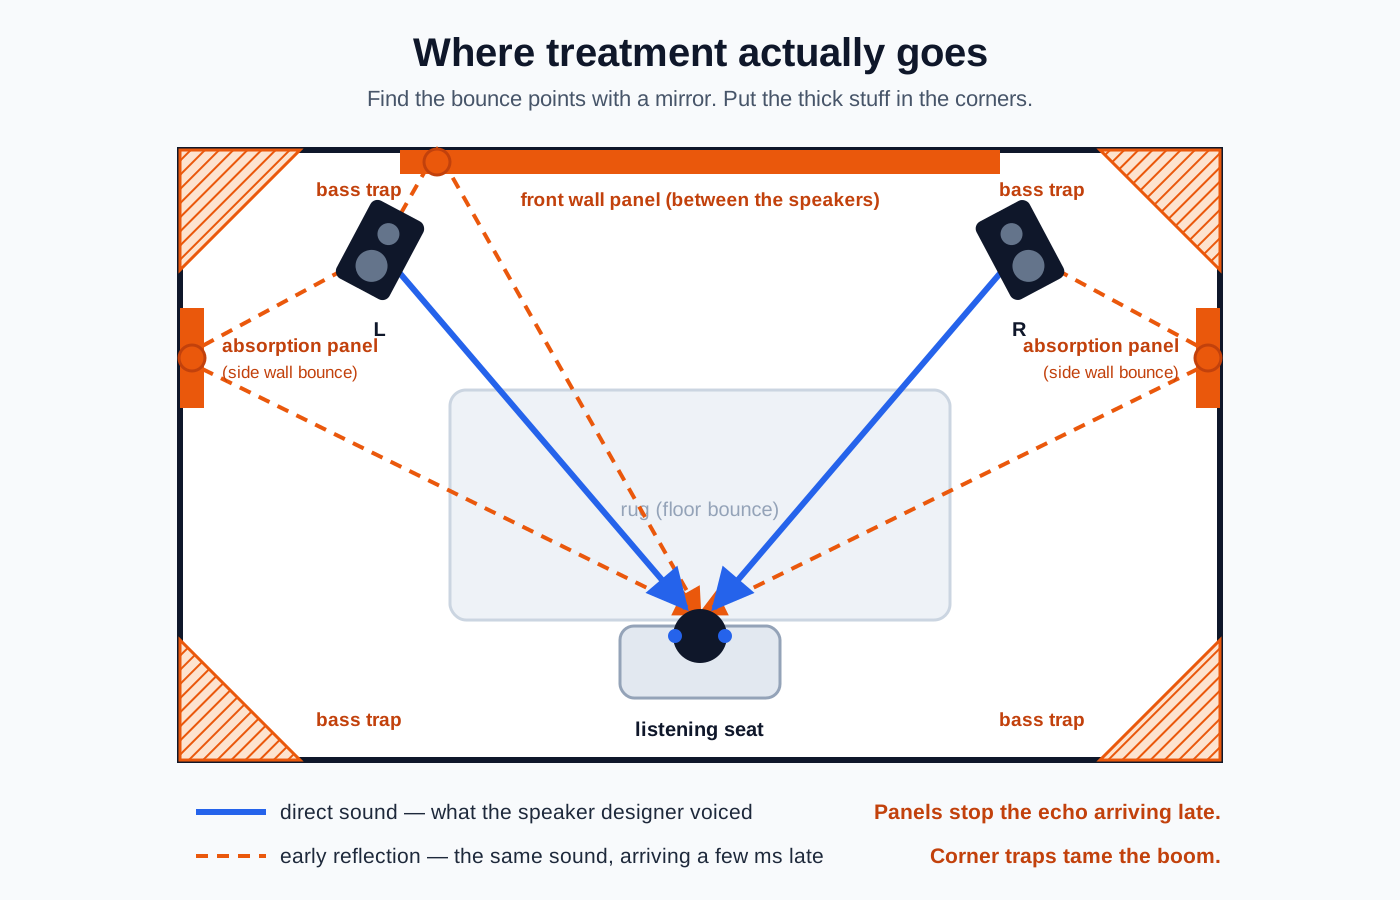
Every review, calibration guide, and placement post eventually says the same thing: treat your room. Almost none of them explain what that means. Room treatment is not soundproofing, it is not foam wedges from a marketplace listing, and it is not something you need a dedicated basement theater to benefit from. It is the practice of controlling two specific problems — early reflections that smear your imaging and dialogue, and room modes that make bass boomy in one seat and thin in the next. This guide covers what your room is actually doing to the sound, how to find the exact spots on your walls that matter using a hand mirror, how thick a panel has to be to absorb the frequencies you care about, why bass traps live in corners, and the order to buy things in so the first $150 does the most work.
The verdict up front: room treatment is about controlling two problems, and only two. The first is early reflections — sound that leaves your speakers, bounces off a nearby wall or the ceiling, and reaches your ears a few milliseconds after the direct sound, blurring the stereo image and making dialogue harder to follow. You fix those with absorption panels placed at the specific bounce points you can find with a hand mirror in about five minutes. The second is room modes — standing waves below roughly 200 Hz that make bass thunderous at one seat and missing at the next. You fix those with thick bass traps in the corners, or by adding a second subwoofer. What treatment is not: soundproofing. Acoustic panels do essentially nothing to stop sound leaving the room or your neighbor's music entering it — those are completely different problems with completely different solutions. Done in the right order, the first two or three hundred dollars of treatment changes what your system sounds like more than the same money spent on almost any component upgrade.
Treatment Is Not Soundproofing
This is the single most common misunderstanding in home audio, and it costs people money every day.
Acoustic treatment controls how sound behaves inside a room. Panels absorb sound energy that is already in the room so it stops bouncing around. That is what changes what you hear from the listening seat.
Soundproofing stops sound from passing through a boundary — a wall, a floor, a door. It is a construction problem, solved with mass, decoupling, damping, and airtight seals: extra layers of drywall, resilient channel, Green Glue, solid-core doors, sealed gaps. It is expensive, disruptive, and usually only worth doing during a build or renovation.
Hanging fabric-wrapped panels on your wall will not keep bass out of the bedroom above. Nothing you can hang on a finished wall will. If your goal is to stop annoying the household, the honest answers are lower volume, a subwoofer on isolation feet, and scheduling — not panels.
Everything below is about treatment. If you actually need soundproofing, that is a contractor conversation, not a shopping list.
What Your Room Is Doing to the Sound
At the listening seat, you are hearing two things layered on top of each other.
Direct sound travels in a straight line from the speaker driver to your ear. This is the part the speaker designer voiced, measured, and sold you on.
Reflected sound leaves the speaker at an angle, bounces off a surface, and arrives a moment later. In an untreated room, reflected energy can easily be most of what reaches your ears. Your speakers are not producing the sound of your system — your room is.
Reflections are not automatically bad. The problem is the ones that arrive very early, because your hearing cannot separate them from the direct sound.
- Early reflections (roughly 1–15 ms after the direct sound) come from nearby surfaces: side walls, ceiling, floor, the wall behind the speakers, a coffee table, a big TV. Your brain fuses them with the direct sound instead of hearing them as echoes. The result is smeared imaging (instruments and effects stop occupying a precise spot), a shifted tonal balance, and reduced clarity — the same clarity your center channel needs to keep dialogue intelligible.
- Later reflections (beyond about 20 ms) are perceived as room ambience or reverb. In a small domestic room these are usually mild and often pleasant. This is why a huge, echoey, tile-and-glass room sounds bad while a normal furnished living room sounds acceptable.
- Room modes (below roughly 200 Hz) are a different mechanism entirely. Bass wavelengths are large compared to your room — a 50 Hz tone is about 22 feet long — so instead of behaving like rays that bounce, low frequencies set up standing waves between parallel surfaces. At some spots those waves reinforce and bass booms; at others they cancel and bass disappears. This is why the same subwoofer sounds completely different one seat over.
Two problems, two frequency ranges, two different tools. Almost every treatment mistake comes from applying the wrong tool to the wrong problem.
The Three Tools, and What Each One Is For
| Tool | What it does | Where it goes | What it fixes |
|---|---|---|---|
| Broadband absorption panel | Converts mid and high frequency sound energy into a tiny amount of heat inside porous material | First reflection points on side walls, ceiling, front wall between the speakers | Smeared imaging, harsh treble, muddy dialogue, slap echo |
| Bass trap | Same principle, but much thicker and placed where low-frequency pressure is highest | Room corners — wall/wall, and especially wall/wall/ceiling tri-corners | Boomy or uneven bass, one-note bass, long bass decay |
| Diffusion | Scatters a reflection in many directions instead of absorbing it, preserving energy and a sense of space | Rear wall, or side walls in a wide room, at least 6–8 feet from the listener | A room that sounds dead or claustrophobic after heavy absorption |
For a typical living room or small dedicated theater, absorption and bass traps are the entire job. Diffusion is a refinement, not a starting point — it needs distance to work properly, and most domestic rooms are already partly diffusive thanks to bookshelves, furniture, and irregular walls.
Finding Your First Reflection Points: The Mirror Trick
This is the highest-value five minutes in the whole process, and it costs nothing.
- Sit in your normal listening seat. Not standing, not leaning — the actual seat, at the actual ear height. If you have not set your seating position yet, do the speaker placement and listening triangle work first, because every reflection point moves when the speakers or the seat move.
- Have a second person slide a hand mirror flat along the left side wall, roughly at ear height, while you stay seated and look at it.
- Wherever you can see the face of the left speaker's drivers in the mirror, mark that spot with painter's tape. That is a first reflection point — sound is bouncing off exactly there and arriving at your ears.
- Repeat on the right wall for the right speaker.
- Repeat on the ceiling. Slide the mirror flat across the ceiling between speaker and seat; the point where you see each speaker is the ceiling bounce, usually roughly a third to halfway between the speaker and the seat.
- Check the front wall between and behind the speakers, and the floor. The floor bounce is real, and a thick rug with padding handles it.
Do it once with the room lights up and it takes minutes. Those five or six taped spots — two side wall, two ceiling, one front wall area, one floor — are where your first panels go, in that order of importance. Everything else on the wall is decoration.
If you run a surround setup, the same logic applies to your surround and height speakers, but with much lower priority. The front three channels do the overwhelming majority of the work, especially the center — which is exactly why untreated first reflections show up as the dialogue intelligibility problem people usually try to fix with settings menus.
Panel Thickness Is the Spec That Matters
Absorption is a function of thickness relative to wavelength. A porous absorber works best where it is at least a quarter of a wavelength thick, which means thin panels only touch high frequencies. This is why the thin foam tiles sold as room treatment are close to useless — they absorb the top two octaves, leave everything below untouched, and produce a room that is dull on top and just as muddy in the midrange.
| Panel thickness | Effective down to (roughly) | Practical use |
|---|---|---|
| 1 inch foam or fabric | ~1,000 Hz and above | Kills sparkle, fixes almost nothing. Skip it. |
| 2 inch mineral wool or fiberglass | ~400–500 Hz | The realistic minimum for first reflection points |
| 4 inch mineral wool or fiberglass | ~200–250 Hz | The right choice for first reflections in a serious room |
| 4 inch panel with a 2–4 inch air gap behind it | ~125–150 Hz | Best value trick in acoustics — the gap buys you low end for free |
| 6+ inch corner trap, or a corner filled solid | ~60–80 Hz and below | Bass trapping |
Two practical notes. First, an air gap behind the panel is nearly free extra absorption — mounting a 2-inch panel on 2-inch standoffs performs close to a 4-inch panel through much of the midrange, because absorption depends on air particle velocity, which is highest away from the wall surface. Second, density matters less than people think once you are in the normal range. Mineral wool around 8–10 lb/ft³ (Rockwool Rockboard 60, Owens Corning 703) or the widely available Rockwool Safe'n'Sound work well. Extremely dense material actually absorbs less at low frequencies, not more.
If you are buying rather than building, look for panels described by their core material and thickness, not by decorative shape. There is a wide range of ready-made acoustic panels available, and the useful ones state a real thickness in inches and a mineral wool or fiberglass core. Anything advertised primarily as a wedge, pyramid, or "soundproofing kit" is not going to do the job described above.
Bass Traps Go in Corners, and Here Is Why
Room modes are pressure phenomena. At a room boundary, air particle velocity goes to zero and pressure goes to maximum — and in a corner, where two or three boundaries meet, pressure is at its highest for every mode in the room simultaneously. That makes corners the one location where a single absorber can affect all the low-frequency problems at once.
This has three consequences worth knowing:
- Corner placement beats wall placement for bass, by a lot. The same volume of material does far more work stacked floor-to-ceiling in a corner than spread flat across a wall.
- Thin "bass" foam does nothing. A 2-inch foam wedge in a corner does not meaningfully touch 60 Hz. Real bass trapping means thick — 6 inches and up, or a corner packed solid, which is where the DIY "superchunk" trap comes from.
- The wall/wall/ceiling tri-corners are the most effective single spots in the room, and they are usually the easiest to give up visually since nobody uses that space.
Bass trapping is also the treatment with the most competition from cheaper solutions. Before you buy bass traps, do the free and near-free things first: run the subwoofer crawl to find the best sub position, and seriously consider whether a second subwoofer is the better purchase. A second sub attacks modal unevenness across multiple seats in a way that a realistic amount of corner trapping cannot, and it usually costs less than enough trapping to match it. In most homes the order is: move the sub, add a second sub, then trap corners — not the reverse.
Sub design matters here too. A sealed subwoofer tends to excite modes a little more gracefully than a big ported box tuned low, which is one reason sealed subs get recommended for smaller, boomy rooms.
Priority Order: What to Do First
Treatment has sharply diminishing returns. The first few pieces do most of the work. This is the order that gets the most audible change per dollar in a normal room.
| Priority | What | Rough cost | Why it is here |
|---|---|---|---|
| 1 | Speaker and seat placement, subwoofer crawl | $0 | Changes more than any panel, and every reflection point depends on it |
| 2 | Thick rug with padding on the floor bounce | $50–200 | Handles a guaranteed reflection, and most rooms need one anyway |
| 3 | Two panels at side wall first reflection points | $80–200 | The single biggest imaging and clarity improvement |
| 4 | Two panels at ceiling first reflection points | $80–200 | Often the strongest remaining reflection, especially with a low ceiling |
| 5 | Corner bass traps, front corners first | $150–400 | Tightens bass and shortens decay; a second sub may beat this |
| 6 | Front wall panel between and behind the speakers | $60–150 | Cleans up the front soundstage |
| 7 | Rear wall absorption or diffusion | $100–300 | Only matters if the seat is close to the rear wall |
| 8 | Everything else | — | Diminishing fast |
Step 5 deserves its hedge. Before buying traps, price a second subwoofer against them — a sealed sub with real DSP does something absorption cannot, which is change where the room's modes get excited from. The SVS SB-1000 Pro is the cheapest we've reviewed that includes the parametric EQ and room-gain compensation that make the comparison worth running, at $599.
A living room that has steps 1 through 4 done is in genuinely good shape. Nobody needs to cover every wall, and covering every wall with absorption produces an unnatural, oppressive room that most people dislike within a week.
What Treatment Fixes That Room Correction Cannot
Modern receivers ship with Audyssey, Dirac, or YPAO room correction, and it is genuinely useful — but it is not a substitute for treatment, because the two operate on different domains.
Room correction works in the frequency domain, mostly at low frequencies, mostly at the measured positions. It adjusts levels, delays, and applies EQ so the measured response at the microphone gets closer to a target curve. That is very effective for taming a modal peak, matching subwoofer level and timing to the mains, and getting speaker distances right.
Treatment works in the time domain. An early reflection is the same sound arriving twice, a few milliseconds apart. EQ cannot subtract a delayed copy of a signal from a room. Turning down 3 kHz does not remove the side wall bounce — it just makes both the direct sound and the reflection quieter. Similarly, EQ can pull down a modal peak, but it cannot fill in a modal null, because at a cancellation point the energy is being destroyed by the room; boosting it just burns amplifier headroom.
The practical takeaway is a sequence, not a choice: place the speakers and sub, treat the reflections and corners, then run room correction last to clean up what physics left behind. Running correction first and treating later means the calibration is now wrong, so do it in that order — and re-run correction after any treatment change. If Audyssey is your system, the step-by-step calibration walkthrough covers the measurement side. Set your crossover points after correction, not before.
If you have added a height layer, note that overhead speakers depend on a ceiling bounce or a direct downward firing pattern, so be deliberate about ceiling absorption — treat the front ceiling reflection points for your main speakers, but do not blanket the ceiling directly above the seats in a 5.1.4 or 7.1.4 layout.
The Living Room Version
Most people are not building a dedicated theater, and a room full of black fabric rectangles is a nonstarter in a shared space. The good news is that ordinary furnishings do real acoustic work, and a normal living room that has been furnished thoughtfully can measure surprisingly well.
- A full, irregularly loaded bookshelf is a legitimate diffuser and partial absorber. Placed on the rear or side wall it is one of the best-looking treatments available.
- Heavy, pleated curtains hung a few inches off the wall absorb midrange and treble effectively. Pleating and the air gap both matter; flat, thin fabric pressed against glass does little.
- Upholstered furniture, especially fabric over foam, absorbs broadband energy. A leather sofa reflects noticeably more than a fabric one.
- A thick rug with a dense pad handles the floor reflection and is the easiest win in a hard-floor room.
- Art panels — printed fabric stretched over a mineral wool core — are treatment that looks like a picture. They cost more than plain panels, but they are the difference between treatment happening and not happening in a shared room.
- The speaker has placement requirements of its own. These are published and they constrain the room before any panel does: the Klipsch RP-600M II needs six or more inches of clearance behind it for its rear port, which rules out a flush shelf, and it is sensitive enough to listening axis that it wants toed-in stands rather than casual placement. Check the manual before you plan the furniture.
- Asymmetry is the enemy. If the left speaker is next to a bare wall and the right speaker opens into a hallway, the two channels reach you differently no matter what you do to the electronics. Treating the reflective side to match the open side is often the single most useful panel in a real house.
None of this replaces a proper panel at a first reflection point, but a furnished, rugged, curtained room with two panels at the side wall bounce points is already ahead of a bare dedicated room with a $3,000 receiver in it.
Common Myths
"Egg cartons work." They do not. They have neither the thickness nor the porosity to absorb anything meaningful, and the shape does not scatter at useful frequencies. They are a fire hazard with a good publicist.
"Foam is acoustic treatment." Thin open-cell foam absorbs above roughly 1 kHz and nothing below. Cover a room in it and you get a dark, dead top end sitting on top of the exact same midrange mud and bass problems you started with. Thickness, not shape, does the work.
"Panels will stop my neighbor hearing the movie." No. That is soundproofing, and it requires mass and decoupling in the structure. See the top of this article.
"More absorption is always better." No. Over-absorbed rooms sound unnatural and fatiguing, and they starve the room of the ambience that makes music sound alive. Treat the first reflection points and corners, then stop and listen before adding more.
"You need to treat the room before buying good speakers." Both matter, but treatment is cheaper per unit of improvement than a component upgrade at almost every budget level. A decent pair of bookshelves in a treated room reliably outperforms expensive towers in a bare one.
"Room correction makes treatment unnecessary." Correction cannot remove a reflection or fill a null. They solve different problems, and the best result uses both.
Bottom Line
Room treatment is not mysterious, and it is not expensive if you attack it in the right order. Two problems: early reflections in the mids and highs, and room modes in the bass. Two tools: absorption panels at least 2 inches thick, placed at the points you find with a mirror, and thick traps in the corners — with a second subwoofer often being the better buy before serious trapping. Everything else is refinement.
Do placement first, because it is free and it moves every other decision. Put a rug down. Hang four panels — two side wall, two ceiling. Then run room correction, and listen for a week before spending anything more. That sequence gets most rooms most of the way there for less than the cost of a mid-range center channel, and it is the only upgrade in this hobby that makes every other component you own sound better at once.
Affiliate disclosure: NetAudioHub links to retailers including Amazon. We earn a small commission on qualifying purchases at no extra cost to you.