How to Set Up AdGuard Home on a Raspberry Pi for Network-Wide Ad Blocking
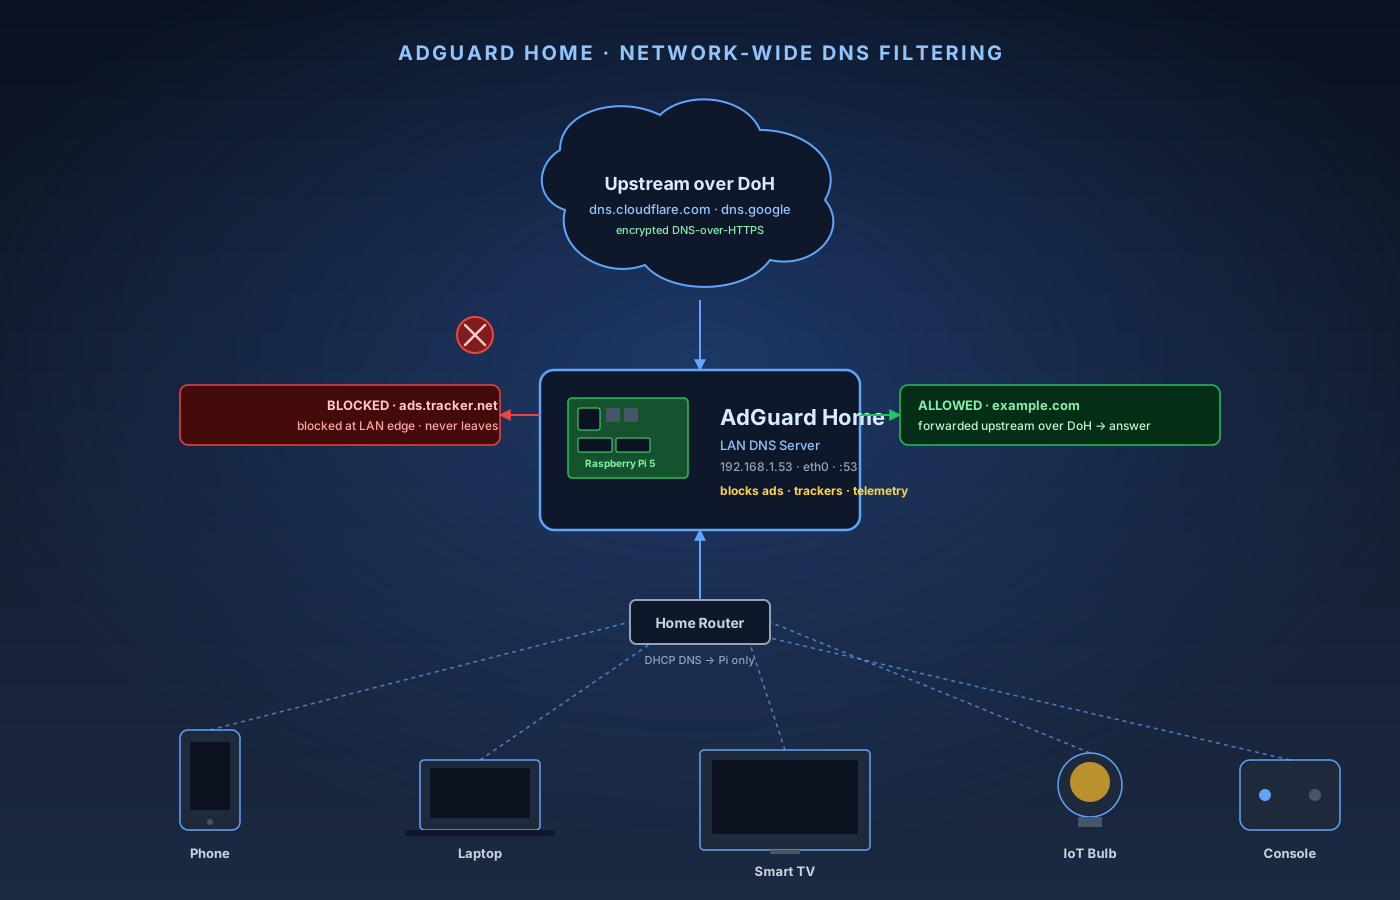
AdGuard Home is a free, open-source, network-wide DNS-based ad and tracker blocker. Like Pi-hole, you point your home network's DNS at a small box on your LAN — usually a Raspberry Pi — and that box answers every DNS lookup before it leaves the network. Lookups for known ad servers, trackers, and telemetry domains are blocked; everything else is forwarded upstream to a real public resolver. The result is network-wide ad and tracker blocking, including on devices that can't run a browser extension: smart TVs, phones, game consoles, IoT gadgets. Think of it as the modern Pi-hole alternative — a single Go binary with a cleaner UI, built-in DNS-over-HTTPS, and first-class per-client filtering. If you're starting fresh in 2026, it's the one we'd reach for first.
What you’ll need
- Raspberry Pi 5 (4 GB or 8 GB) or Raspberry Pi 4
- Official Raspberry Pi 5 power supply (27W USB-C PD)
- microSD card, 8 GB minimum, 32 GB or larger recommended, A2 rated
- Cat6 Ethernet cable
- Computer with a microSD reader to image the card
11-Step Overview
- 1
Gather the parts and router access you need
A Raspberry Pi 5 with 4 GB RAM is the right baseline, and a Raspberry Pi 4 works fine too — AdGuard Home barely touches a couple hundred MB of RAM at idle on a home network. The extra headroom is cheap insurance if you later run WireGuard or other small services on the same Pi. Pair the Pi with the official 27W USB-C PD power supply; Pi 5 boards are picky about under-powered chargers and will throttle or refuse to boot under a generic phone brick. Add an A2-class microSD card (8 GB is the bare minimum, 32 GB the practical sweet spot for cost, headroom, and write endurance) and a Cat6 patch cable — the Pi must be wired, not Wi-Fi, because every device on the LAN will depend on its DNS service. One prerequisite that isn't a part: admin access to your router's DHCP settings. The final step hands out the Pi's IP as the network's DNS server, so if you're on an ISP-locked combo router that hides those settings, read the edge-case note in Step 8 before you start.
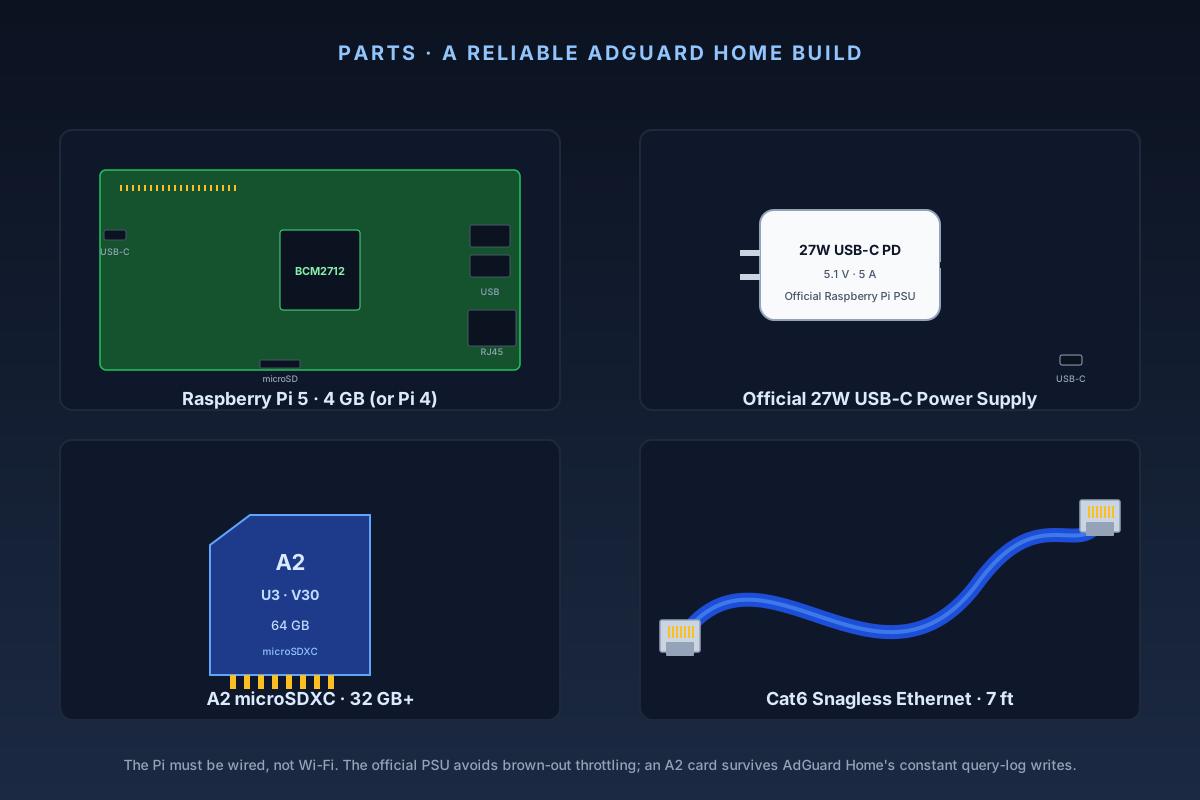
The parts that make a reliable AdGuard Home box: a Pi 5 (or Pi 4), the official 27W PSU, an A2-class microSD card, and a wired Ethernet patch cable. Check Price on Amazon →Recommended Product
CanaKit Raspberry Pi 5 Starter Kit (4 GB)
Official-PSU bundle with active cooling and a case. Active cooling keeps the Pi 5 out of thermal throttle under sustained DNS load on warm days.
- 2
Flash Raspberry Pi OS Lite (64-bit) with the official Imager
Download Raspberry Pi Imager from raspberrypi.com/software on your main computer (Mac, Windows, or Linux) and insert the microSD card via a card reader. In the Imager: Choose Device → Raspberry Pi 5 (or Pi 4); Choose OS → Raspberry Pi OS (other) → Raspberry Pi OS Lite (64-bit) — we want Lite, no desktop, since AdGuard Home has its own web UI and this Pi never gets a monitor; Choose Storage → your microSD card. Click Next, then Edit Settings to apply OS customisation. Set the hostname to adguard (this is what shows up in your router's DHCP table), a personal username (avoid the deprecated pi default) with a strong password, leave wireless LAN disabled (the Pi is wired), set your timezone and keyboard layout (a wrong timezone breaks dashboard timestamps), and under Services enable SSH with password authentication. Apply the settings, confirm the overwrite warning, and let Imager write and verify the card — the verify pass matters, since corrupted cards cause a large share of "my Pi randomly stopped working" threads.
Check Price on Amazon →Recommended Product
SanDisk Extreme 64GB microSDXC (A2, U3)
A2-class random IOPS keep AdGuard Home's query log and stats responsive; 64 GB gives multi-year headroom well beyond the 8 GB minimum.
- 3
Boot the Pi headless, SSH in, and update
Insert the card into the Pi, plug the Cat6 into your router or a switch on the same LAN, then plug in the USB-C PSU. The Pi boots in 20–40 seconds. Find its IP two ways: look for hostname adguard in your router's DHCP client list (TP-Link: Network Map → Clients; UniFi: Client Devices; Asus: Network Map → Client List), or from your main computer run `ping adguard.local` (macOS and modern Linux respond out of the box; on Windows, use the router DHCP table if .local doesn't resolve). SSH in with `ssh youruser@192.168.1.53` (substitute your Pi's IP), accept the host key, and you should land at a `youruser@adguard:~ $` prompt. Then patch the base OS before installing anything: `sudo apt update && sudo apt upgrade -y`. A fully patched base OS avoids most install-time surprises and picks up current security fixes; if the upgrade pulls a new kernel, `sudo reboot`, wait 30 seconds, and reconnect. If SSH refuses to connect, the most common cause is that SSH wasn't enabled in Imager — pull the card, re-flash with SSH enabled, and try again.
Check Price on Amazon →Recommended Product
Cable Matters Snagless Cat6 Ethernet Cable, 7 ft
Snagless boots and reliable terminations; Cat6 is overkill for DNS but matches the rest of the home-lab gear and survives years of being yanked behind furniture.
- 4
Install AdGuard Home with the official one-line script
From your SSH session on the Pi, run the official installer: `curl -s -S -L https://raw.githubusercontent.com/AdguardTeam/AdGuardHome/master/scripts/install.sh | sh -s -- -v`. The `-s -S` keeps curl quiet but still shows errors, `-L` follows redirects, and the `-v` after `sh -s --` runs the installer in verbose mode so you can watch each step. The script detects the Pi's ARM64 architecture, downloads the matching AdGuard Home release, installs it as a systemd service (so it starts on every boot), and launches it — then prints the address of the initial setup wizard, typically `http://192.168.1.53:3000`. Confirm the service is running with `sudo systemctl status AdGuardHome` (you should see `active (running)`; press q to exit). Piping a script straight into a shell always deserves a second look: it's coming from AdGuard's official GitHub repo over HTTPS, but if you'd rather inspect first, download it with `curl -sSL https://raw.githubusercontent.com/AdguardTeam/AdGuardHome/master/scripts/install.sh -o install.sh`, read it with `less install.sh`, then run `sh install.sh -v`.
- 5
Complete the setup wizard in the web UI
Open http://<pi-ip>:3000 in a browser on any computer on the same LAN (e.g. http://192.168.1.53:3000). AdGuard Home's first-run wizard appears. Walk through the screens: Welcome → Get Started; Admin web interface → leave the dashboard port at 3000 unless something else already uses it (you can move it to port 80 later for a bare http://adguard/, but 3000 avoids conflicts); DNS server → this must be 53, the standard DNS port, or clients won't find it, and keep the listen interface set to All interfaces; Authentication → create an admin username and a strong password and save it in a password manager; Finish. After the wizard, the dashboard lives at http://<pi-ip>:3000 and you log in with the credentials you just created. If port 53 fails to bind, another resolver is already listening on the Pi — on Raspberry Pi OS this is occasionally systemd-resolved. The installer usually handles it, but if the wizard complains, run `sudo systemctl stop systemd-resolved` and `sudo systemctl disable systemd-resolved`, then `sudo systemctl restart AdGuardHome` and reload the wizard.
- 6
Set encrypted DNS-over-HTTPS upstream resolvers
By default AdGuard Home forwards upstream queries in plaintext, which your ISP can read and log. One of its headline advantages over a stock Pi-hole is built-in DNS-over-HTTPS (DoH) — no extra cloudflared proxy to install. In the dashboard go to Settings → DNS settings, delete the defaults in the Upstream DNS servers box, and paste `https://dns.cloudflare.com/dns-query` and `https://dns.google/dns-query` (the DoH endpoints for Cloudflare 1.1.1.1 and Google 8.8.8.8). Below the box, set the mode to Load balancing (spreads queries across both) or Parallel requests (fastest response wins). Click Test upstreams to confirm both resolve, then Apply. Two optional hardening touches on the same page: set Bootstrap DNS servers to 1.1.1.1 and 8.8.8.8 (AdGuard Home needs a plain-DNS resolver just to look up the DoH hostnames at startup), and enable DNSSEC to validate signed responses.
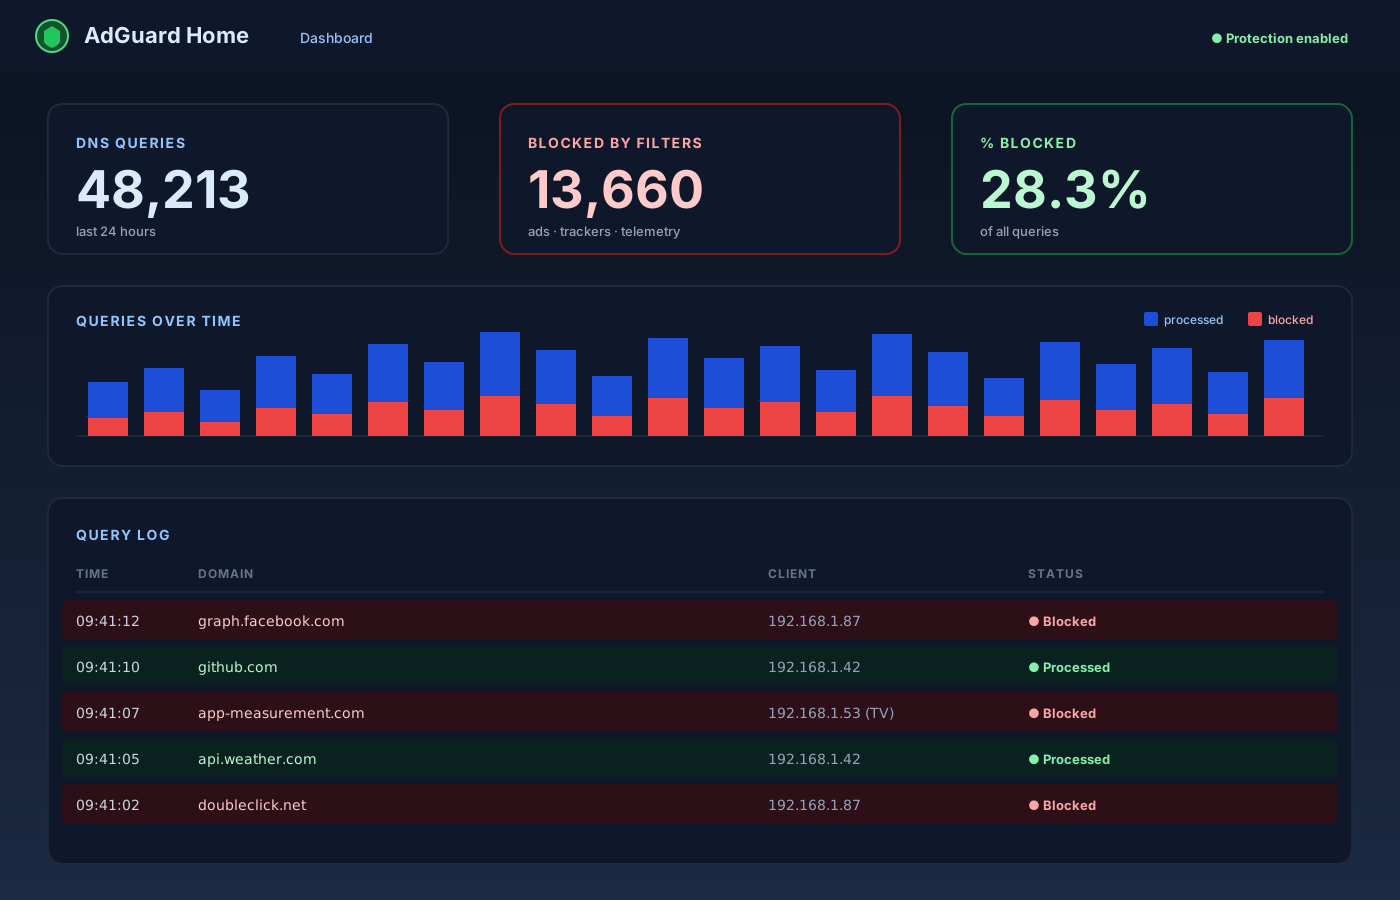
The AdGuard Home dashboard: total queries, blocked count, and percent-blocked up top, with a live query log below. Green rows forwarded upstream over DoH; red rows were blocked at the LAN edge. - 7
Enable curated blocklists
Go to Filters → DNS blocklists. AdGuard Home ships with its own AdGuard DNS filter enabled by default; add a small, well-maintained set alongside it. Click Add blocklist → Choose from the list and enable the AdGuard DNS filter (on by default, leave it on), OISD (broad ad and tracker coverage with famously low false positives), and Steven Black's list (the widely-used hosts merge of ad/tracker/malware sources). That's a strong baseline; if you want more aggressive coverage, add OISD Full deliberately and watch for false positives for a day. After enabling the lists, click Check for updates to compile them. Resist the urge to stack a dozen lists — each extra list adds memory pressure, raises the chance of false positives, and gives almost no incremental blocking, since most large public lists are 80–95% overlap. A focused set blocks 70–90% of ad and tracker domains in the standard d3ward test (Step 9). If you later find a legitimate domain is blocked, add an allow rule under Filters → Custom filtering rules like `@@||push.pushover.net^`, or use the Allow button directly from the Query Log.
- 8
Point your router's DHCP at the Pi as the only DNS server
This is the step that makes AdGuard Home actually block anything, and it's where most "I installed it and nothing's being blocked" threads end up. First, pin the Pi's IP: AdGuard Home only works if its address never changes, so add a DHCP reservation in your router — find the Pi in the DHCP client list (by hostname adguard or by MAC) and bind it to a fixed LAN IP (e.g. 192.168.1.53). A reservation survives router reboots and reinstalls and is easier to audit than a static IP baked into the Pi's OS. Then hand that IP out as DNS: in your router admin open the LAN / DHCP settings (not the WAN settings), find DNS Server 1 / DNS Server 2 (or "DNS Servers handed to clients"), set DNS Server 1 to the Pi's reserved IP, and leave DNS Server 2 blank or set it to the Pi's IP again. Do not set a real secondary like 8.8.8.8 or 1.1.1.1 — client devices treat the DNS list as failover, and the moment the Pi reboots or stalls for half a second, every device silently falls back to the secondary and resolves ad domains directly. Have exactly one DNS server on the LAN: the Pi. Save, then renew DHCP on a test device (toggle Wi-Fi off/on, or reboot it) so it picks up the new DNS server. If your ISP combo router locks down DHCP DNS (some AT&T and Spectrum units do), set the Pi as DNS per-device, bridge the ISP router behind your own, or enable AdGuard Home's built-in DHCP server under Settings → DHCP settings — bridge mode is the cleanest long-term.
- 9
Verify blocking from a client device
Two checks confirm AdGuard Home is doing its job. First, from any LAN client visit https://d3ward.github.io/toolz/adblock.html — the page fires dozens of real ad/tracker/telemetry requests and reports how many were blocked. A correctly configured AdGuard Home with DoH upstreams and the recommended lists scores 70–90%; below 60% usually means DNS is leaking around the Pi somewhere, so recheck Step 8 and make sure the client actually renewed its lease. Second, open the dashboard at http://<pi-ip>:3000: the top tiles show DNS Queries, Blocked by Filters, and percent blocked, and the Query Log confirms your test client's queries are arriving (allowed rows forwarded upstream, blocked rows flagged in red). If the query log is empty, the client isn't using the Pi for DNS yet. Healthy percent-blocked figures for a whole-network deployment: 20–35% for a typical browsing/streaming household, 40%+ if you have many IoT devices, and 0–5% means configured but bypassed — go back to Step 8.
- 10
Add per-client rules (optional)
Per-client filtering is where AdGuard Home really pulls ahead of a stock Pi-hole: instead of one global policy plus awkward group workarounds, you can give any device its own filtering profile in a couple of clicks. Go to Settings → Client settings → Add client and identify the device by IP address (best for a DHCP-reserved client), MAC address, or client ID. Then set that client's rules: allowlist a device for gaming or streaming by turning off blocking for a game console or free ad-supported streaming stick that needs its ad domains to function, while the rest of the LAN keeps full filtering; apply stricter filtering to a kid's tablet by keeping the ad/tracker lists on and enabling AdGuard Home's parental-control and safe-search toggles for that client only; or, if you've segmented IoT devices onto their own VLAN, add that subnet's clients and apply the most aggressive blocking — IoT gear is the chattiest telemetry source on most home networks and never needs ads to work. Per-client rules take effect immediately; there's no gravity-style recompile to wait on.
- 11
Enable automatic updates
Two things update independently: the blocklists and the AdGuard Home binary. For blocklists, go to Settings → General settings and confirm automatic filter updates are enabled (they are by default) with an interval of 24 hours or less, which keeps your lists current without you touching anything. For the binary, an Update button appears in the dashboard header when a new release is available; AdGuard Home updates in place and restarts the service. Skim the release notes first — major versions occasionally change defaults — but minor and patch releases are safe to apply as they appear. You can also update from the shell with `sudo AdGuardHome -s stop`, `sudo AdGuardHome --update`, then `sudo AdGuardHome -s start`. A few things eventually go wrong worth watching for: SD card wear (lower query-log retention under General settings, or move the install to a USB SSD), upstream DoH outages (keeping two upstreams lets AdGuard Home fail over), port 53 conflicts after an OS update re-enables systemd-resolved (re-run the disable commands from Step 5), and a blocklist breaking a real app (find the red row in the Query Log and click Allow). A monthly five-minute check keeps AdGuard Home working for years.