How to Calibrate Your TV's Picture Settings (No Meter Required)
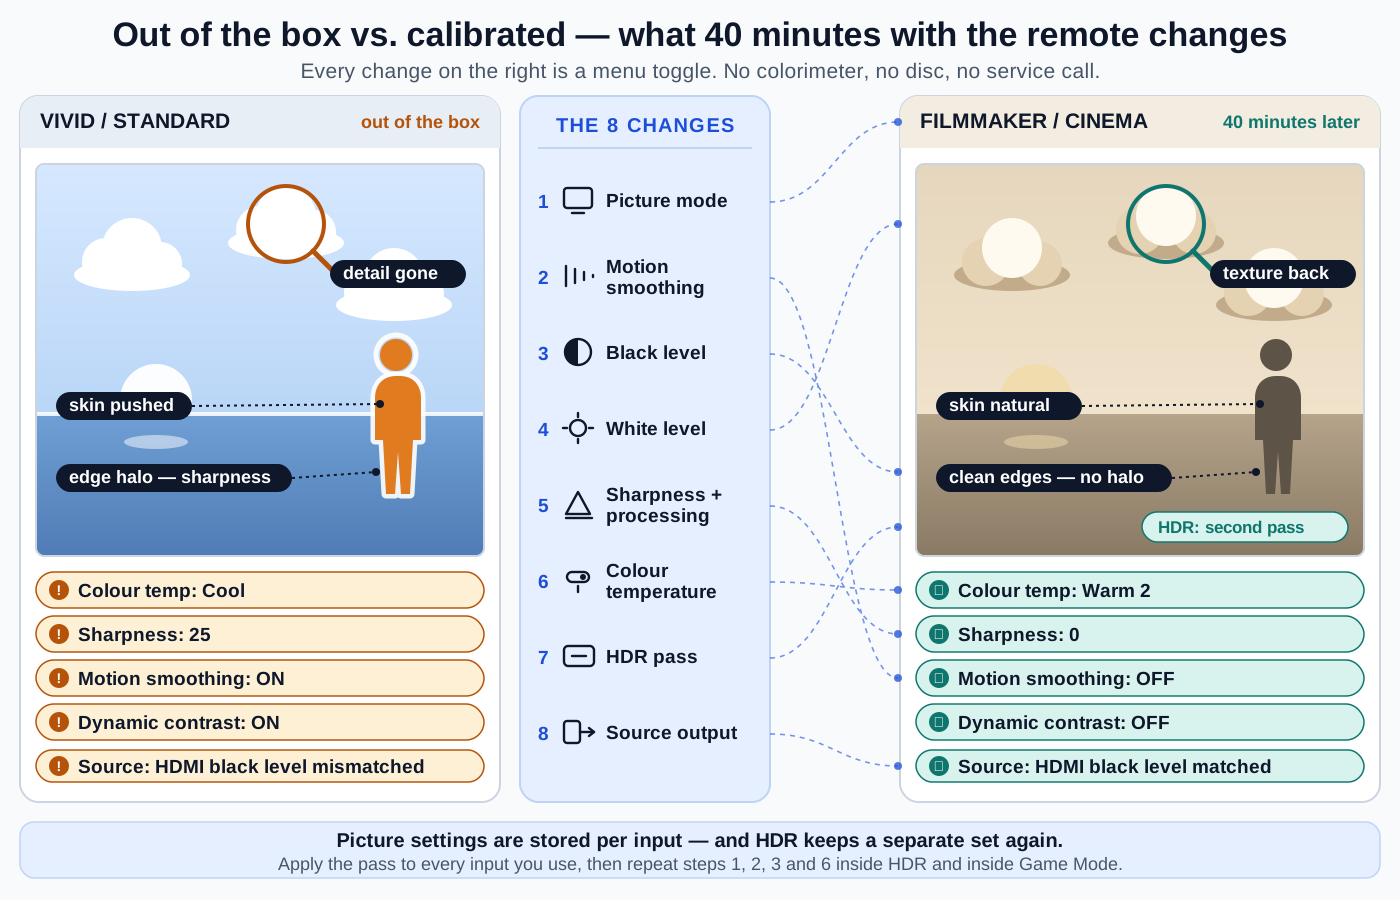
Your TV shipped in a picture mode designed to win a fight under the fluorescent lights of a showroom floor, against forty other screens, from twenty feet away. That mode is wrong for a living room, and it is wrong in specific, correctable ways: the whites are pushed blue, the highlights are clipped, the edges are artificially outlined, and a motion processor is inventing frames that were never shot. You do not need a colorimeter, a $300 disc, or a professional visit to fix most of it. You need about forty minutes and the remote.
This guide covers the free version of a TV calibration: picking the right starting mode, killing the soap opera effect on every major brand, setting black level and white level against a test pattern, switching off the processing that fights you, doing a second pass for HDR because HDR keeps its own settings, matching the output of your streaming box or console so the shadows are not crushed before the TV even sees them, and setting up a game input without wrecking the film settings. What it will not do is fix a panel's colour accuracy at the greyscale level — that genuinely does need a meter and software. The good news is that on a modern set in a proper picture mode, that last few percent is the smallest part of the difference you will see.
What you’ll need
- Your TV's remote, and around 40 minutes in the room's normal evening lighting
- A free test-pattern source — the AVS HD 709 pattern set is the long-standing free option; any full-screen 4K test-pattern video will do for black and white clipping
- The streaming box, console, or disc player you actually watch on, so you can set its output to match the TV
- A note on your phone to record what you changed, per input — you will want it after the next firmware update
10-Step Overview
- 1
Start from the right picture mode
Everything else in this guide is a small adjustment to a starting point. Get the starting point right and you have already captured most of the available improvement.
Go to your picture settings and look for Filmmaker Mode. It is an industry-standard mode defined by the UHD Alliance and it exists on most recent LG, Samsung, Panasonic, Hisense, and TCL sets. It targets the same white point and gamma the film was graded against, and — this is the underrated part — it switches off motion interpolation, sharpening, and noise reduction in one action. If your set does not have it, use Cinema, Movie, Calibrated, or on Sony, Cinema or Professional. Any of those lands you in roughly the right neighbourhood.
Brand Mode to choose LG Filmmaker Mode (or Cinema) Samsung Filmmaker Mode (or Movie) Sony Cinema, Professional, or Custom Panasonic Filmmaker Mode (or True Cinema) TCL / Hisense / Roku TV Filmmaker Mode (or Movie / Movie Dark) Vizio Calibrated or Calibrated Dark Two things surprise people here. The first is that it will look dim and yellow compared to what you were watching. That reaction is real and it fades — you have been looking at a blue-shifted picture for years and your eyes have normalised it. Give it a week of actual viewing before you judge. The second is that picture settings are usually stored per input, so calibrating HDMI 1 does nothing for HDMI 2, and on many sets the TV's own streaming apps count as a separate input again. Most TVs offer an "Apply to all inputs" or "Apply Picture Settings: All Sources" option — use it, then come back and give your gaming input its own treatment in step 9.
- 2
Turn off motion smoothing
The soap opera effect is motion interpolation: the TV generating in-between frames that the director never shot, converting 24 frames per second of film into something that moves like a live broadcast. It is the single most-hated default in television, and every brand gives it a different name.
Brand What it is called Samsung Auto Motion Plus (under Picture Clarity Settings) LG TruMotion Sony Motionflow Panasonic Intelligent Frame Creation TCL / Roku TV Action Smoothing Hisense Motion Enhancement Vizio Reduce Judder / Reduce Motion Blur Set it to Off. If you picked Filmmaker Mode in step 1 it is probably off already — check anyway, because it comes back after some firmware updates.
Two nuances worth knowing. If your set exposes separate de-judder and de-blur sliders, de-judder is the one that causes the soap opera look; de-blur only sharpens motion and some people like a little of it. And black frame insertion is a different feature — LED Clear Motion on Samsung, OLED Motion Pro on LG, X-Motion Clarity on Sony — that improves motion clarity by strobing the backlight rather than inventing frames. It does not cause the soap opera effect, but it dims the picture noticeably and can flicker, so leave it off unless you specifically want it for sports.
- 3
Switch off the processing that fights you
Before touching any slider, turn off the features that change the picture dynamically, because you cannot set a black level against a target that keeps moving.
- Dynamic contrast — also Contrast Enhancer, Adaptive Contrast, Black Enhancer, Dynamic Tone Mapping. Off. It re-grades the image scene by scene, crushing shadows and blowing highlights to manufacture punch.
- Noise reduction — Digital Clean View, MPEG Noise Reduction, Digital Noise Filter. Off for 4K, Blu-ray, and good streams; it smears fine texture like grain, skin, and foliage. A low setting is defensible on bad cable or old standard-definition content only.
- Eco / energy saving / ambient light sensor — Energy Saving Mode, Eco Solution, Automatic Brightness. Off. These dim the panel based on room light and on the content itself, which means your carefully-set brightness drifts around all evening. Note that in some regions the energy-saving default is mandated on out of the box and can reappear after a factory-adjacent update.
- Auto colour / flesh tone / vivid colour enhancers. Off.
Leave the TV's own local dimming on, if it has it — that is panel hardware doing its job, not processing artifice. High or Medium is the usual sweet spot on a mini-LED set; see OLED vs QLED vs mini-LED for what your panel type can and cannot do here.
- 4
Set the black level with a PLUGE pattern
This is the one adjustment in the guide with an objectively correct answer, and it is the one most often wrong.
First, understand that your TV has two different brightness controls and manufacturers do not agree on the names:
- Light output — how bright the panel goes overall. Called Backlight, OLED Pixel Brightness, Panel Brightness, or on recent Samsung sets simply Brightness.
- Black level — where the darkest part of the image sits. Historically called Brightness; on recent LG sets it is called Black Level.
You can always tell them apart by watching the screen rather than reading the label: adjust the control and if the whole image including the whites changes, that is light output; if only the shadows shift while the whites stay put, that is black level.
Now put up a PLUGE pattern (the AVS HD 709 set includes one) and look at the bars sitting either side of reference black. The target is simple: the below-black bars must be invisible, and the just-above-black bars must be faintly but definitely visible. Raise the black level until every bar is visible, then lower it one click at a time until the below-black bars vanish — and stop there. One click further and you are deleting shadow detail permanently; everything in the darkest part of the image collapses into the same flat black, which is why some people's night scenes are an unreadable smear.
Set light output separately, by comfort: bright enough to look natural in the room you are actually in, not so bright it is fatiguing at night. There is no wrong answer, and it is the setting most worth having two presets for (see step 10).
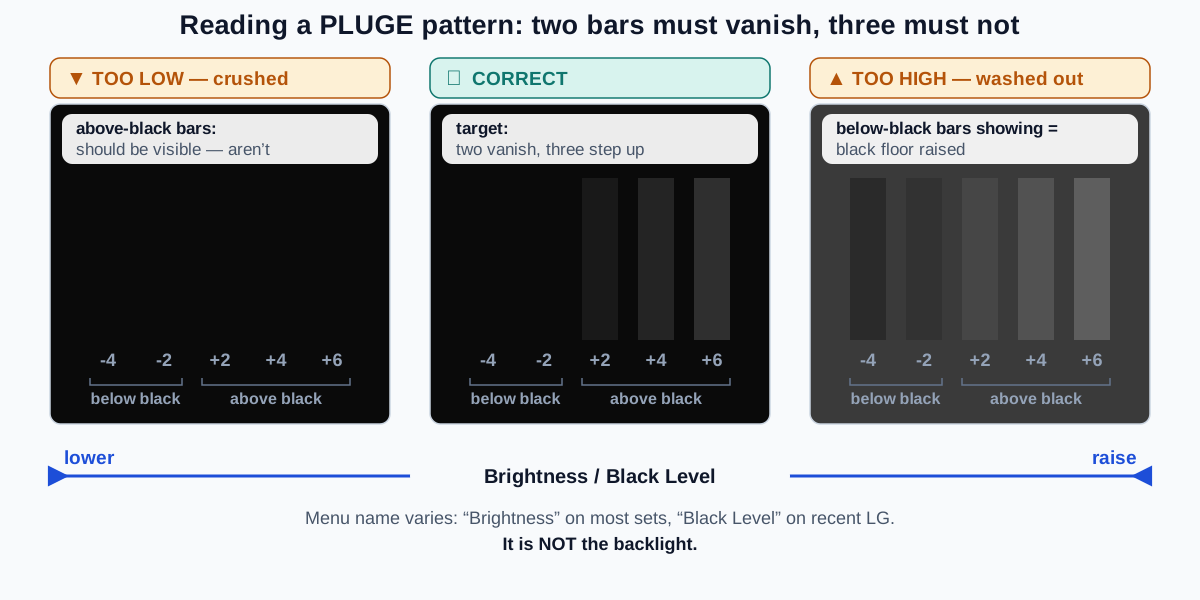
The only adjustment in this guide with a single objectively right answer: turn black level down until the two below-black bars disappear, then stop. One click further and you are deleting shadow detail you paid for. Search on Amazon →Recommended Product
A free test pattern set
The AVS HD 709 patterns are free and sufficient for everything in this guide, but a benchmark disc adds motion, HDR and clipping patterns in one place if you want to go further.
- 5
Set the white level, then leave colour and tint alone
Contrast sets the white level — the point at which bright detail stops being detail and becomes flat white. Put up a white-clipping pattern, or use a real scene with texture near white, such as clouds, a white shirt, or snow. Raise contrast until the near-white steps stop separating from each other, then back off until they separate again. On most sets in an accurate picture mode, the factory contrast is already close and needs only a few points of adjustment, if any.
Sharpness should be at whatever value means no processing, which is 0 on most sets and a midpoint value on some Sony models. TV sharpness controls do not add real detail; they add a bright outline along high-contrast edges. Put up any pattern or scene with a clean hard edge, raise sharpness, and you will see the halo appear. Set it below the point where the halo exists.
Colour (saturation) and Tint (hue) should stay at their defaults. In an accurate picture mode they are already right, and without a meter you have no reference to improve them against — the old blue-filter trick applies to a colour-bar standard most modern content no longer uses. Leave them.
- 6
Set colour temperature to Warm
Find Colour Temperature and choose Warm 2 on LG and Samsung, Expert 1 on Sony, or whatever your set calls its warmest preset. This targets D65, the white point essentially all film and television is mastered against.
It will look distinctly yellow for the first few days. It is correct; the cool default you are used to is not. If you set Filmmaker Mode in step 1 the warm point may already be selected.
If your set exposes Gamma, 2.2 is a reasonable all-round value and 2.4 suits a properly dark room — that is a preference about how quickly the image falls off into shadow, not a right-or-wrong setting. If there is a BT.1886 option, it is equivalent to the dark-room choice.
- 7
Do a second pass for HDR, because it keeps its own settings
Here is the thing that catches almost everyone: your SDR settings do not apply to HDR. The moment an HDR signal arrives, the TV switches to a separate set of HDR picture modes with their own stored values. Calibrate all evening in SDR, start an HDR film, and you are back on factory defaults.
So play something in HDR — an HDR title on a streaming app, a 4K disc, a console with HDR enabled — and repeat steps 1, 2, 3, and 6 inside that mode. Choose Filmmaker Mode (HDR), Cinema HDR, or the equivalent, switch motion smoothing and noise reduction off again, and check colour temperature.
Two HDR-specific notes:
- Do not lower light output in HDR. HDR is mastered assuming a bright panel, and dimming it is how you end up unable to see anything in dark scenes. Run HDR at or near maximum light output and control the room instead.
- Tone mapping is where the remaining judgement sits. Your TV cannot hit the brightness the content was mastered at, so something has to map it down. If you are watching HDR10 from a streaming box, leaving the TV's dynamic tone mapping on usually produces a better result than static mapping, which tends toward the dark side. If your source does its own — a Panasonic player's HDR Optimizer, for instance, as on the Panasonic DP-UB820 — turn the TV's off and let the player handle it. Do not run both. Dolby Vision handles this itself per title and needs no intervention; see Dolby Vision vs HDR10+ vs HDR10 for which format your content is actually using.
- 8
Match your source device's output
A perfectly calibrated TV will still show you crushed or milky blacks if the box feeding it disagrees about what "black" means. This is the HDMI black-level mismatch, and it is responsible for a surprising share of "my new TV looks wrong" complaints.
Video is normally encoded as limited range (video levels 16–235), while computers and some devices output full range (0–255). If the source sends limited and the TV expects full, blacks look washed out and grey. If the source sends full and the TV expects limited, blacks crush and highlights clip. Your TV's control is usually called HDMI Black Level with options of Low, High, or Auto; the source has an RGB range or colour space setting.
The fix, in order of preference: set both ends to Auto if both offer it; otherwise set both to limited/Low for a video source or both to full/High for a PC. Then verify with the PLUGE pattern from step 4 — the mismatch is instantly visible there, and that is the only proof that matters.
While you are in the source's settings:
- Enable the enhanced HDMI mode on the port itself. Called HDMI UHD Colour on Samsung, HDMI Deep Colour on LG, Enhanced format or HDMI signal format on Sony, and it is set per port. Without it the input is limited to an older bandwidth and 4K HDR will simply never engage. This is the number-one reason an HDR source refuses to trigger HDR. HDMI 2.1 features explained covers what each port on your set can actually carry.
- Apple TV 4K: set the format to 4K SDR and turn on both Match Dynamic Range and Match Frame Rate. That way SDR content stays SDR instead of being converted, and 24p film plays at 24p. Details in our Apple TV 4K review.
- Nvidia Shield: match resolution and frame rate to the source rather than forcing everything to 4K60, and check the colour-space setting against the TV. See the Shield TV Pro review.
- Consoles: run the console's own HDR calibration screens — PS5 and Xbox both have one, and the Xbox pass is per-game as well as system-wide.
- 9
Give your game input its own setup
Game Mode exists because picture processing costs time, and time is input lag. Turning it on bypasses most of the processing chain and typically cuts lag from something around 80–120 ms to roughly 10–20 ms on a modern set. That is the difference between a controller feeling connected and feeling underwater.
Rather than toggling it every time, set it on the input the console lives on and leave the film inputs alone. If your TV and console both support ALLM (Auto Low Latency Mode), the console will flip the TV into Game Mode automatically and back out when you stop — enable it and forget about it.
If you have an HDMI 2.1 set and a current console, also enable VRR, per port, on the port the console uses. And be aware that Game Mode has its own picture values: it is a separate mode, so walk steps 2, 3, and 6 once more inside it. Motion smoothing and noise reduction are usually off there already by design, but colour temperature frequently is not.
- 10
Control the room, then check it twice
Your room does more to the image than the last ten percent of any calibration.
- Nothing should throw light directly onto the screen. A lamp or window reflecting off the panel raises the apparent black level far more than any menu setting can lower it, and it hits glossy screens hardest.
- Bias lighting helps. A dim, neutral 6500K light behind the TV reduces eye strain in a dark room and makes blacks look deeper by giving your eyes a reference white. Keep it dim and keep it neutral — a colour-changing strip set to blue defeats the purpose.
- Then check your work twice: once at night, once in the middle of a bright day. If the daytime picture is too dim, do not undo the calibration. Instead, set up a second picture mode — most sets keep Standard around for exactly this — with light output raised and everything else matched, and switch modes with the room instead of re-tuning.
Finally, write down what you changed, for each input, in a note on your phone. Firmware updates and factory resets both put everything back, and the second time through should take ten minutes, not forty.
Search on Amazon →Recommended Product
6500K bias lighting
A dim neutral light behind the panel cuts eye strain in a dark room and deepens perceived black without touching a single picture setting.
What this gets you, and what it doesn't
Forty minutes of menu work gets you the right white point, honest shadows, unclipped highlights, no invented frames, and a source device that agrees with your TV about what black is. That is the overwhelming majority of the visible gap between a factory picture and a calibrated one.
What it does not get you is a corrected greyscale or verified colour accuracy. Those need a colorimeter, pattern-generator software, and a couple of hours, and on a decent modern panel in Filmmaker Mode the remaining error is small enough that most people would fail to spot it side by side. Do the free version first; if you still want the last few percent afterward, you will at least know what you are buying.
Next steps
- How to set up HDMI ARC and eARC — the audio half of the same HDMI chain, and the fastest way to get sound off the TV's own speakers.
- How to set up a 5.1 surround sound system and how to set up Dolby Atmos at home — the natural follow-on once the picture is sorted.
- Why can't I hear movie dialogue? — the audio equivalent of this guide's black-level problem, and the most common complaint after picture.
- Soundbar vs AV receiver — if the TV speakers are the next thing on the list.
Related reading
- What size TV should you buy for your viewing distance? — worth reading before you conclude the picture is the problem.
- OLED vs QLED vs mini-LED — what your panel technology can physically do, which sets the ceiling on everything above.
- eARC vs ARC explained — why your HDR-capable HDMI chain may still be dropping the audio format.
- How to set up a home theater projector — the projector version of this process, where room light matters even more.