How to Set Up HDMI ARC / eARC (and Fix It When There's No Sound)
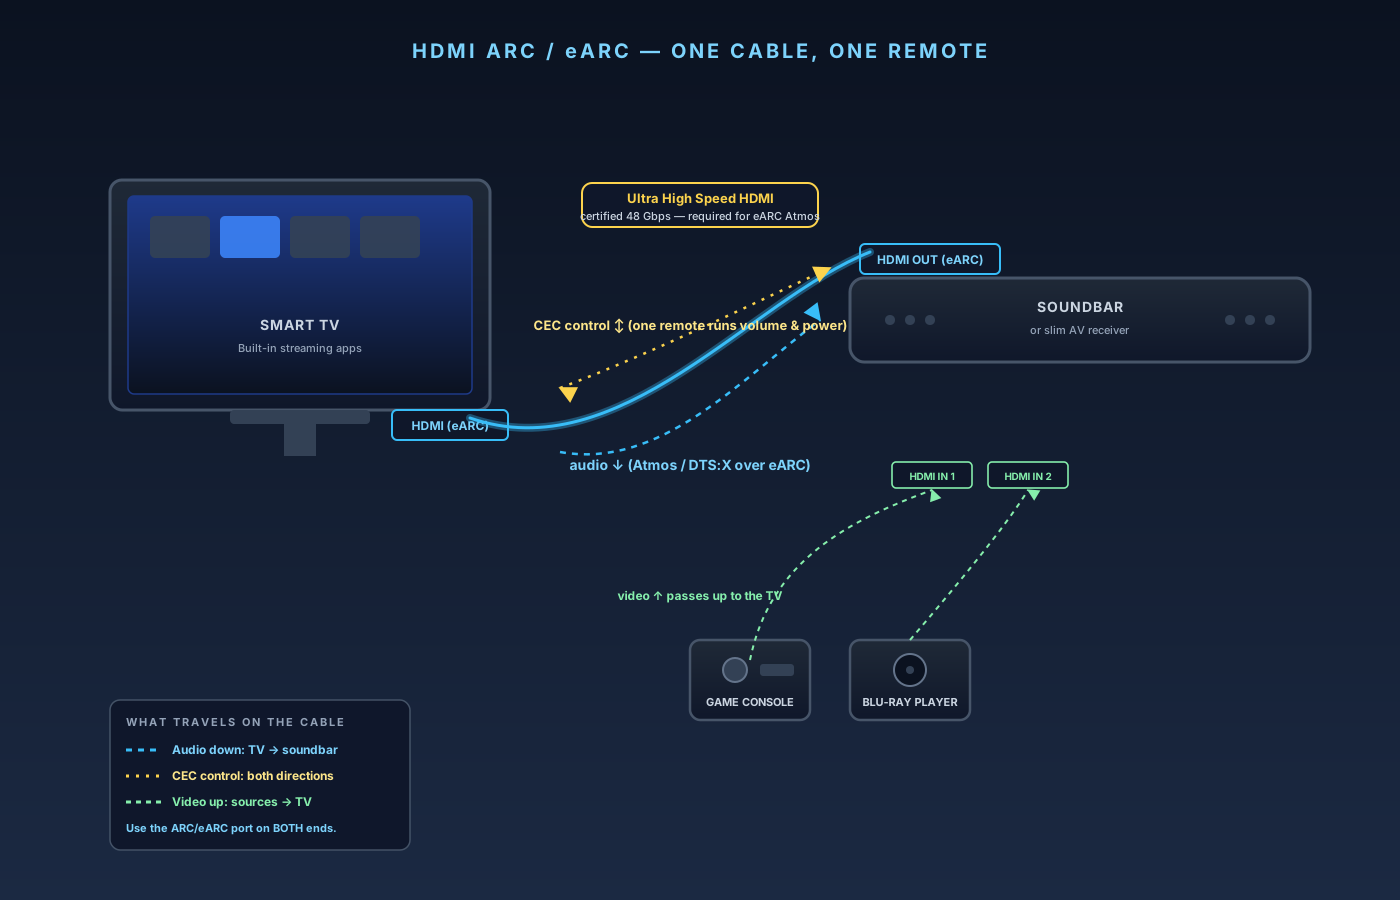
HDMI ARC is the feature that lets you run your TV and your soundbar or AV receiver with one remote and one cable — no separate optical cable, no juggling inputs, and the TV's own streaming apps play through your good speakers. When it works, it's invisible. When it doesn't, you get the classic home-theater headache: a brand-new soundbar, a correct-looking connection, and dead silence. This guide explains what ARC and eARC actually do, which port and cable you need, how to switch on the settings that most people miss, and a step-by-step fix for "there's no sound over ARC." Budget 15–30 minutes; no tools required.
What you’ll need
- A TV with an HDMI port labeled ARC or eARC
- A soundbar or AV receiver with an HDMI OUT labeled ARC or eARC
- An HDMI cable — any High Speed cable for ARC; a certified Ultra High Speed (48 Gbps) HDMI cable for eARC with lossless Atmos/DTS:X
7-Step Overview
- 1
Know the difference between ARC and eARC
ARC (Audio Return Channel) sends audio backward over a single HDMI cable — from the TV to a soundbar or receiver — so you don't need a separate optical cable, and it carries CEC control signals so one remote can run volume. ARC's bandwidth is limited: it reliably carries stereo, Dolby Digital, and DTS, and it compresses (or drops to Dolby Digital) anything richer. eARC (enhanced ARC), part of HDMI 2.1, has far more bandwidth and carries full lossless formats — Dolby TrueHD, DTS-HD Master Audio, and object-based Dolby Atmos and DTS:X — uncompressed from the TV to your audio system. If you want the TV's apps or a connected player to deliver true lossless Atmos to your soundbar, you need eARC on both devices and a good cable. If you're weighing whether Atmos and DTS:X are worth chasing, our Dolby Atmos vs. DTS:X explainer breaks down the difference, and eARC vs. ARC explained goes deeper on the bandwidth gap.
- 2
Find the ARC/eARC HDMI port on each device
Only ONE HDMI port on your TV supports ARC/eARC, and only one on the soundbar or receiver — the feature does not work on the other ports. Look at the labels next to the ports: the correct TV port reads 'HDMI ARC', 'HDMI eARC', or 'HDMI 2 (eARC)'. On a soundbar it is usually the port labeled 'HDMI OUT (ARC/eARC)' or 'TV OUT'. On an AV receiver it is the HDMI OUT to the TV marked ARC/eARC. If you plug into any other port, you'll get no return audio no matter what else you do — this single mistake causes most 'ARC not working' complaints.
- 3
Use the right HDMI cable
For plain ARC, any working High Speed HDMI cable is fine. For eARC carrying lossless Atmos or DTS:X, the cable has to pass a lot more data, and a cheap or old cable can cause dropouts, no sound, or a silent fallback to compressed audio. Use a certified Ultra High Speed HDMI cable (rated 48 Gbps, HDMI 2.1). 'Certified' matters — it means the cable was tested to the 48 Gbps spec rather than just labeled '2.1'. Keep the run reasonably short; very long passive HDMI runs are where marginal cables fail.
- 4
Connect the cable and set the TV's audio output
Run the HDMI cable from the TV's ARC/eARC port to the soundbar's HDMI OUT (ARC/eARC) or the receiver's HDMI OUT to TV. Then open the TV's sound settings and set the audio output to the external system: on most TVs this is 'HDMI', 'HDMI-ARC', 'Receiver (HDMI)', or 'Audio out: HDMI eARC/ARC' rather than 'TV Speakers'. Some TVs need you to explicitly turn off the internal speakers. This step is what actually routes sound out of the TV and into your soundbar.
- 5
Turn on HDMI-CEC on every device
HDMI-CEC is what lets one remote control volume and power across devices, and on many TVs ARC audio will not pass until CEC is enabled. The catch is that every brand renames CEC: Samsung calls it Anynet+, LG SIMPLINK, Sony BRAVIA Sync, Vizio CEC, Panasonic VIERA Link, Sharp Aquos Link, Philips EasyLink, and Hisense/TCL often just 'CEC' or 'HDMI-CEC'. Turn it on in the TV's settings and in the soundbar/receiver's settings — it must be enabled on both ends. Once it's on, the TV remote's volume buttons should drive the soundbar and the soundbar should switch on with the TV.
- 6
For eARC and Atmos, enable eARC and pick the right output format
If both devices support eARC, make sure eARC mode is actually turned on — some TVs default to plain ARC and have a separate 'eARC' or 'eARC on/off' toggle in the sound or HDMI settings. Then set the TV's digital audio output format correctly: choose 'Auto', 'Passthrough', or 'Bitstream' (not 'PCM') so the TV passes the original Dolby/DTS bitstream to your system to decode. If you leave it on PCM or a stereo setting, you'll get sound but not Atmos or surround. For streaming Atmos from the TV's own apps, confirm the app and the title actually offer Atmos, and that your TV passes Atmos over eARC (most 2019-and-later eARC TVs do). Our how-to on optimizing an AV receiver for Dolby Atmos covers the receiver side of this.
- 7
Fix it when there's still no sound over ARC
Work down this list in order. Confirm the cable is in the ARC/eARC port on BOTH devices, not a regular HDMI port. Confirm HDMI-CEC is enabled on both devices (under its brand name). Set the TV audio output to the external system and disable TV speakers. Power-cycle everything: unplug the TV and soundbar from the wall for 60 seconds, then plug the soundbar in first, then the TV — a full power cycle clears the great majority of ARC handshake failures. Try a different, known-good HDMI cable, ideally a certified Ultra High Speed one. Set the TV's digital audio format to Bitstream/Auto if a specific format isn't playing. Update the firmware on both the TV and the soundbar/receiver, since ARC/CEC handshake bugs are frequently fixed in updates. If you have a soundbar with pass-through inputs, plug your game console or Blu-ray player into the soundbar's HDMI inputs instead of the TV so their audio never has to travel back over ARC at all.